

Sellers can register for Flash Sales in 2 ways:
Method 1: Flash sales are always displayed first in the Tiki’s campaign section on the Seller Center homepage, sellers can click on Register now or select All campaigns to see the campaign list. Flash sales will be labeled in orange badge.
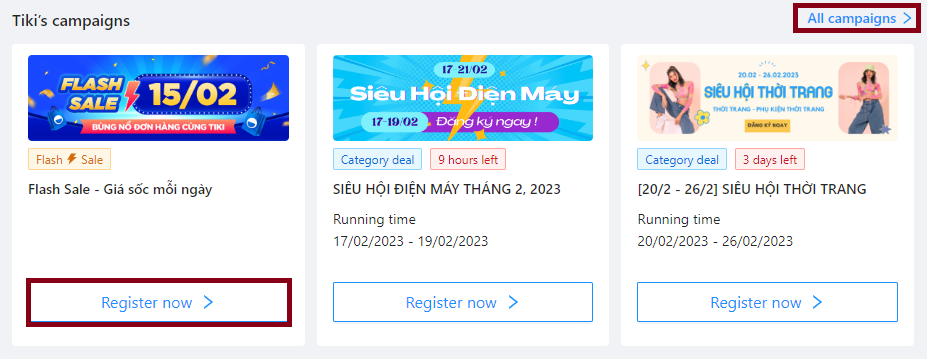
Seller Center homepage
Method 2: Seller selects Marketing Center > Promotion tools > At the Tiki’s campaign section, select All campaigns to see a list of available programs.
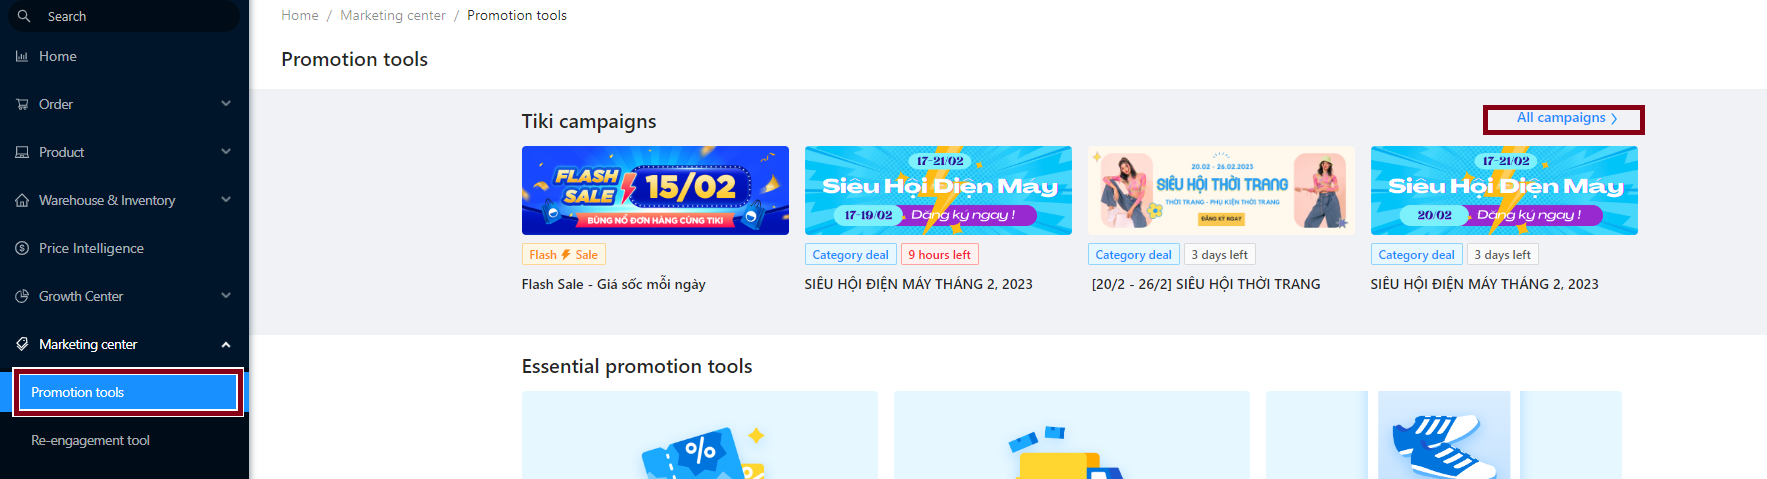
Here, sellers can easily search by different campaign statuses: Upcoming, Ongoing, Finished.
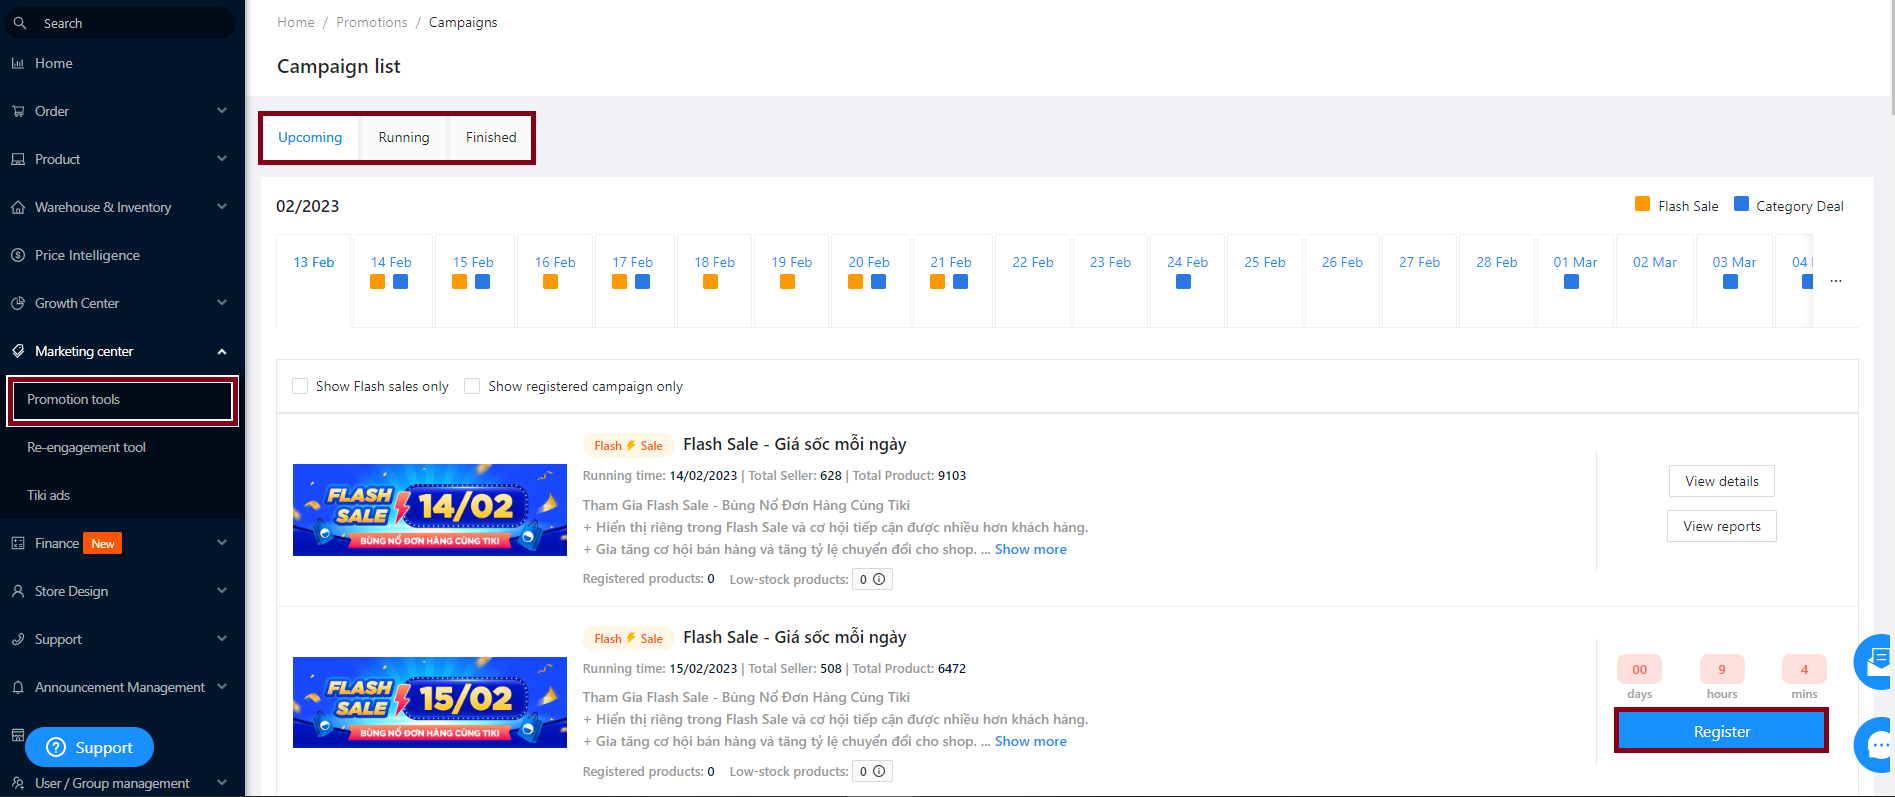
The campaign list
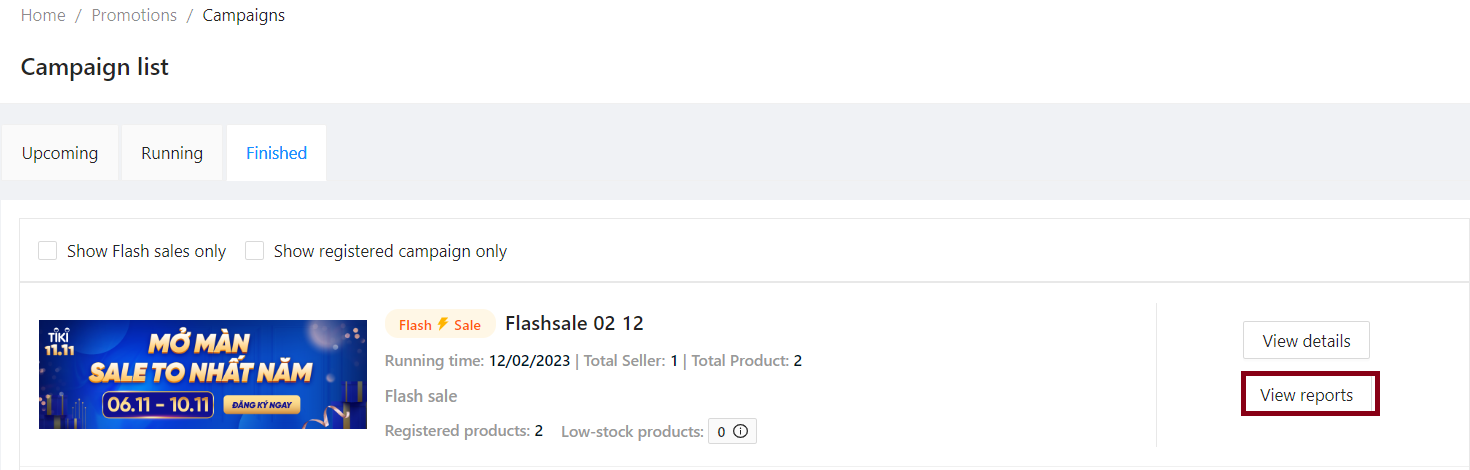
Campaign list displays 3 tabs to help sellers manage easily: Upcoming, Running and Finished.
Upcoming:
All upcoming promotions are shown, along with the registration deadlines. Sellers can filter the list of registered promotions.
If the campaign is still open for registration, a Register button will appear. To participate in the program, the seller clicks on the Register button.
If the registration period for the promotion has expired (but the due date has not yet passed), there will be a View Details option.
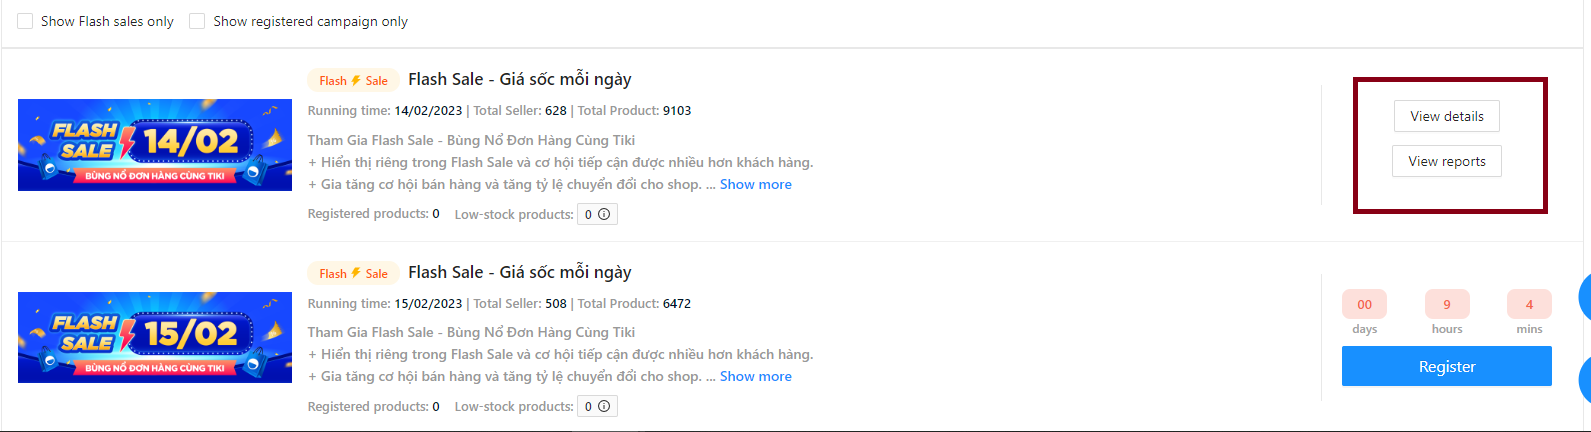
Running: display the ongoing campaigns. You can:
View details: Direct to campaign detail page
View reports: Link to Growth Center to view Campaign performance report
Finished: display ended campaigns. You can:
View details: Direct to campaign detail page
View reports: Link to Growth Center to view Campaign performance report
1. Add products directly
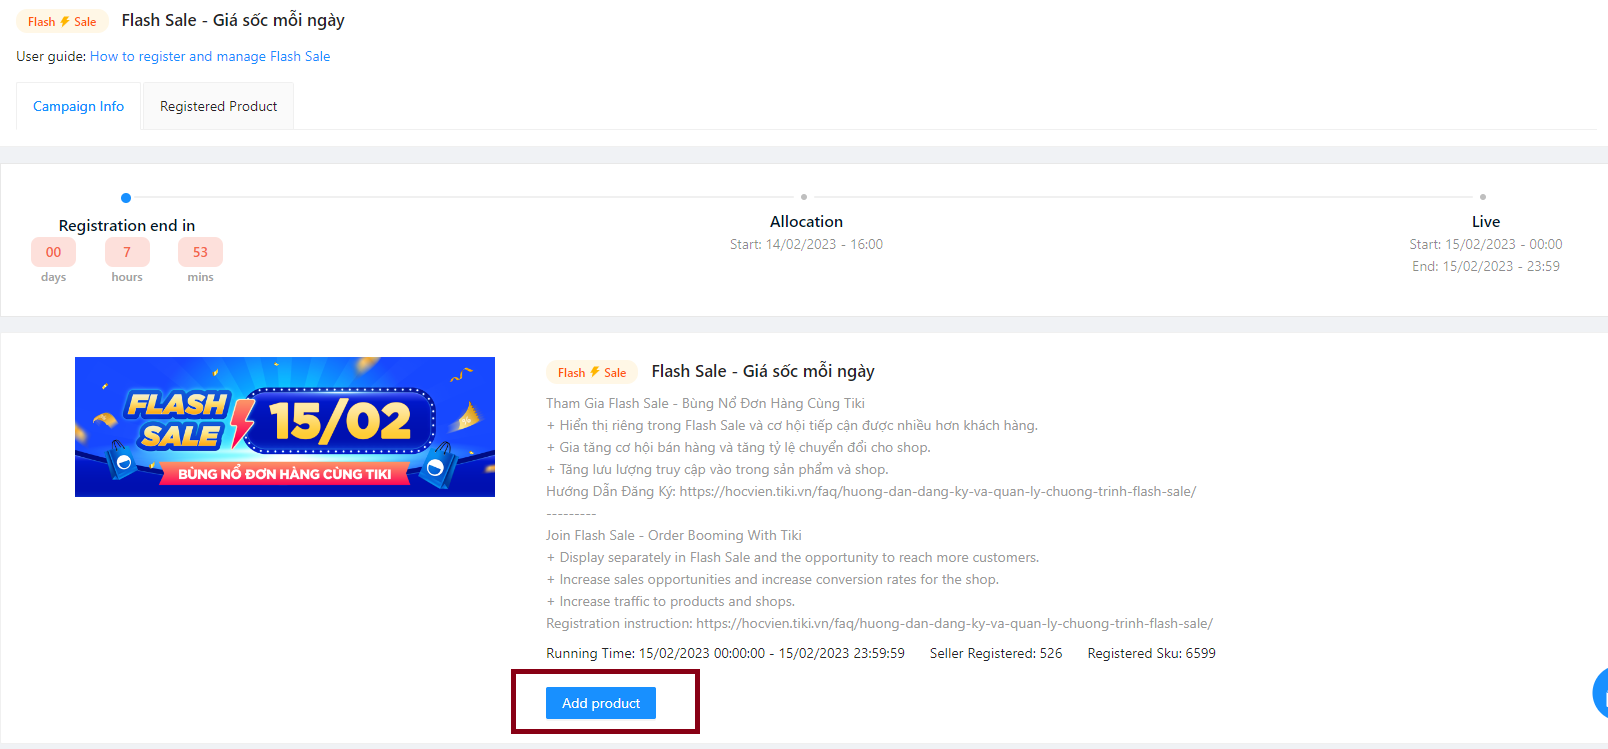
After clicking on Register, the screen will display 2 tabs:
Campaign Info: All campaign information is displayed in this tab.
Registered Product: This tab displays the product list with its status.
Step 1: Sellers can add product directly at both tabs Campaign Info and Registered Product by clicking on Add product
At this moment, the screen will display the eligible product list. Sellers can choose products to participate in the promotion.
Sellers can search by Product Name or SKU and filter by category.
To add, sellers can choose specific products from the left table by clicking + symbol or Select entire page (maximum 50 products/page). You can select a maximum of 250 products for each registration. To remove products, please choose products from the right table and click on x or Remove all.
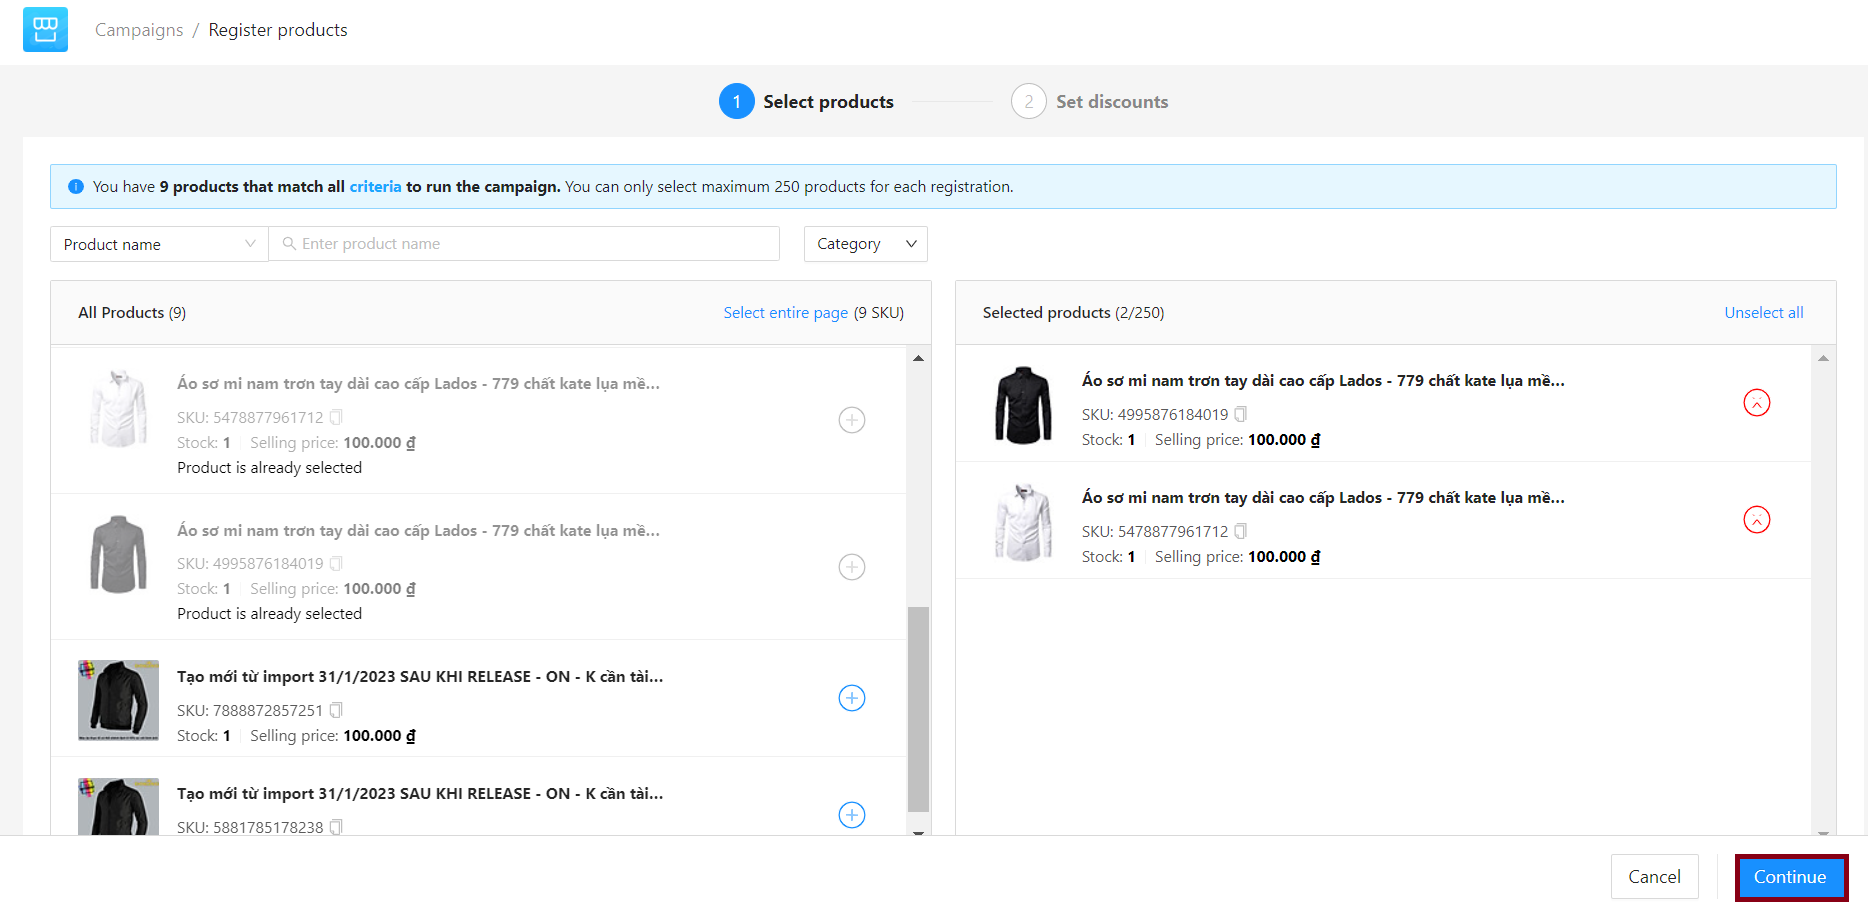
Then, click Continue to set the price, stock and purchase limit for the product.
Note: This will suggest only products which pass following criteria:
Sales history: >=5 quantities sold in the last 30 days.
SKU rating should be >=3 or have no rating.
(The above conditions will be applied to all variations of one product).
Step 2: Setting discount price, discount quantity and purchase limit
The system will automatically suggest discount price and discount quantity of products to enroll for the campaign. Sellers can edit the Discount price and the Discount quantity, including:
suggested price.
Discount quantity: Must be greater than or equal to suggested quantity.
In case you have entered the discount and inventory but still want to see the system’s suggestion, please hover over the Discount price/Discount quantity box.
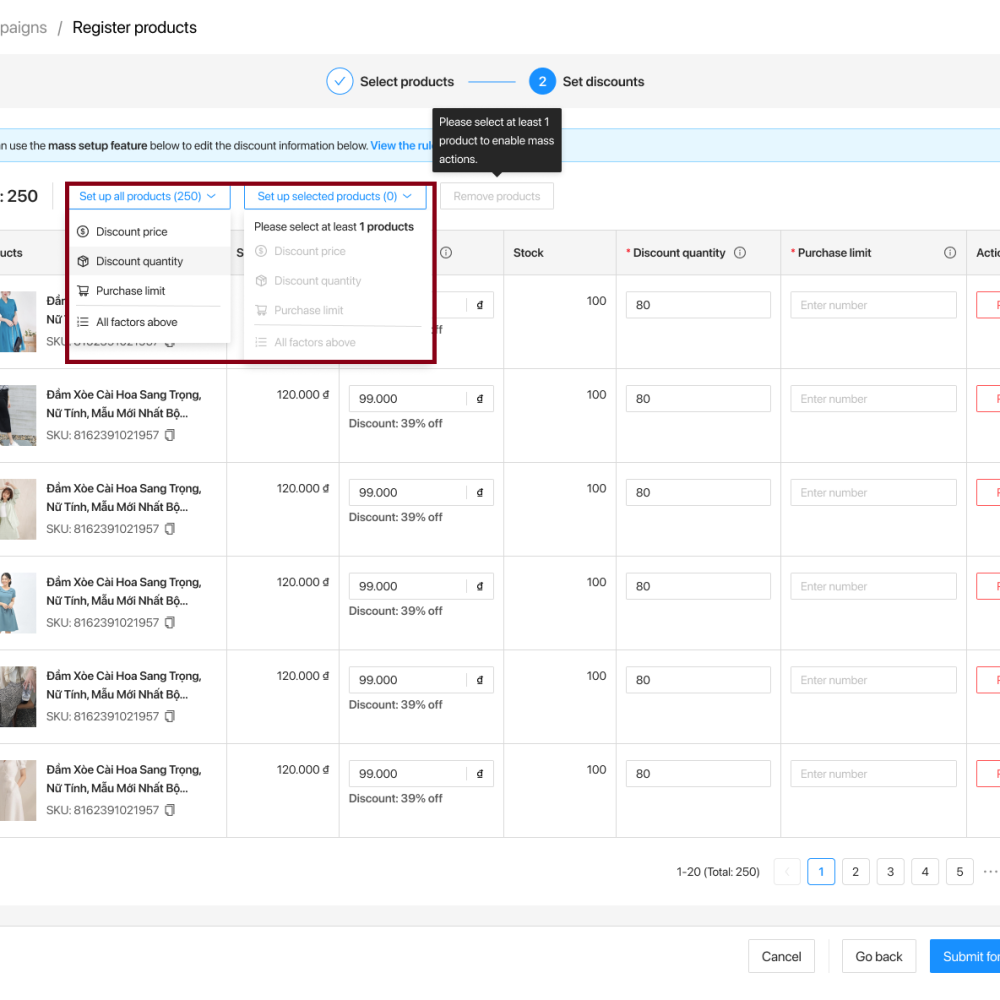
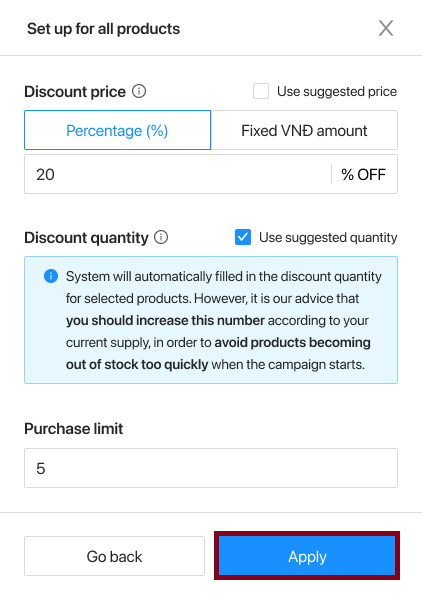
Sellers can perform mass actions when setting discounts for all products or selected products by: Discount price (in % or by amount), Discount quantity, Purchase limit or All factors above. Then click Apply.
Step 3: Seller click Submit to review. The list of products will be displayed in the Approved section.
2. Mass import products
Sellers can mass import products for Flash Sale by importing a file at tab Registered product:
Step 1: Download eligible products file, including suggested price and stock.
Template 1: Sellers click on Export eligible products to download an import sample which include information on SKU, suggested price and and suggested quantity by the system.
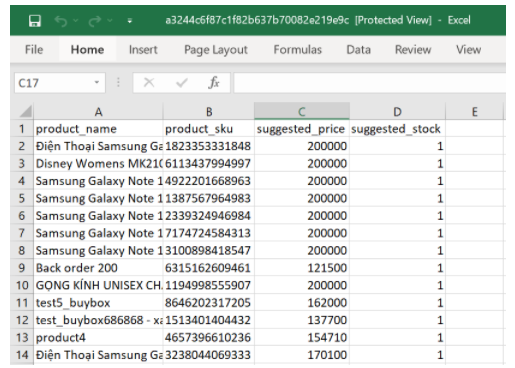
Template 1
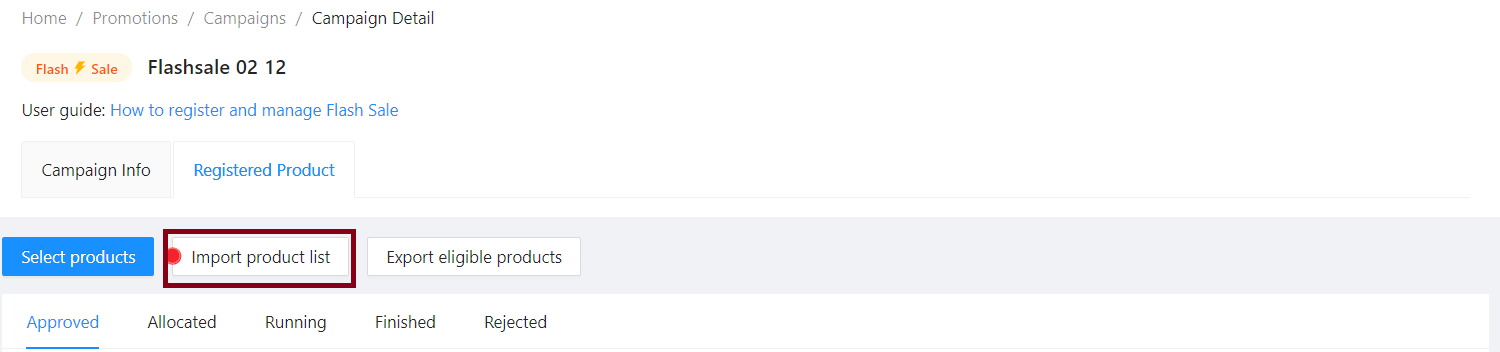
Step 2: Import product list for registration
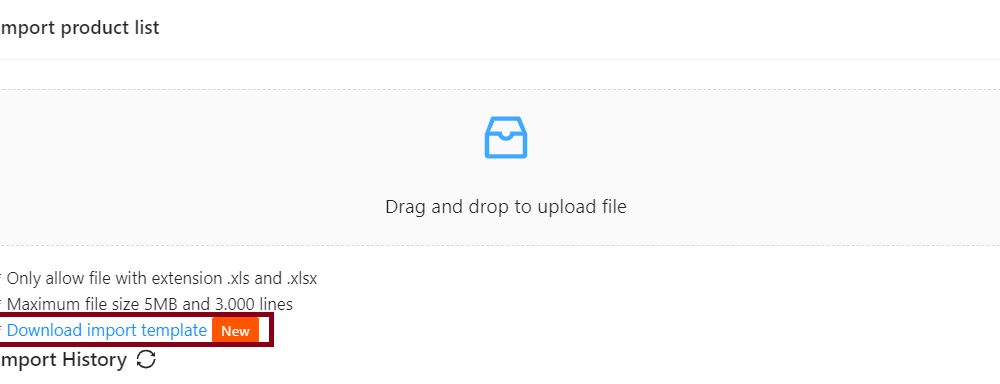
Step 2.1 After getting the list of eligible products (Template 1), select Import product list then select Download import template (Template 2).
Fill in the products the seller wants to register from Template 1 to Template 2, including SKU, price, quantity and limit_quantity
Notes:
Value in the price column must be less than or equal to suggested price.
Value in the quantity column must be greater than or equal to the number of proposals.
Value in the limit_quantity column (Purchase limit) must be less than or equal to the discount quantity.
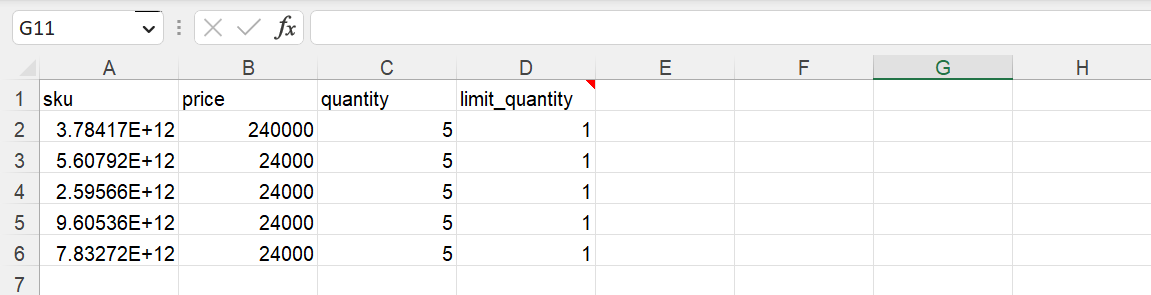
Template 2
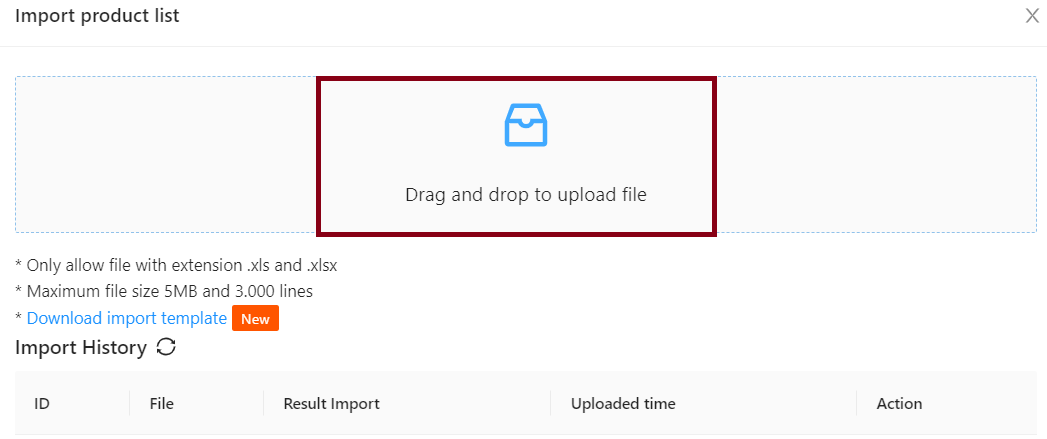
Step 2.2: Import product list
Sellers click on Import product list, then click or drag the file to upload.
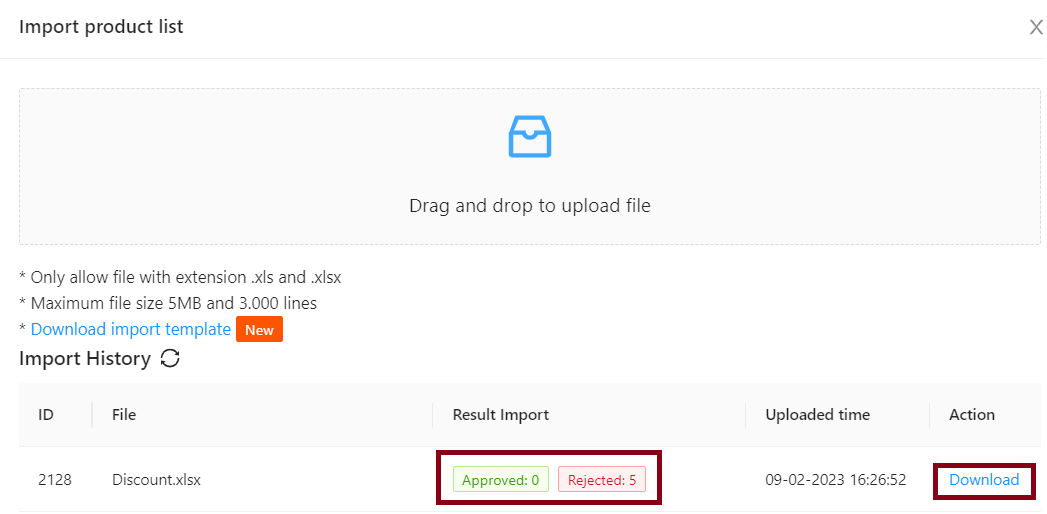
Step 3: Check import result.
The Import History section will display all the files that you have uploaded.
The Result Import column shows the number of approved and disapproved products:
Fail: The product was rejected by the system. You can click on Download in the Action column to see the details of the reason.
The newly created product list will be displayed in the Approved section. Sellers can also select Export data below each item to view the corresponding product list.
💡Tip: Tiki encourages sellers to set the number of Flash sale products to match the expected selling ability and sales speed within the Flash sale time frame, thereby showing customers that the product is well sold (through the “Selling bar”) and push customers to make purchasing decisions faster.
Tiki will prioritize the following product promotions in order to ensure that they reach customers in the best and most consistent way possible:
1. Flash sale – Top priority
2. Category deal – Second priority
3. Price discount – Third priority
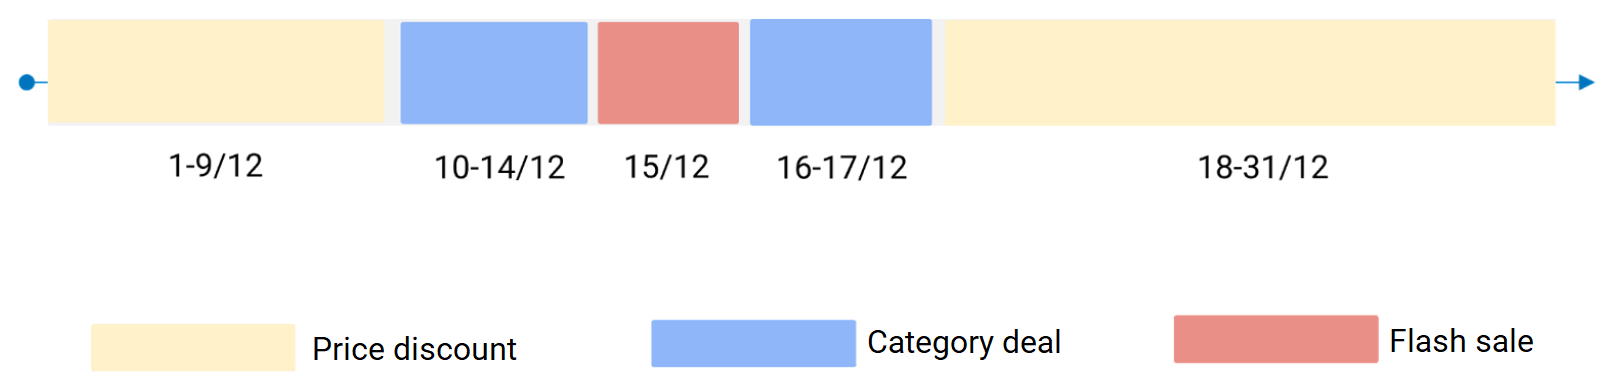
When a product participates in more than one promotion with partially or completely overlapping running times, the system will use priority to determine which promotion is applicable at any time, allowing the seller’s promotions to run continuously. When a campaign’s runtime expires, the system will continue to trigger the next lower-priority campaign.
Examples:
Product A participates in Flash sale on December 15
Product A participates in Category deal continuously from December 10 to December 17
Product A participates in Price discount continuously from December 1 to December 31
Based on priority, promotions will be applied to product A in stages as follows:
At any given time, the seller cannot register more than one campaign for each type of promotion (Flash Sale, Category Deal, or Price Discount). The system will notify you if you register for the same campaign twice.
After product registration is completed, you need to track the inventory of registered products, the distribution results of the promotion campaign (deal duration) and business results, by:
Step 1: Go to Seller Center > Promotions > Campaigns, select View details or Register to enter the detail page of a campaign.
Step 2: Select the Product details section in the details page to track the status of registered products.
The Product Details section consists of 5 main sections, representing the status of participating products, displayed as tabs. Sellers can choose Export data to see a list of products corresponding to each status.
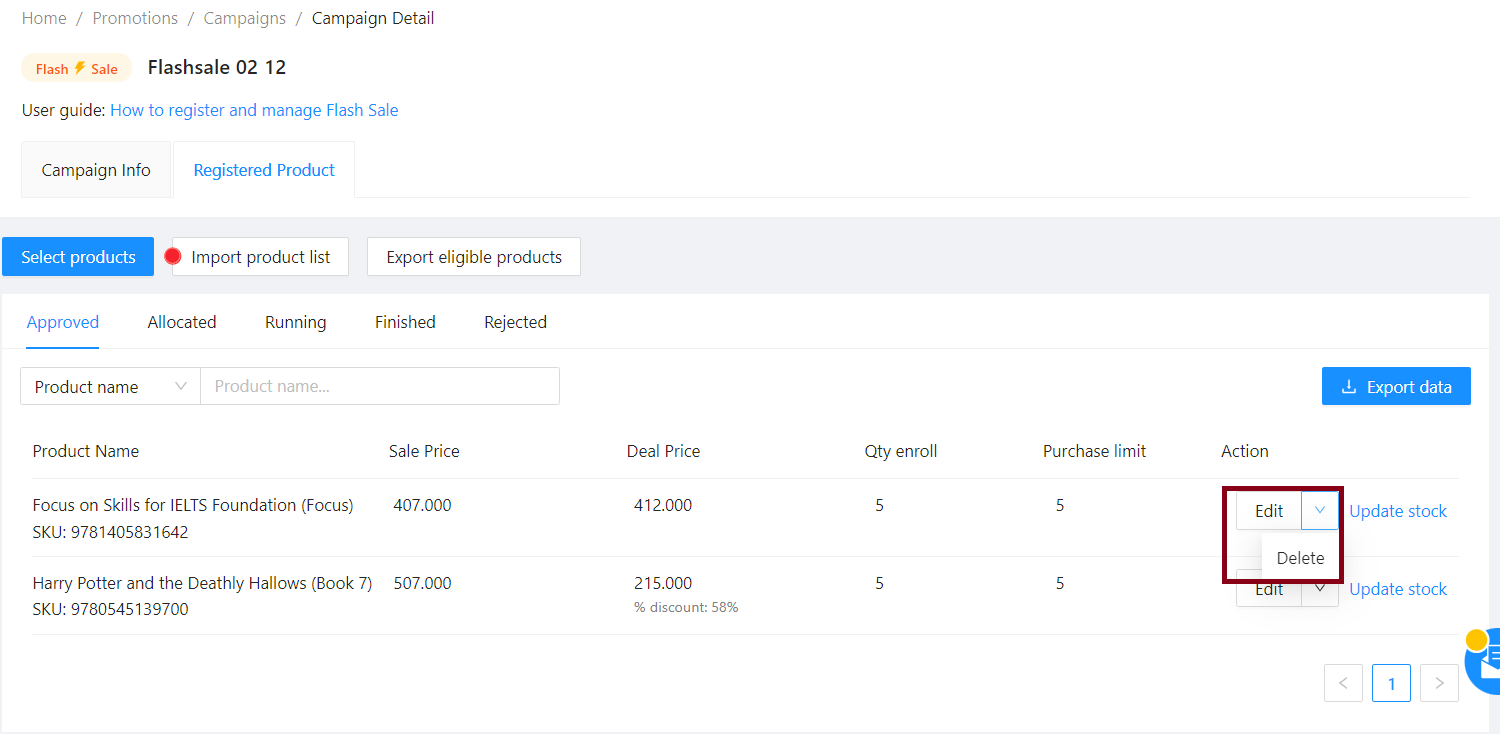
1. Approved tab
Displays a list of products that have been approved by the system after you registered.
Depending on the program’s subscription term, sellers may edit prices, product enrolled quantities, or delete products, until the program subscription expires. Sellers need to pay attention to the program registration deadline in the Upcoming section with a countdown timer.
Low-stock products: After registering the participating product, the system will warn the product with a lower inventory than the amount of inventory the seller has registered for the program as shown below. Sellers can choose to Update Inventory to ensure that products are not rejected when the system is making allocations. Note: Sellers can always directly update the inventory until before the campaign starts to ensure all the products are in stock.

Low-stock products in the campaign list
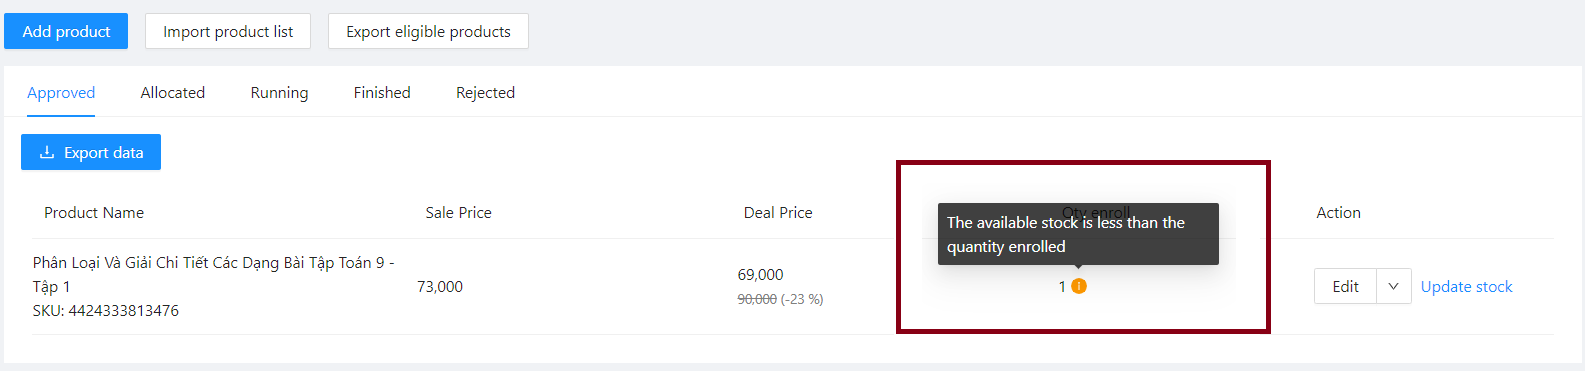
Low-stock products in campaign detail page
2. Allocated and Rejected tab
After the campaign registration time expires, the system will start to allocate the Seller’s registered products in the Approved tab.. Sellers can check for the allocation schedule on the Campaign details page. The result of the allocation will have 2 cases:

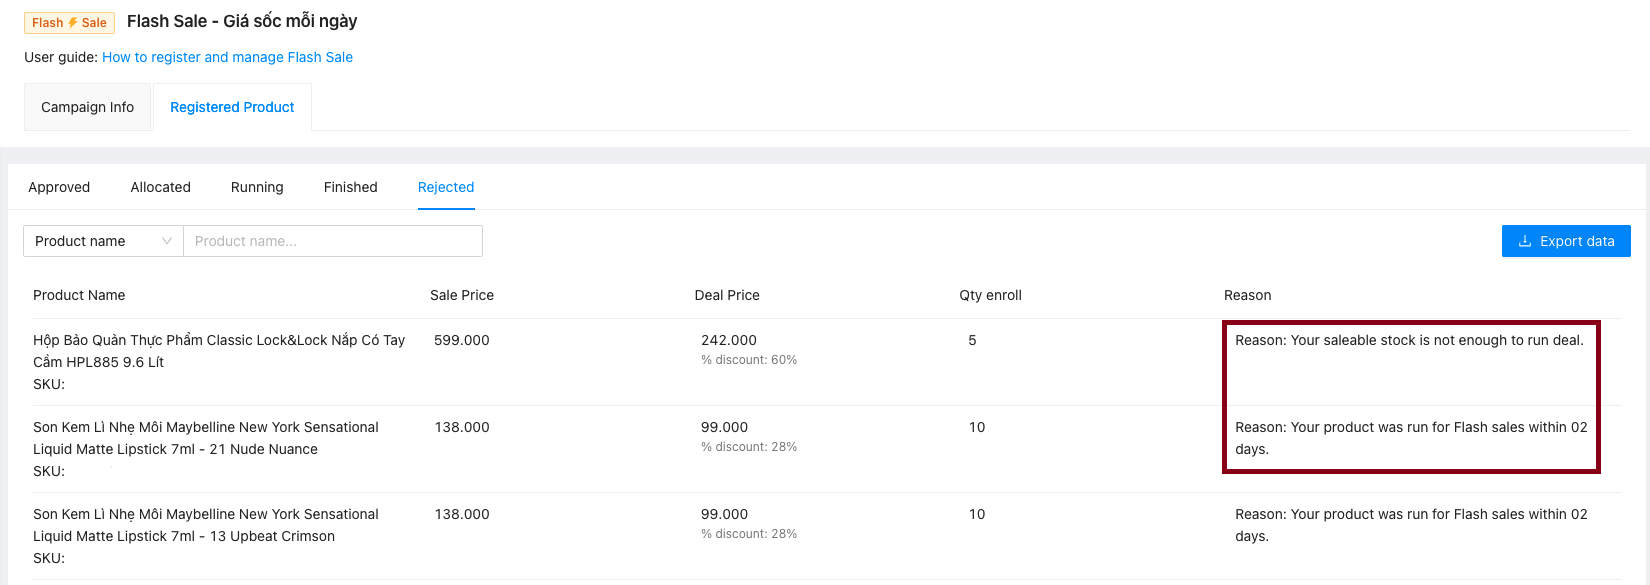
Your saleable stock is not enough to run deal > To ensure that there is enough inventory to run the promotion, the seller must check the inventory before the time of allocation.
Your product was run for Flash sales within 2 days > The system states that products that have been allocated and run Flash sales in the last two days will not be allocated again, you must thaen register for another campaign.
3. Running tab
On the date of Flash sales activation, deals will be automatically moved to this tab, where sellers can see the quantity of products sold for flash sales (real-time) and the revenue as well.
4. Finished tab
A list of products that have sold out of registration or if the campaign finished, such information will be shown here.
Sellers can efficiently manage registered ongoing campaigns with the Promotions Insight feature in the Growth Center.
Method 1: Log in to Seller Center > Marketing center > Promotion tools > All campaigns, the system will then navigate to the Campaign list where you should. Select View reports for each campaign in the Ongoing or Ended tab.
Method 2: Go to Seller Center > Growth Center > Select Promotions Insight > Select Campaign tab

See more instructions on how to view the report on the Growth Center here.