

In order for the product to be approved as quickly as possible, please:
Fill in the required product information correctly;
Choose the right category;
Provide full legal documents for the product;;
Ensure product image and content comply with the regulations on image and product content of Tiki
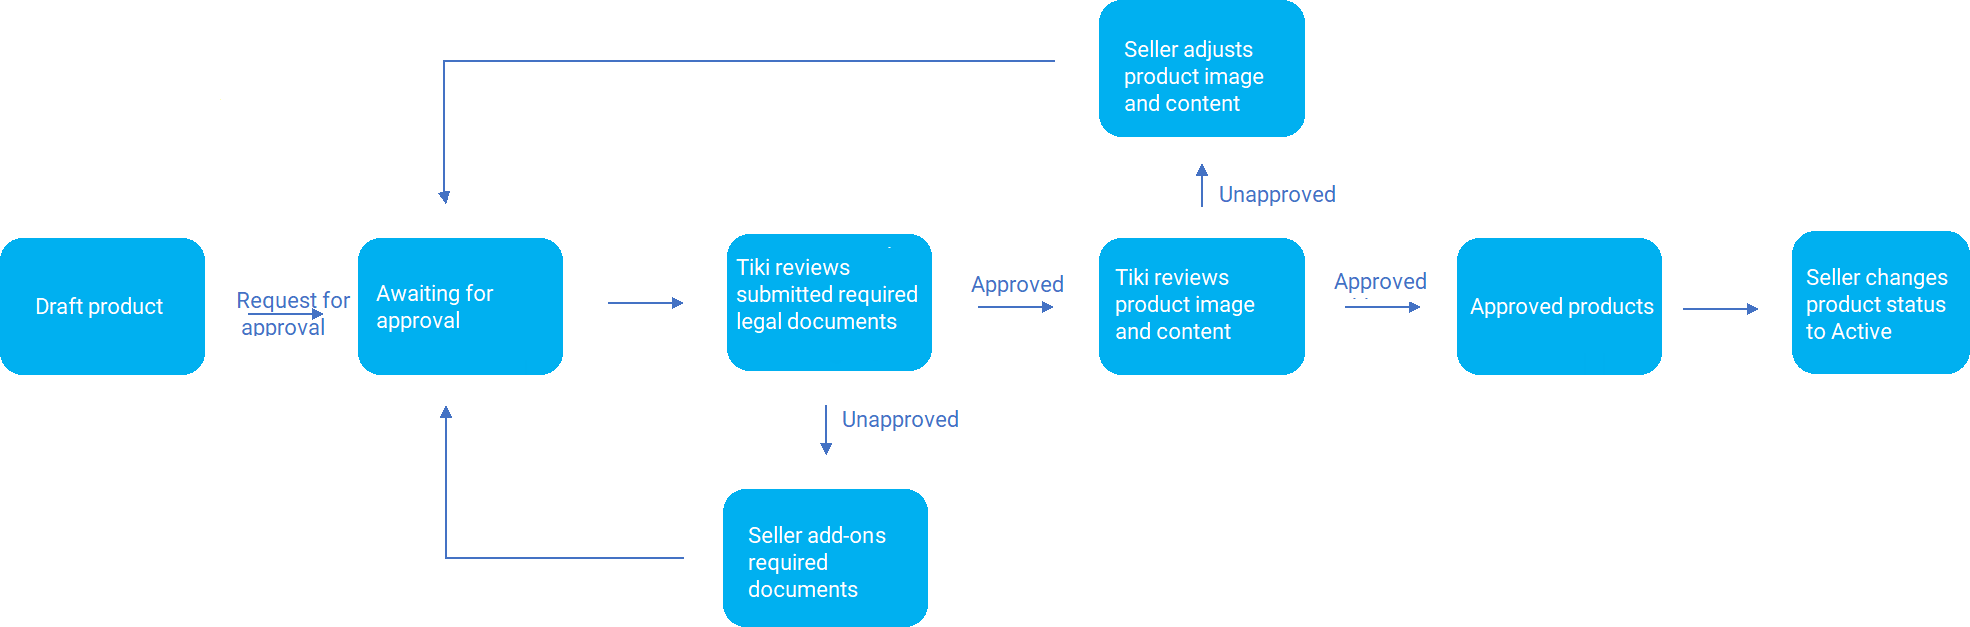
Steps to sell products on Tiki:
Step 1: Login to Seller Center
Step 2: Fill in product information
Step 3: Provide required documents
Step 4: List at least 1 product
Step 5: Tiki review products
Step 6: Change the product status to “Active” when it was successfully approved by Tiki
Note:
Time to review legal documents for products and brands (for Documents of assessment criteria for safety and quality) is 48 hours;
In case there is a lack of records, documents or content, images the product listing process will take longer than usual
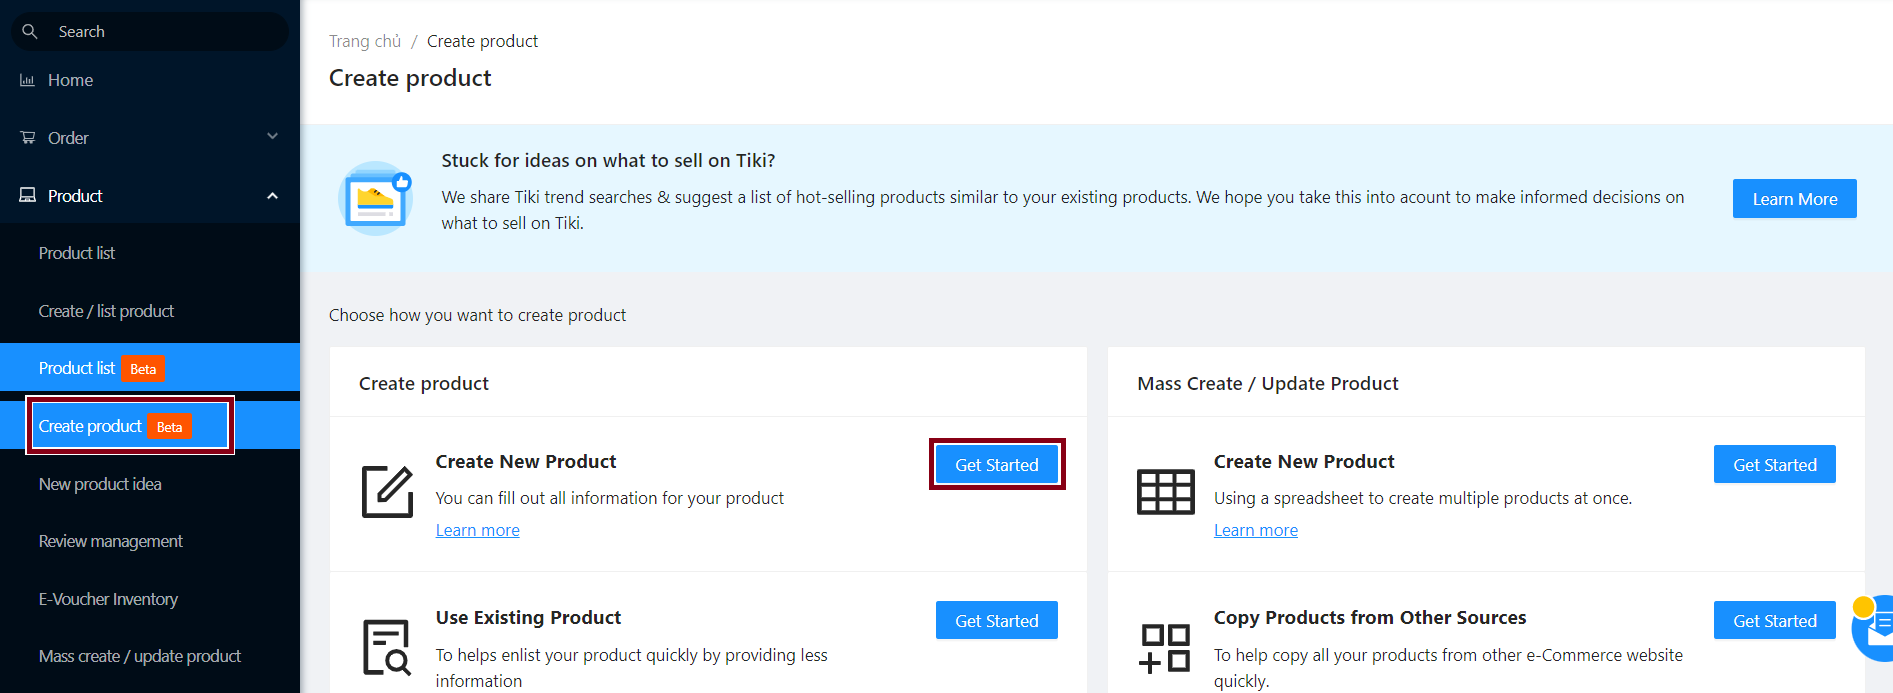
Step 1: At Seller Center, please choose Product list > Create Product > At Create New Product, select Get Started.
Step 2: Fill in product information
1. Important information
Product name: Length from 3 – 255 characters, comply with the standards here.
Category: Auto-suggested by product name or selected by seller through search by ID or Category Name.
Trademark: Enter a brand name to search or create a new brand by clicking Create new brand.
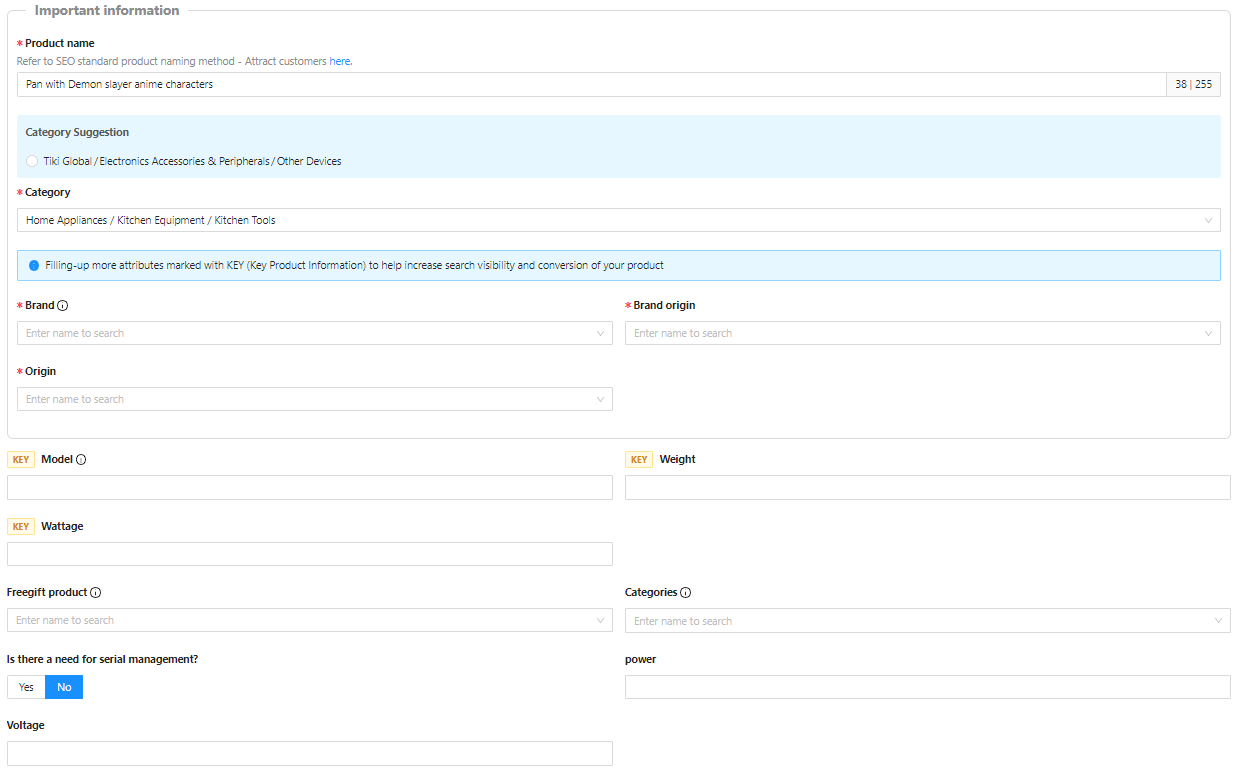
Tip: Properties marked with KEY (Key Product Information) will help increase visibility when customers search.
2. Product descriptions
Product video: Sellers can add videos to help customers better visualize the product. Learn more about video standards here.
Description (required): Seller needs to enter all necessary information about functions, utilities, specifications, origin or warranty,…
3. Options & Operation
3.1 Options
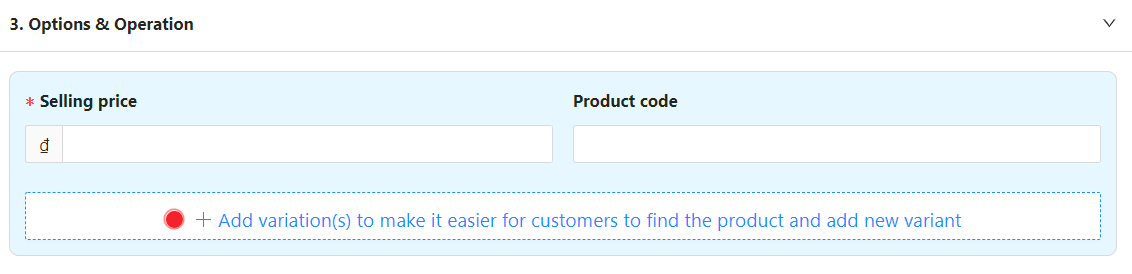
Click on + Add variation(s)… > Select variation and then select variants for variation (eg Size, Color…)
Variant(s) for the variation: Click on the white frame > Select Create new option and enter information (for example, with the Variant (s) of color there will be options for black, blue, red, yellow,…)
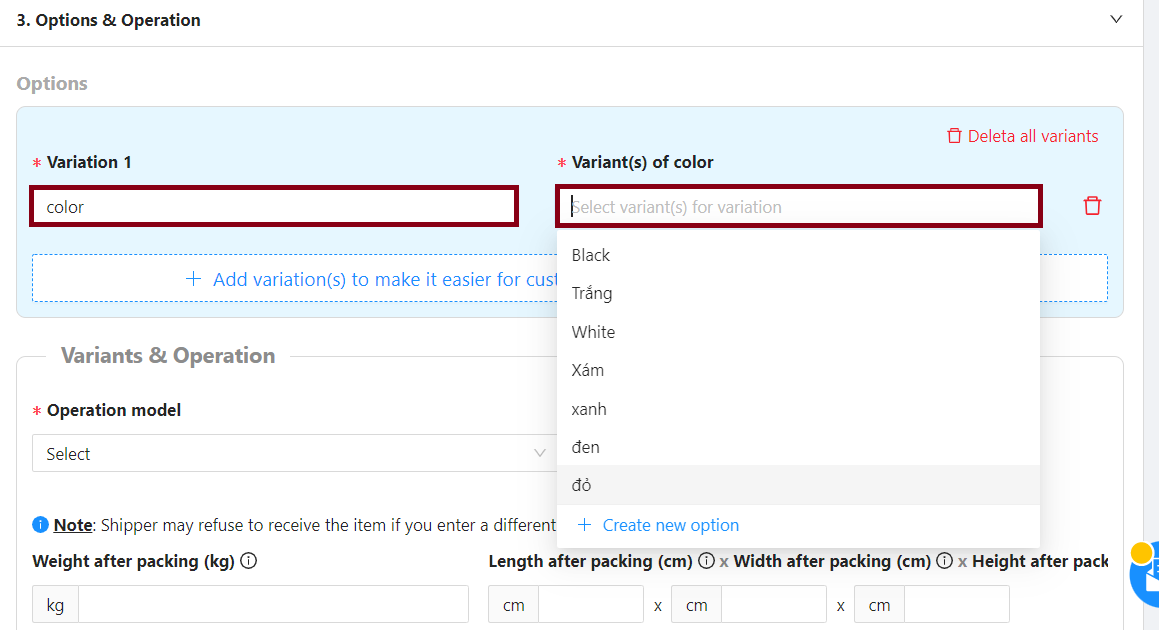
Tip: Add variation information to make it easier for customers to find your product in the search page and at the category section.
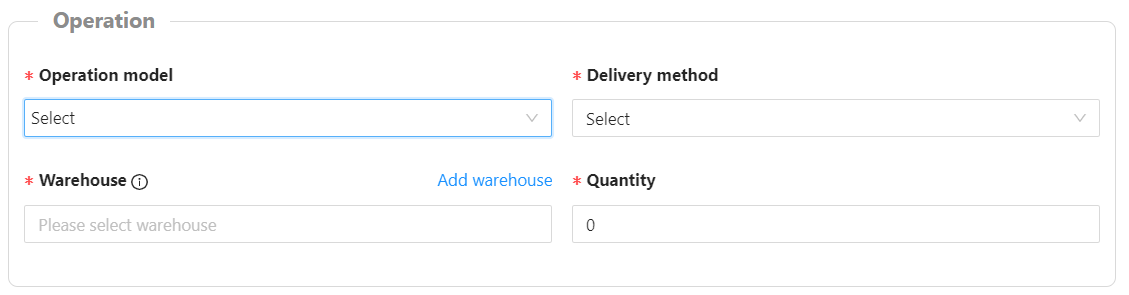
3.2 Operational model
When the Seller selects the Operating Model, the system will display additional attributes corresponding to that model such as Operation model, Warehouse, Delivery method, Quantity. Seller needs to complete this information.
During the warehouse selection process, to add a new warehouse, the Seller selects Add warehouse, the system will move to the Fulfillment model, warehouse & contact info page, in the Pickup & return warehouse(s) section, select Add Warehouse > Save Information.
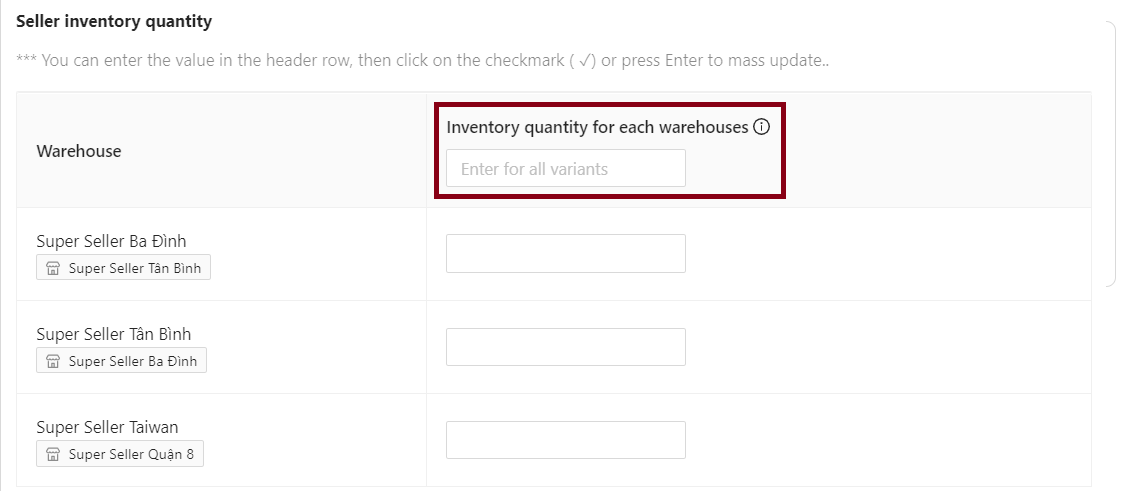
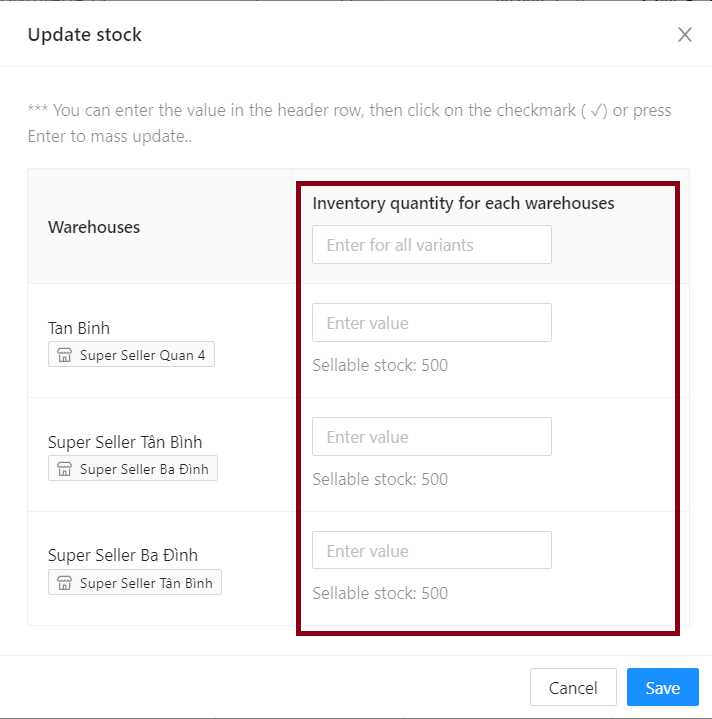
The Seller will select the warehouses of the products they want to create and fill in the inventory quantity corresponding to each warehouse in the Inventory quantity for each warehouse.
Tip: Sellers can enter a value in the Enter for all variants box, then press Enter to mass update the warehouses below. The system will duplicate this product quantity to all selected warehouses.
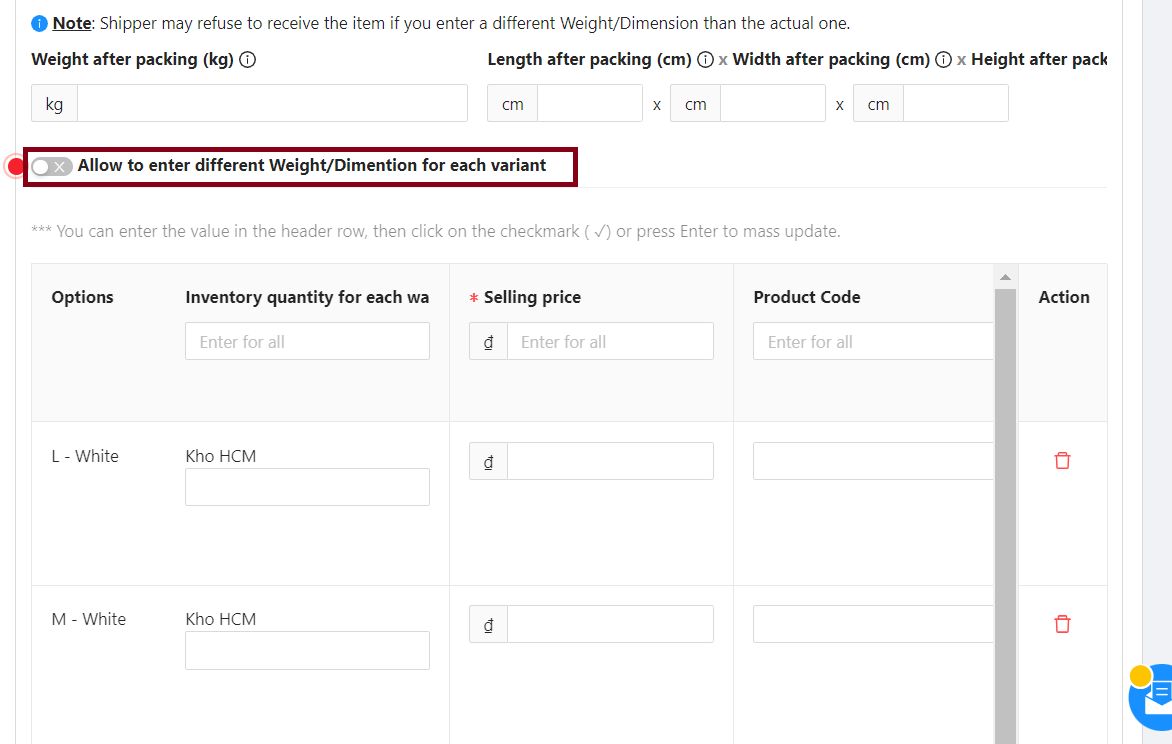
Enter the weight (kg) and product dimensions (length x width x height). If the product has multiple options (attributes) with different sizes/weights, the Seller slides the Allow to enter different Weight/Dimension for each variant to enter information for each type.
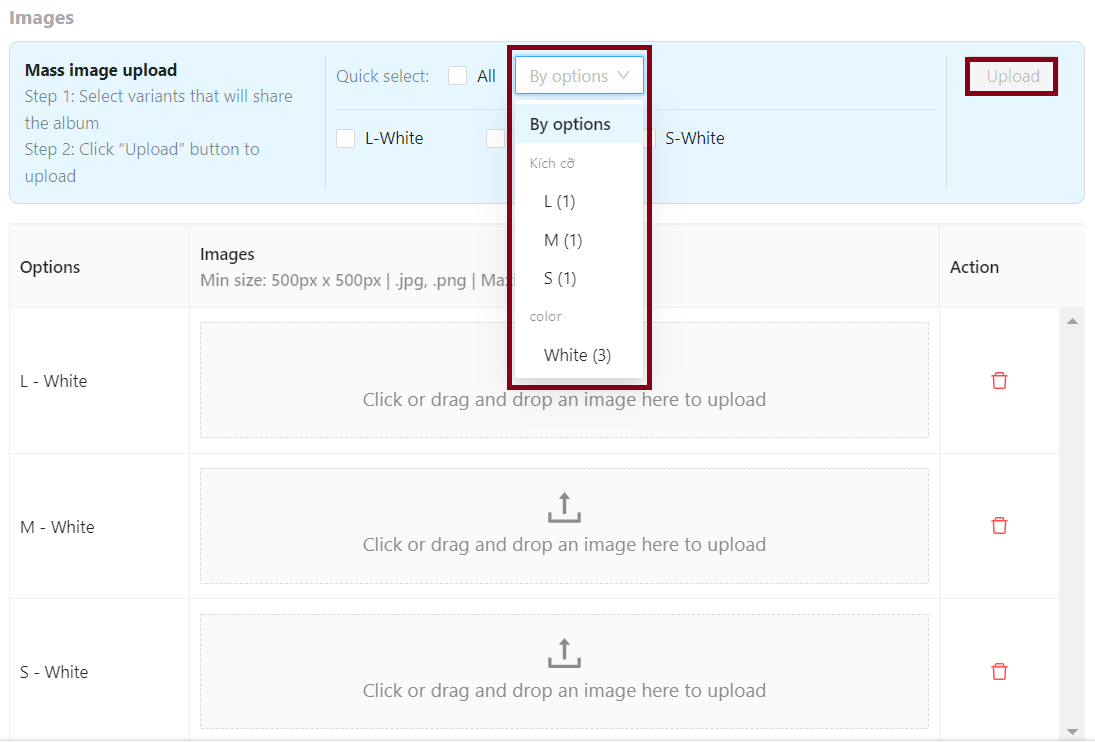
3.3 Images
Seller updates product images, recommends using 7 images or more, resolution 500×500 pixels (minimum). To update photos for multiple selections at the same time, at Quick select, click By options > The drop-down list displays product selections, please choose options that will share the same photo > Click Upload and select the photos to upload.
4. Authentic document
When listing products, you are responsible for preparing authentic documents such as seller and product legal documents, as well as ensuring that all products adhere to Tiki’s regulations and listing policies. More detail here.
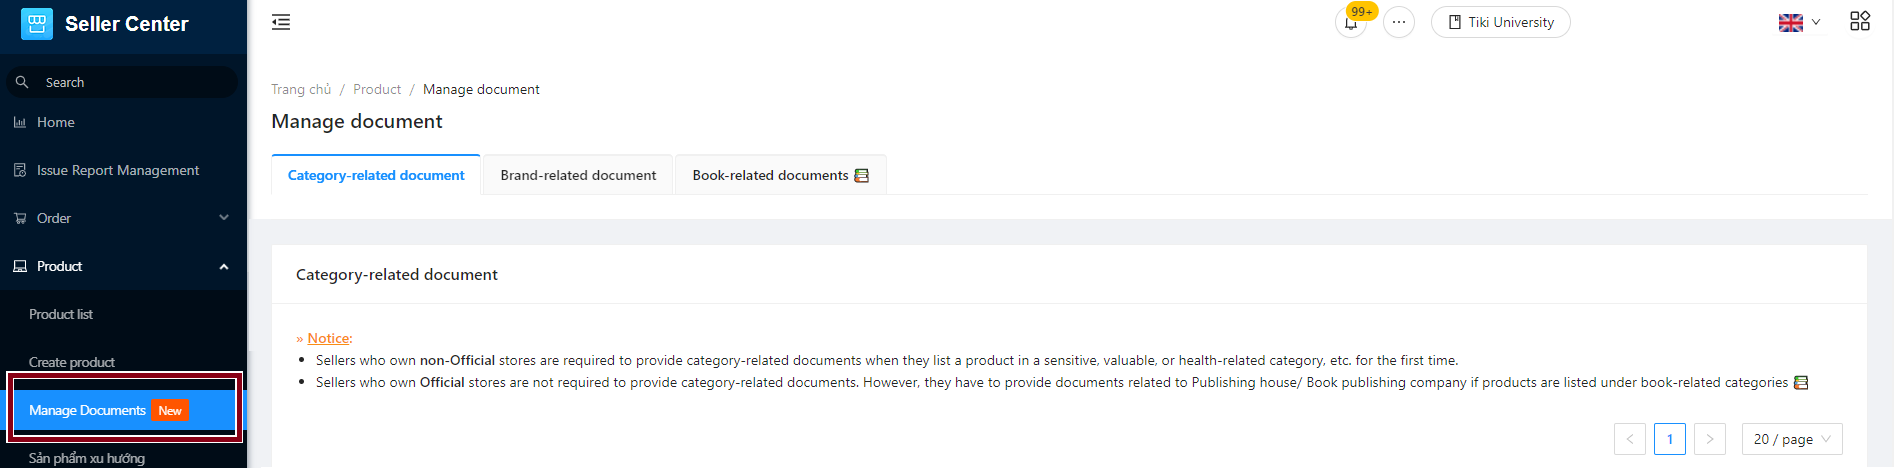
Tip: Sellers only need to provide documents once for products with the same requirements. Uploaded documents will be stored in the Manage Documents feature.
If the documents required for brand and category that you uploaded have been approved, you are not required to provide it again when listing new products in the same Sub-Category/Brand.
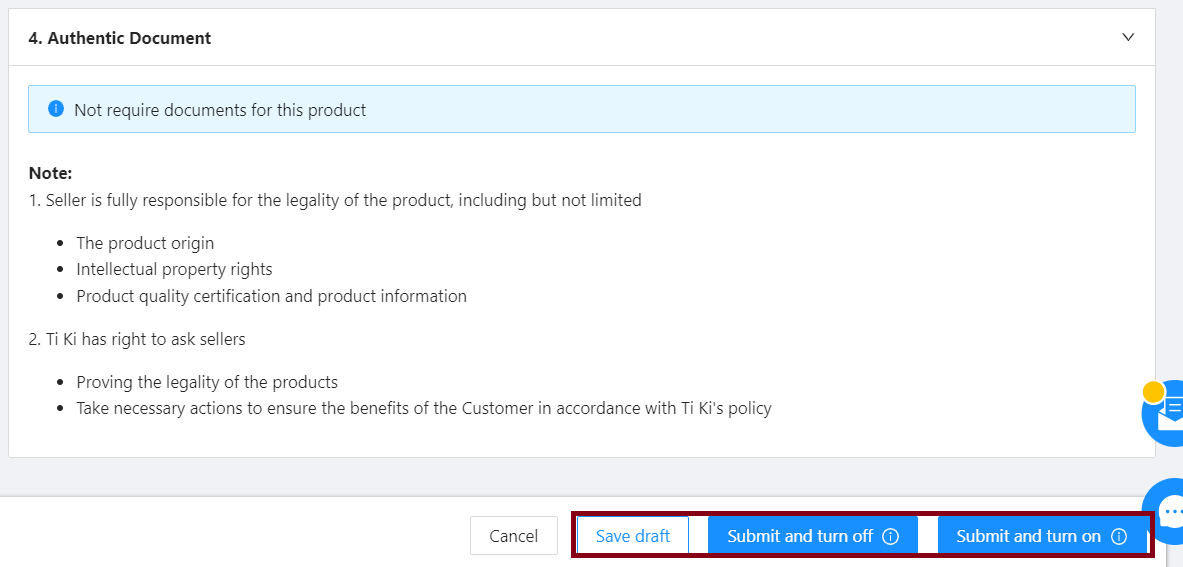
Step 3: After filling in all the above information, the Seller clicks:
Submit and turn on: Products after receiving Tiki’s approval will be automatically available for sale on Tiki Web/App.
Submit and turn off: Products after receiving Tiki’s approval will not be available for sale on Tiki Web/App. Sellers need to turn on the product.
Save draft to save information and update later.
Step 1: At Product, choose Create/List product, in that screen Sellers click on Get Started in Use Existing Product section.
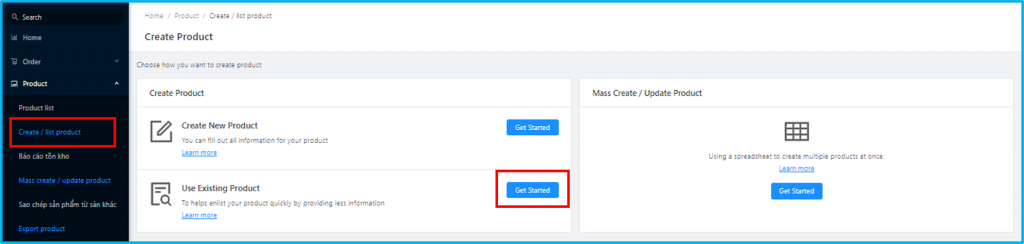
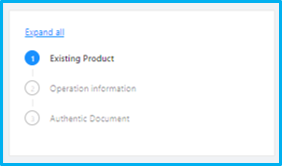
In this screen, Seller need to fill-in 3 sections: Existing Product, Operation information và Authentic Document
Step 2: Existing Product(s)
Step 2.1: Add product name to search the existing product

Step 2.2. Choose the existing product to list
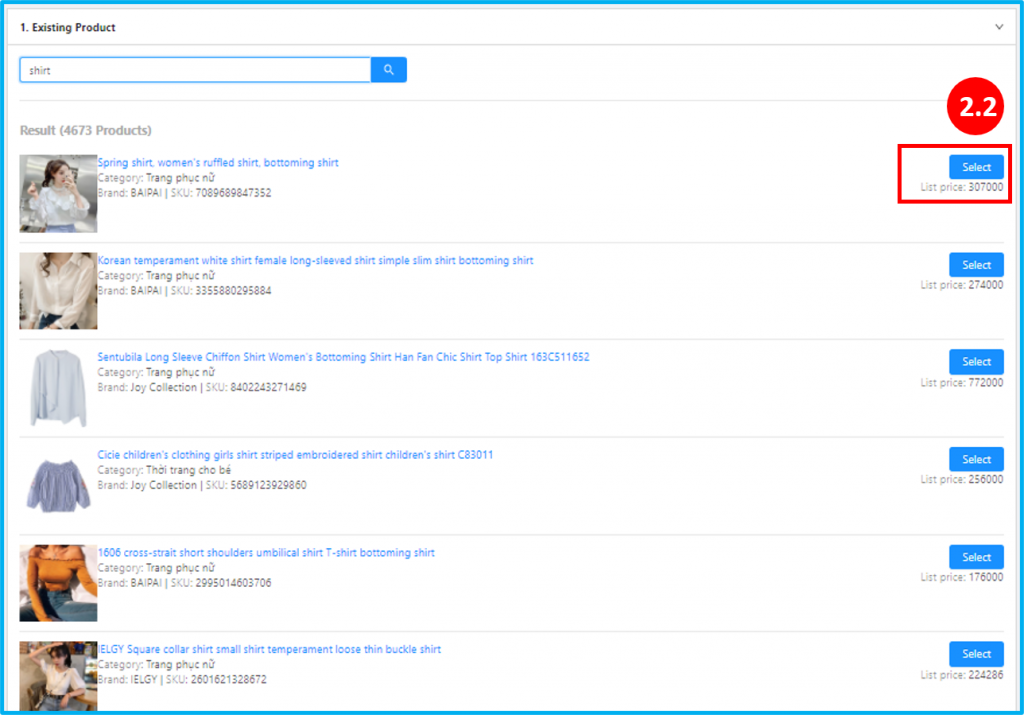
After searching, Sellers click on Select to list this existing product.
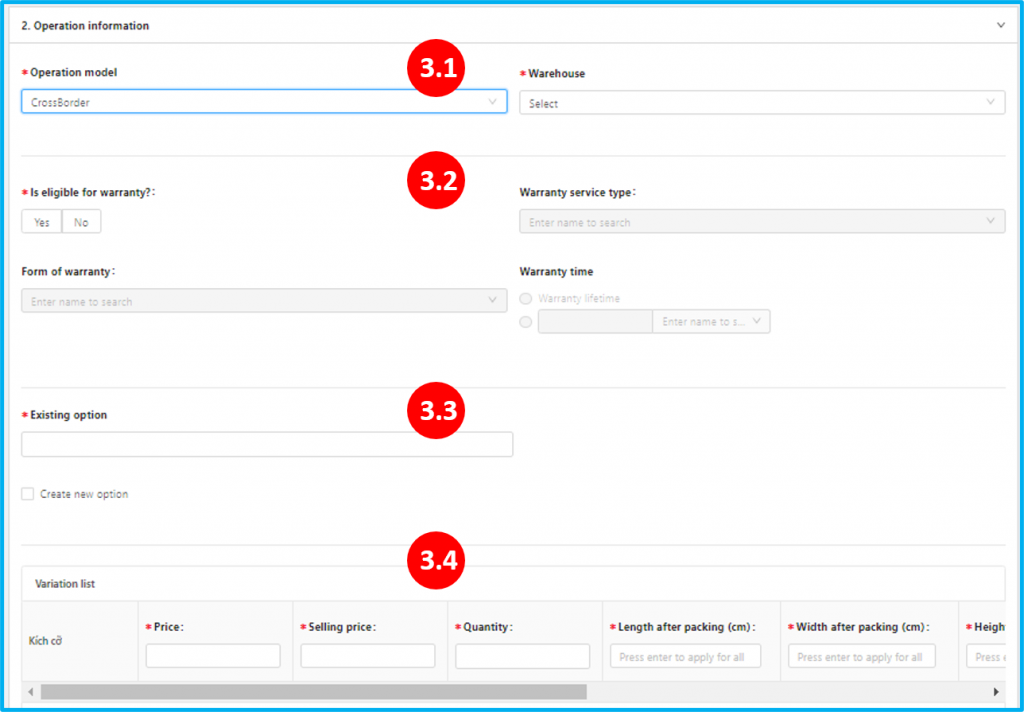
Step 3. Fill in Operation information of the product
Details:
3.1. Operation model & Warehouse
Please choose CrossBorder in the Operation model box and then select the Warehouse.
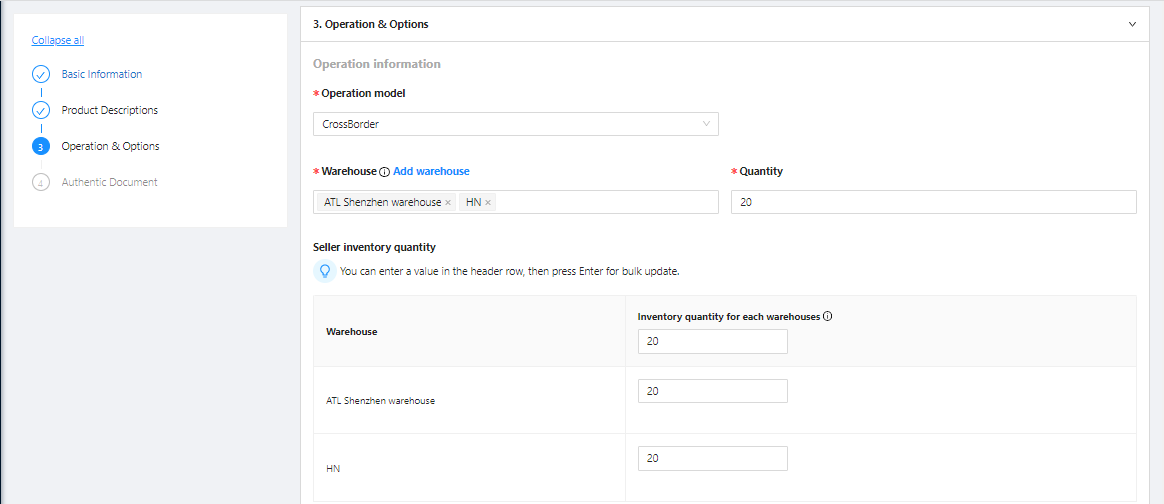
Please choose warehouses for this product and enter the inventory quantity for each warehouse.
Note: Quantity allowed for order = Quantity in stock for each warehouse – Quantity in process/ordered stock. Tiki calculates this number automatically based on the Seller’s inventory and the number of orders being processed.
Tip: Sellers can bulk update the stock at all warehouses by entering a value in the Enter number for all box and pressing Enter. This product quantity will be duplicated automatically across all selected warehouses.
Tiki expected to stop using the Inventory quantity attribute (the total inventory of all warehouses) in January 2022 and will instead use separate inventory numbers for each warehouse. As a result, if your products are sold at multiple warehouses, please kindly update the inventory quantity for each warehouse by January 4, 2022 to ensure smooth operation. Products that are only sold in one warehouse do not require any additional adjustments. In the event that there are too many products to update, Tiki recommends that you update the best-selling products first to ensure stable operation after January 4, 2022.
3.2. Warranty information.
Global Sellers choose No.
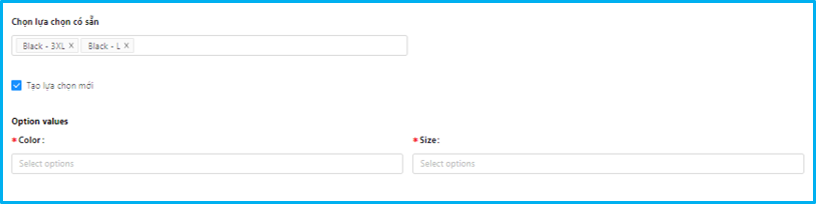
3.3. Multiple selection product
Sellers can choose available options or Create new options as below:
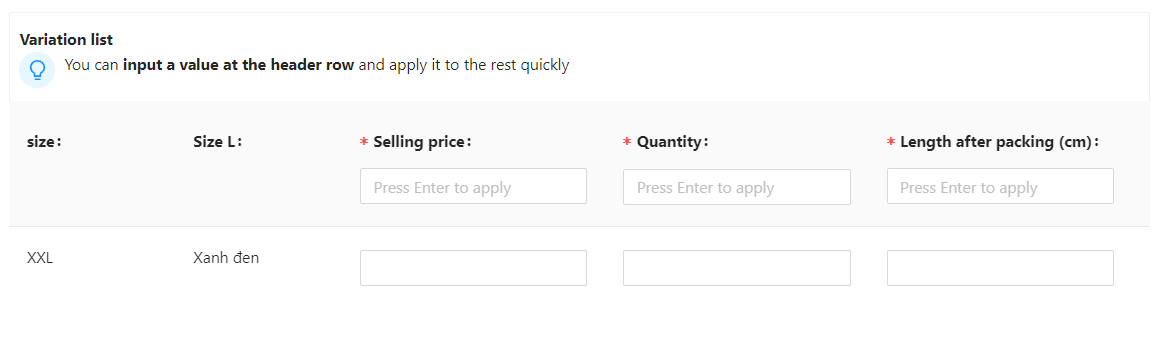
3.4. Setting price and parameters of products
The screen will display sections that need to fill-in information by the number of options set at section 3.3.
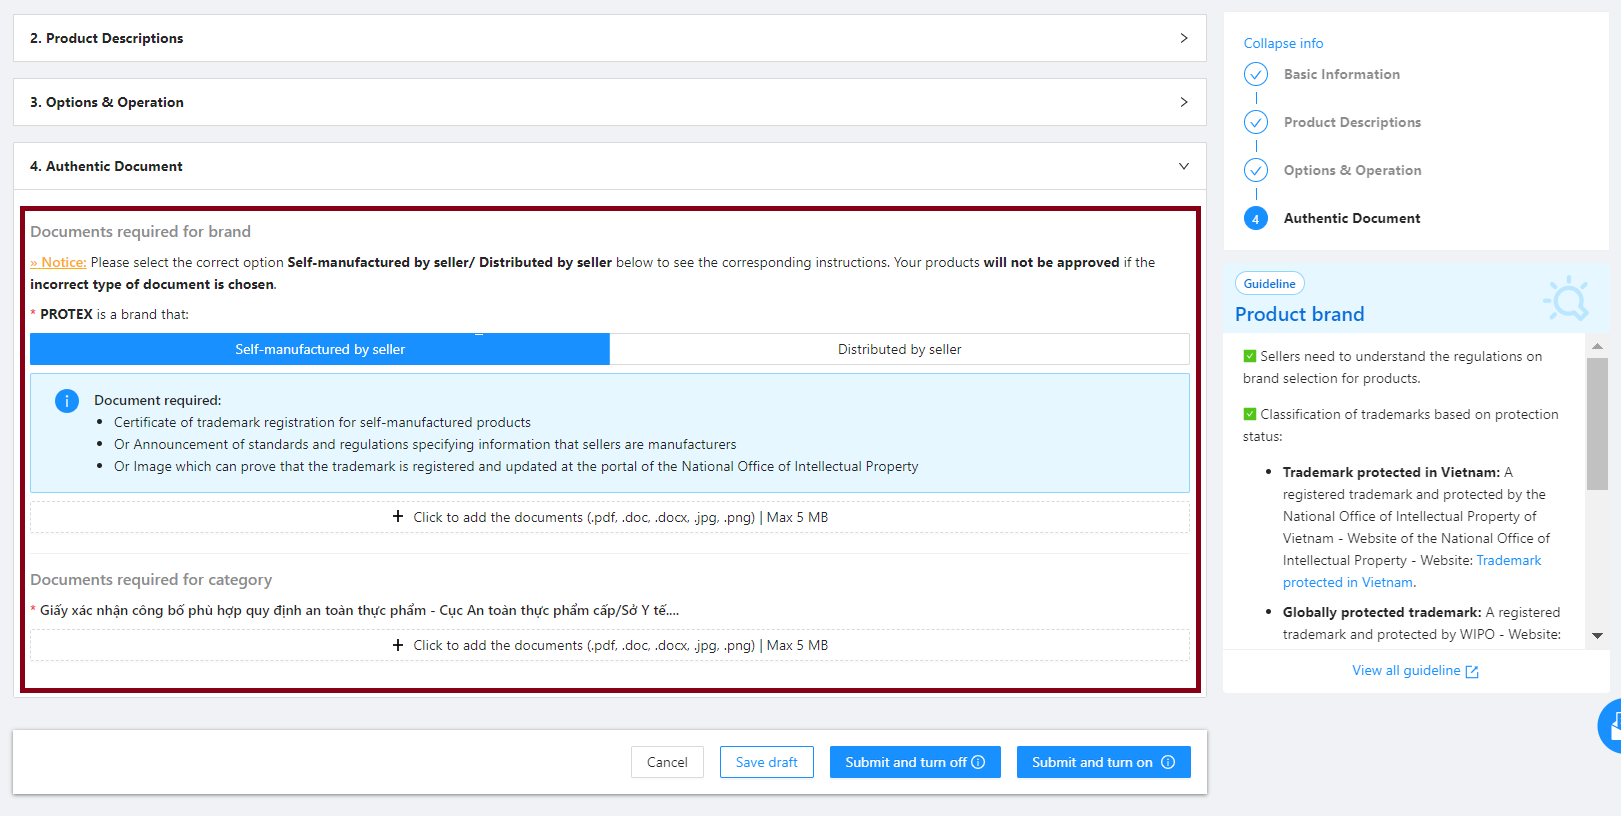
Step 4. Authentic Document
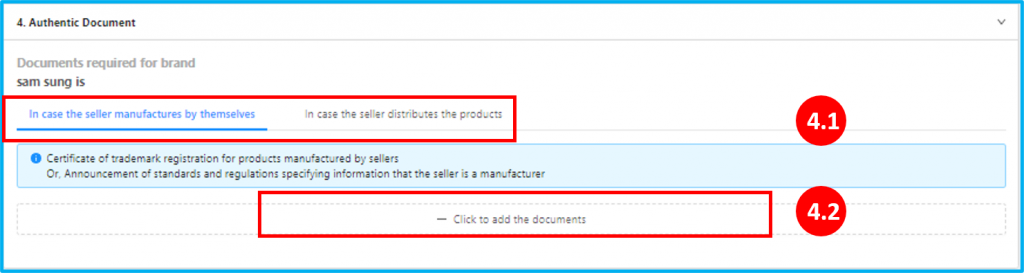
The Documents section is divided into 2 cases, on a case-by-case way to provide the types of documents:
The seller manufactures by themselves
The seller distributes the products
Note: The seller should pay attention to the instructions of the system for each type of
document.
If the product is an OEM, Seller no need to provide the authentic documents.
Step 5. Create product

After filling in all information, Sellers click on Create to list products or click on Save draft to save the information and update later.
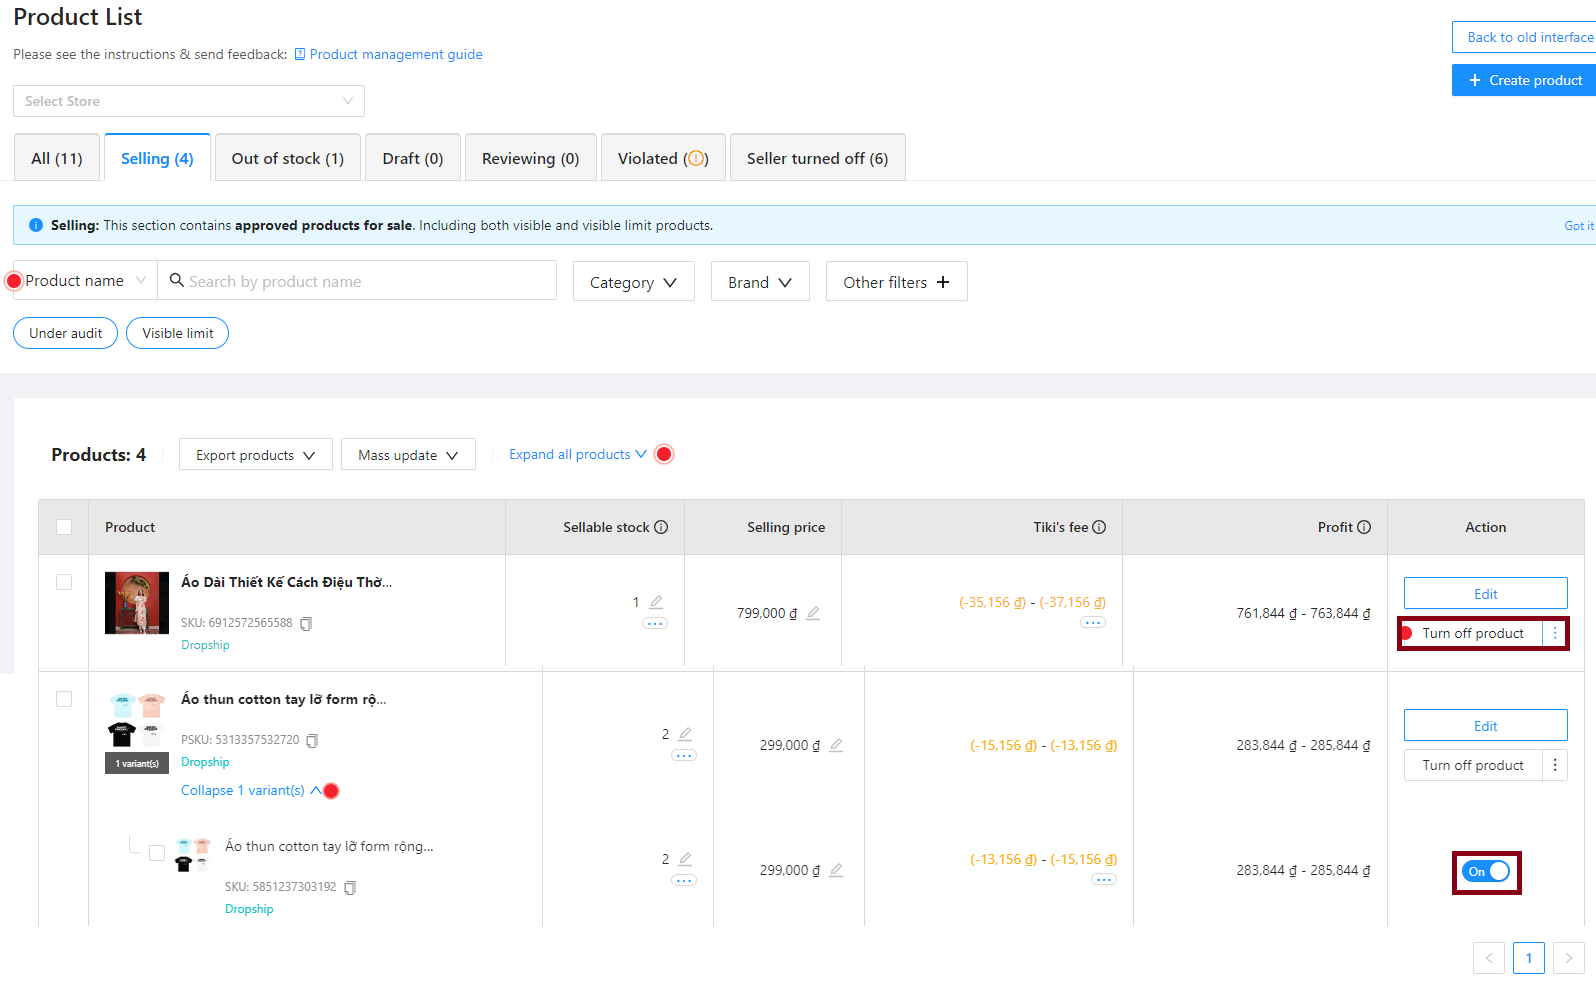
In the Product List section, you can filter and search by: Product (Product Name, Product Code, SKU, PSKU), Category, Brand, Other Filters… by product status. As follows:
|
Status |
Description |
Actions that can be performed |
|
All |
Displays products that have been approved for sale, excluding products in Draft, Reviewing and Permanently locked. |
– Update selling price and inventory for main product and for each option (if any) (see item 1) – Edit product name (see item 2) – Turn the product on/off (see item 3) – Delete the product (see item 4) – Add new options for products (see item 5) |
|
Selling |
Show available products. Includes currently displayed and restricted products in search results. |
|
|
Out of stock |
Display products with a variation that is out of stock or out of stock altogether. The seller updates the value in the Sellable column > 0 to put the product for sale again. |
|
|
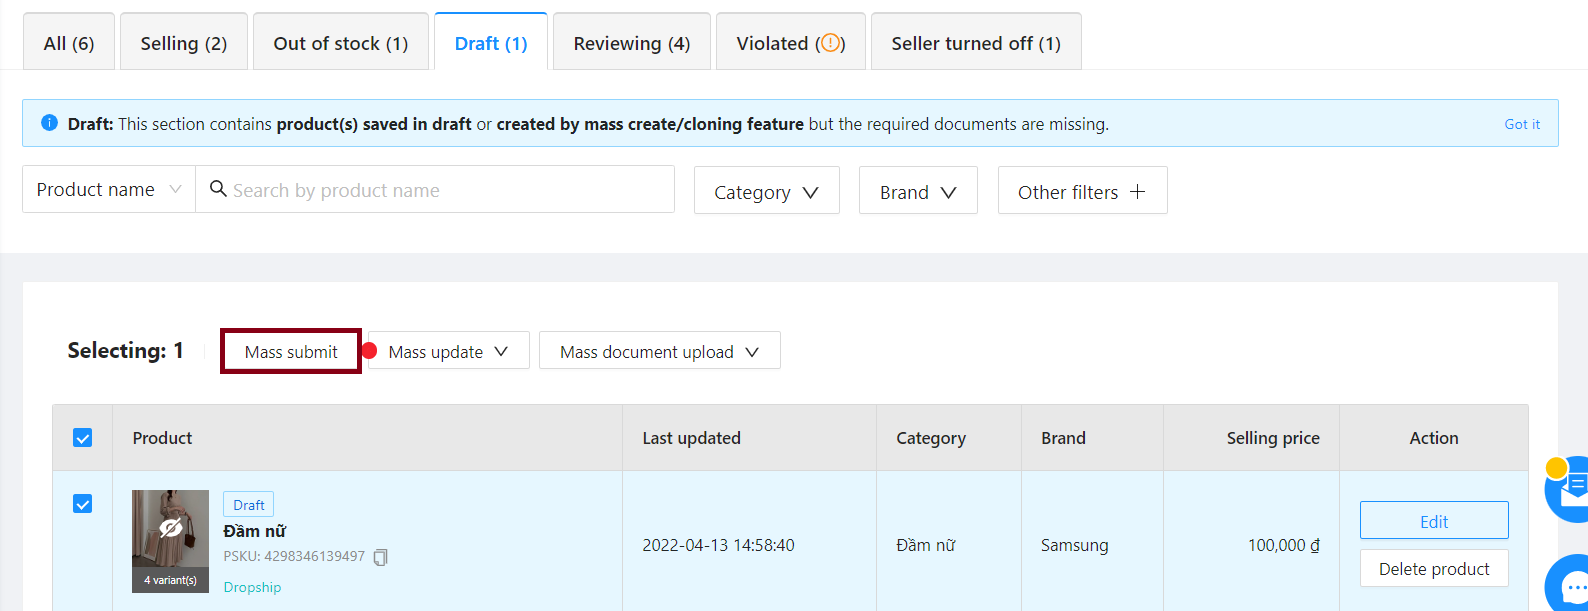
Draft |
Show products in draft or created with Create New/Mass copy but have not attached the required document (Brand/Category) in search results. |
– Edit product name (see item 2) – Add new options for products (see item 5) – Mass update of categories/products/documents for Draft products (see item 6) – Submit product for review (see item 7) – Delete the product (see item 4) |
|
Reviewing |
Displays products awaiting approval by Tiki. Successful approved products will be automatically moved to the Selling tab. If Tiki does not approve, the product will be moved to the Violated tab. |
|
|
Violated |
Displays failed or violated products during the review process. |
– Update product information (see item 7) |
|
Seller turned off |
Displays products for which the seller has disabled all variations. Customers cannot place orders. |
– Edit product name (see item 2) – Turn on the product (see item 3) – Delete the product (see item 4) |
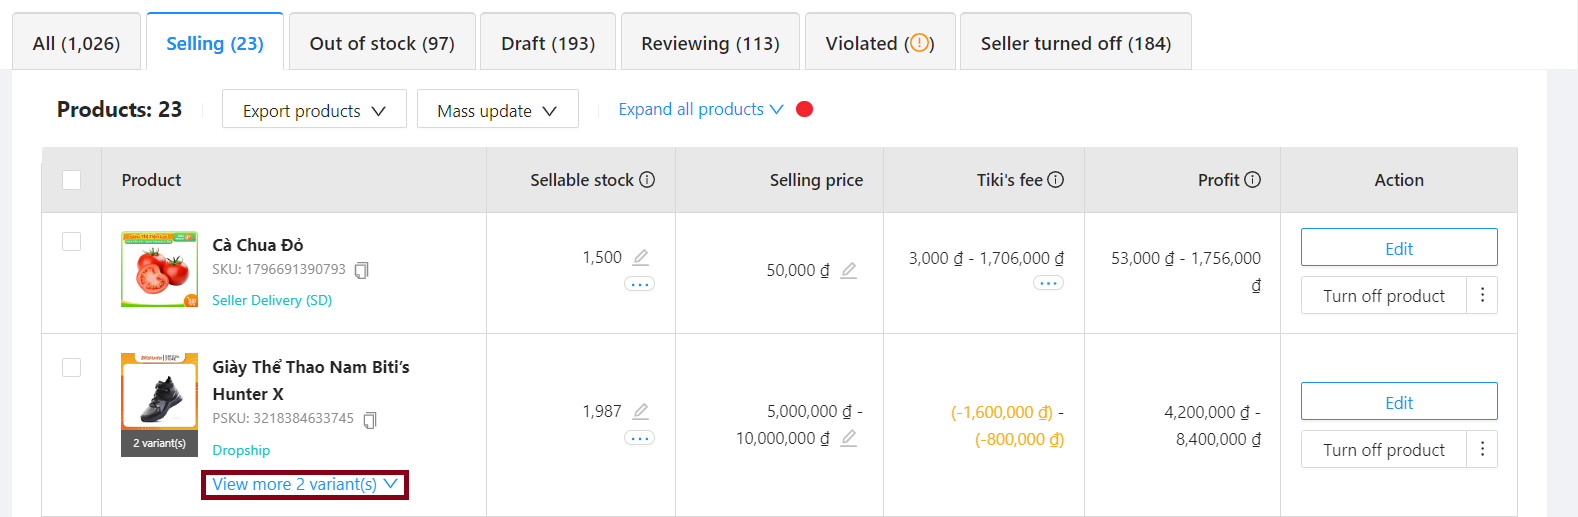
1. Update selling price and inventory for main product and for each variations
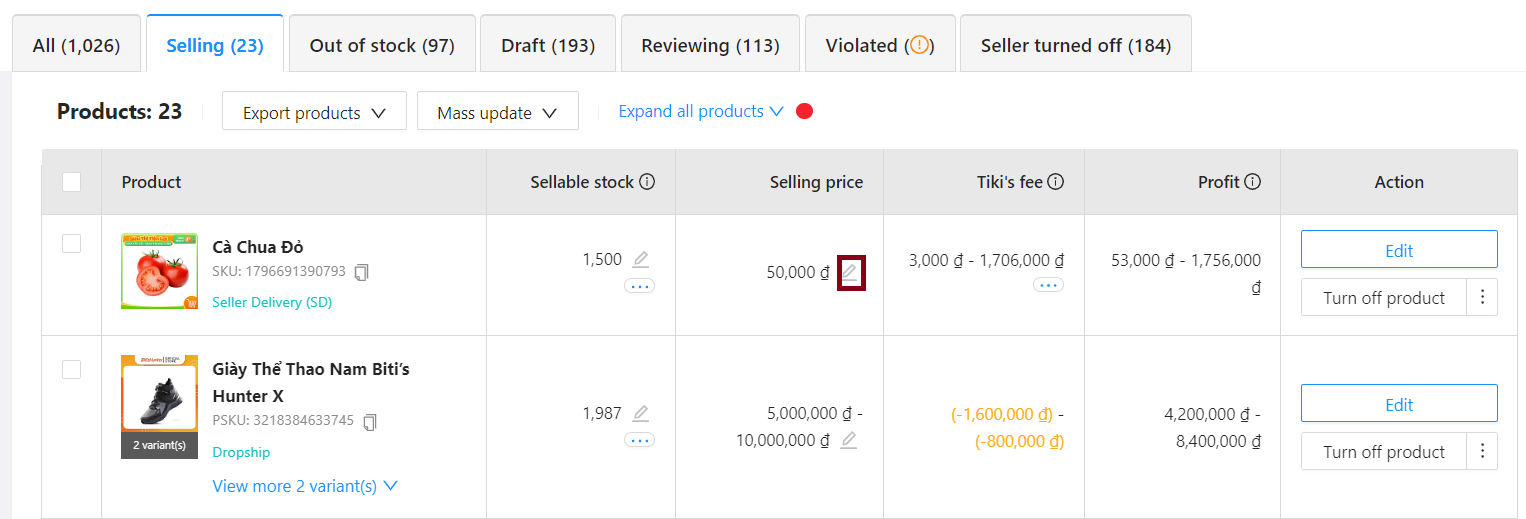
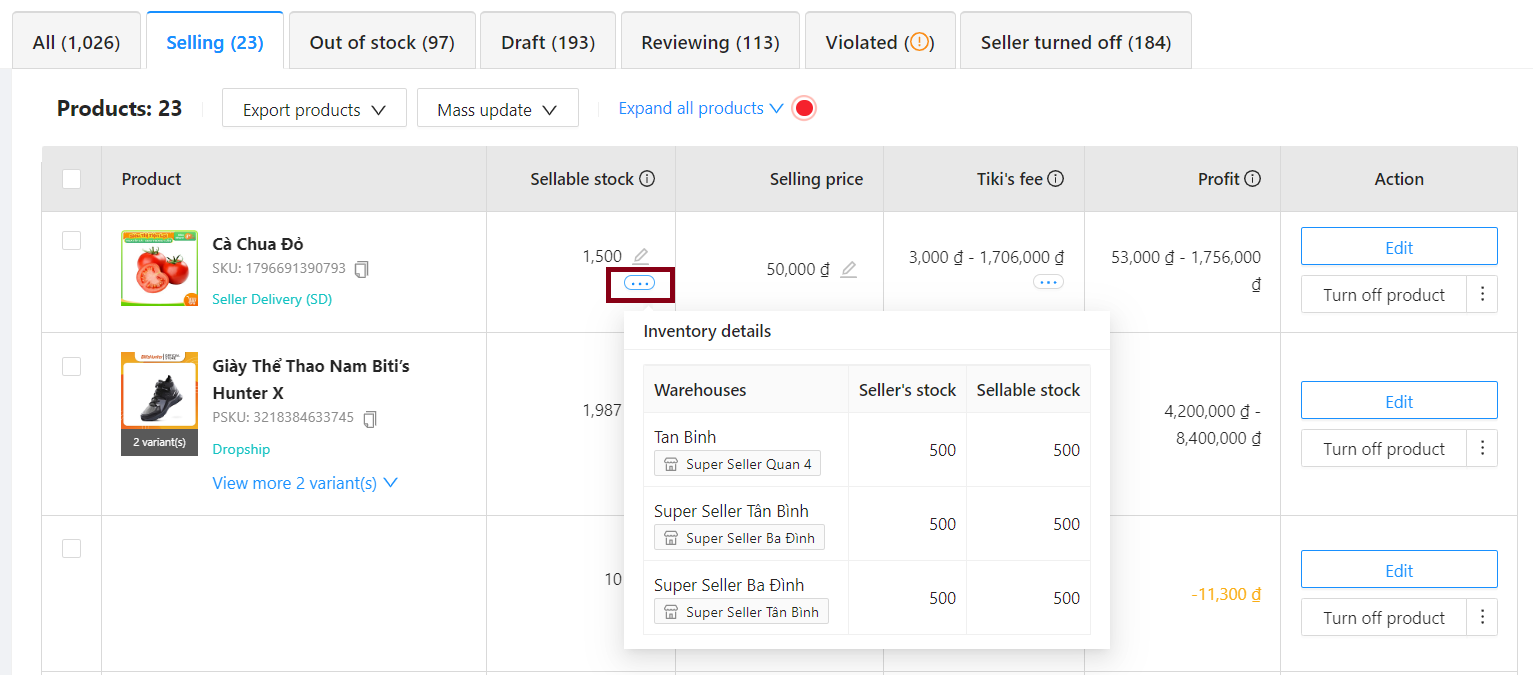
To adjust the amount of inventory, the seller clicks on the pencil icon. On the dialog box that appears, enter information in the box Inventory quantity for each warehouse > Click Save to complete the update.
In the Action column, the Seller clicks the Turn on/off product (for main products) or slides the On/Off button for each option (if any).
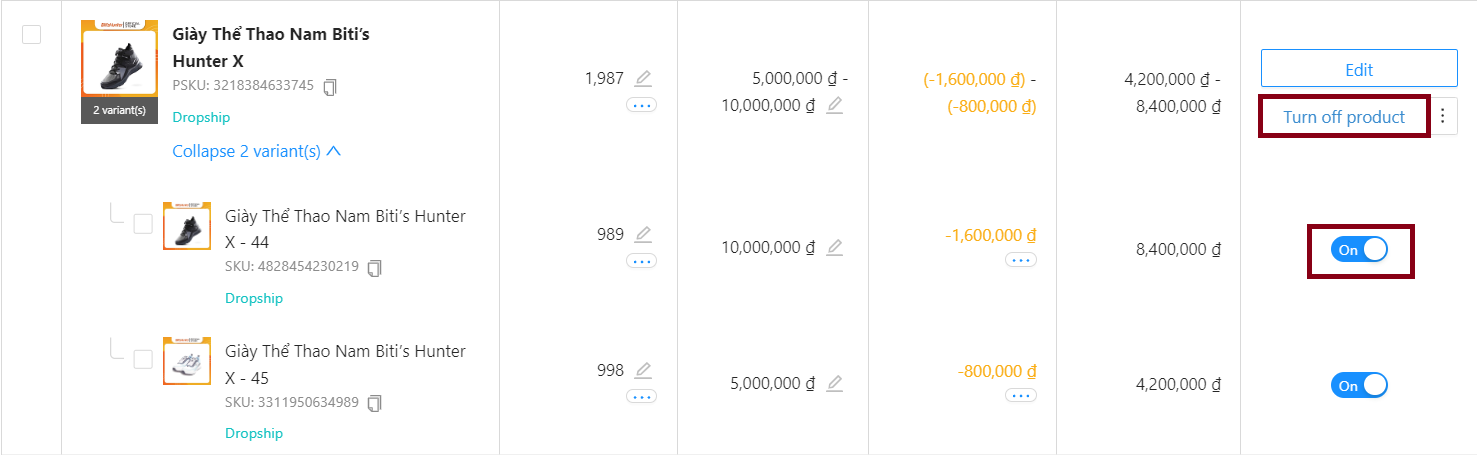
Note: When the Seller clicks On/Off the product, it means that the product selections will also be On/Off.
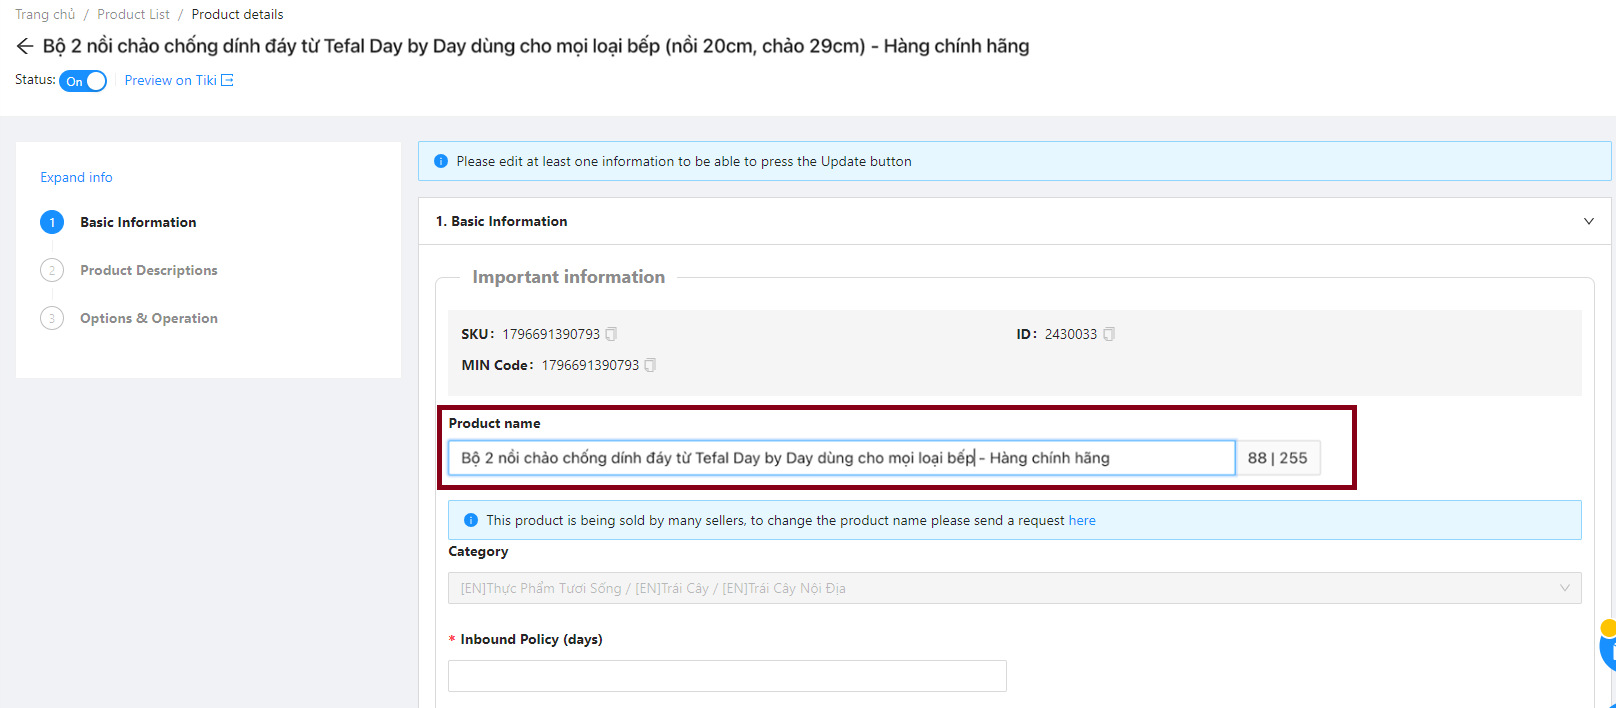
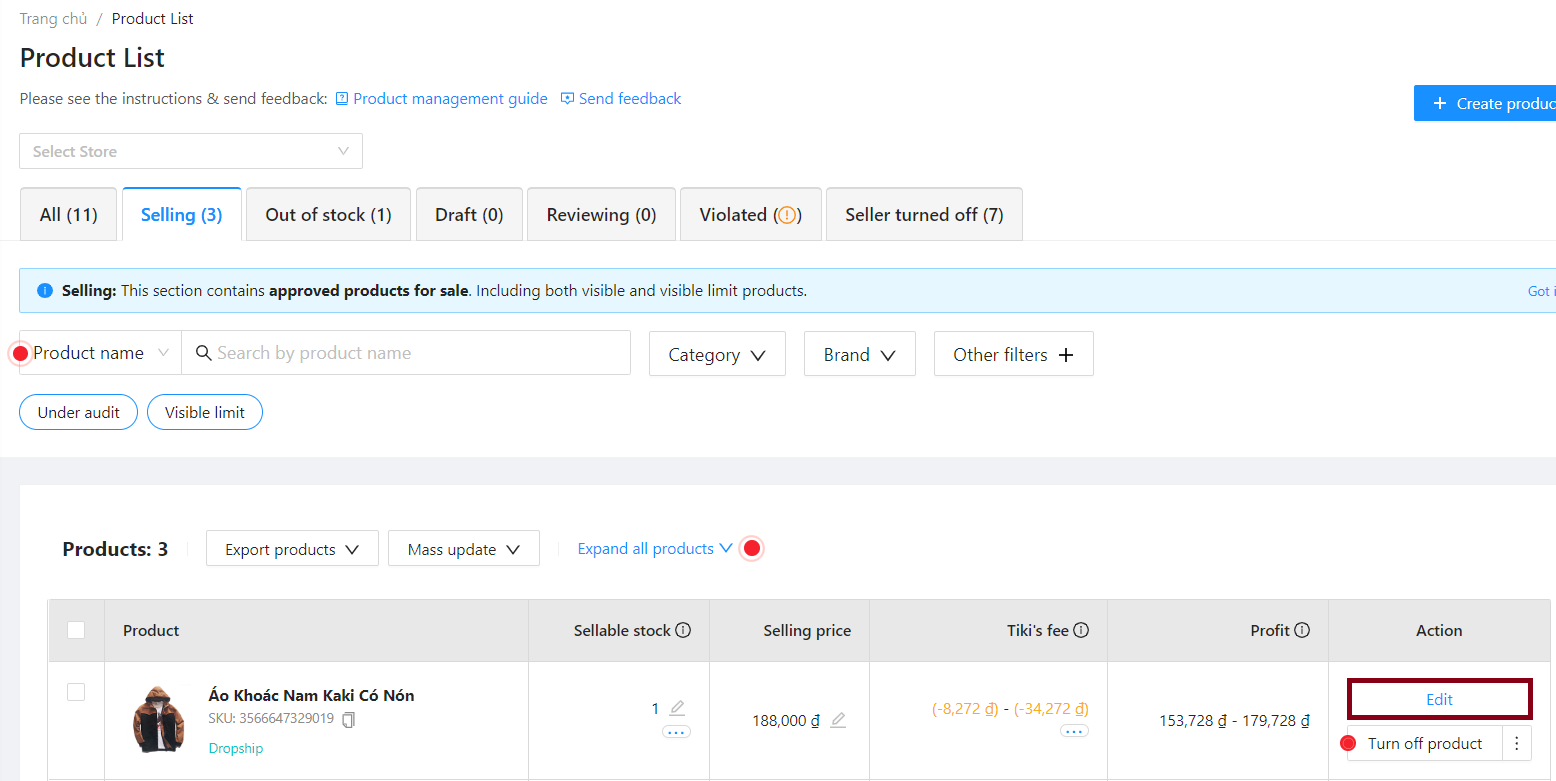
2. Edit product name
In the Action column, please click on Edit. At the product details page, enter the name you want to change and click Update. Once done, the modified product name will be activated immediately.
If you have a large number of products that need to be renamed, please download the Edit Product Name Excel template here, then export the excel file and upload it at the above registration form for Tiki to review and change.
Our content department will receive the request, change the product name or contact the seller if more information is needed.
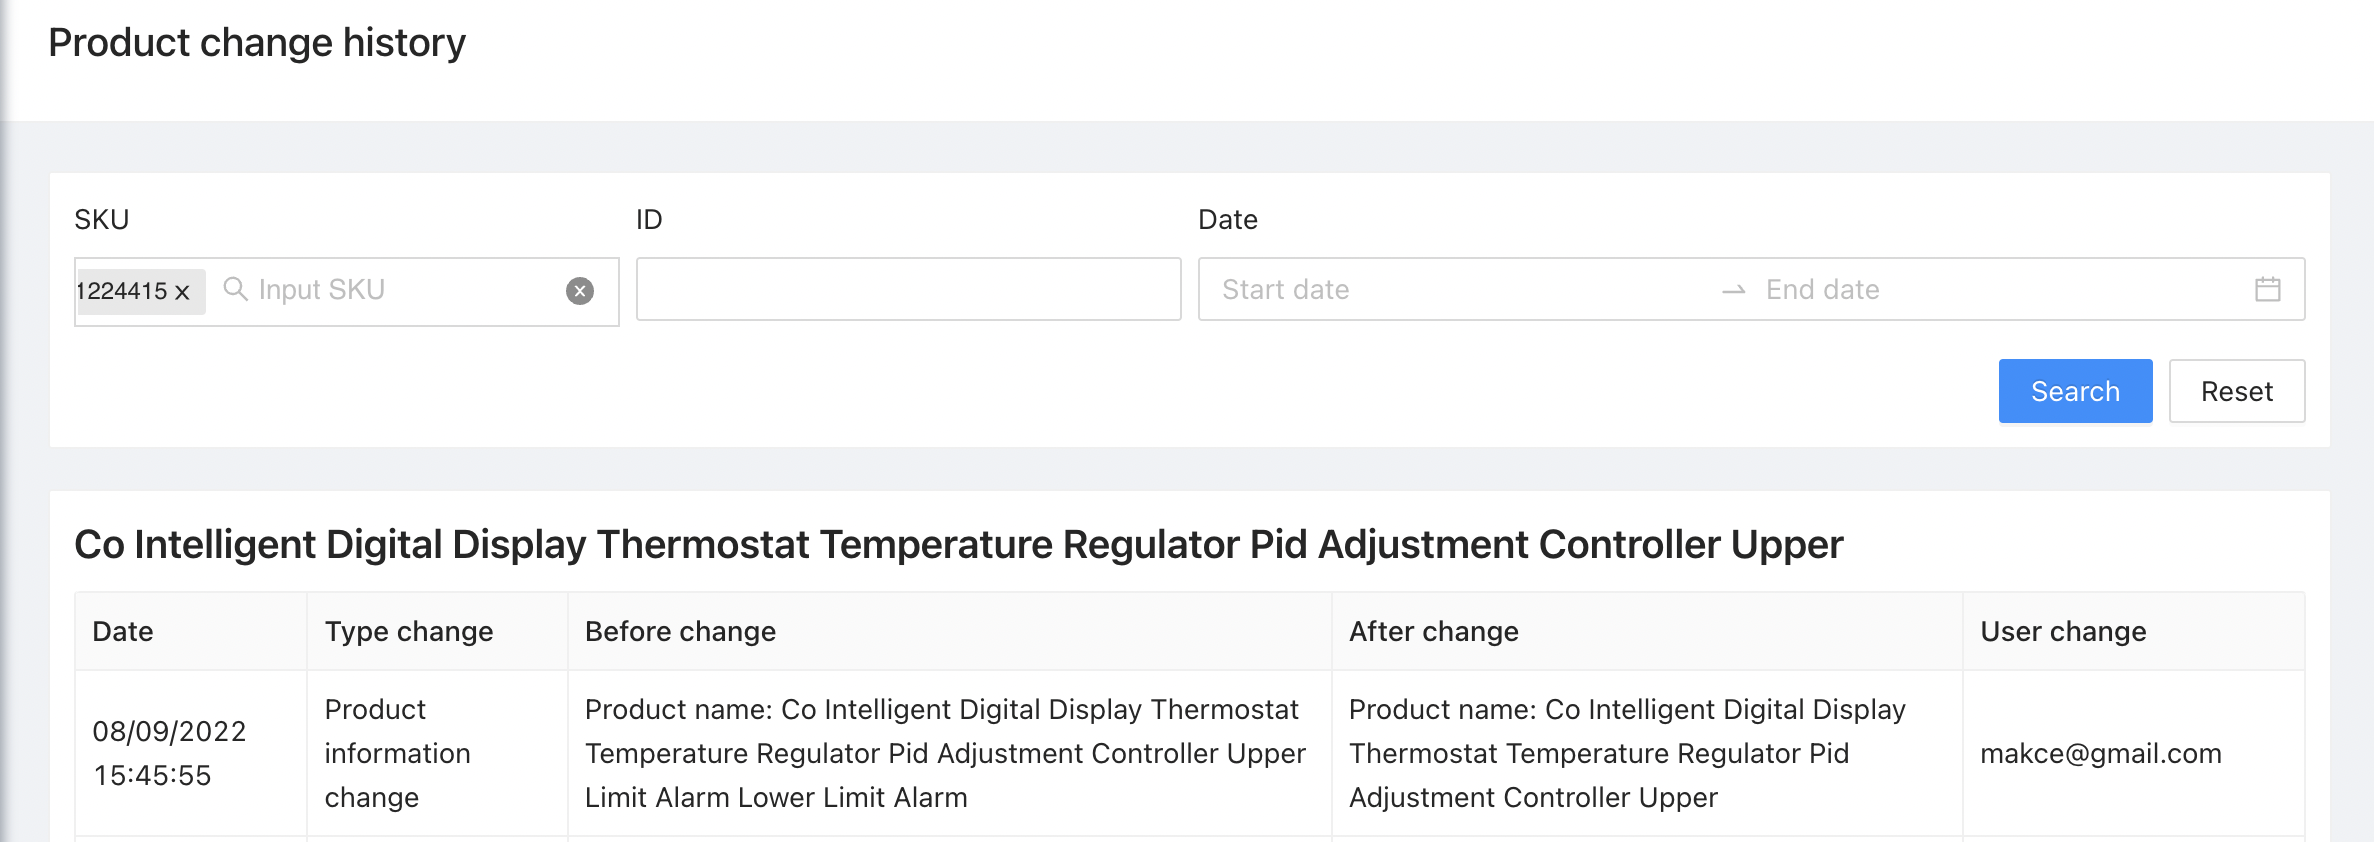
To view the edit history, in the Actions column, select Changes history.
Tip: Sellers can use the New product idea tool (Tiki search insights) to see a list of keywords customers are using to search for products. According to which, change the product name following market trends to attract more customers.
3. Turn the product on/off
In the Action column, select Turn off products (for the main product) or slide the On/Off button for each variants (if any).
Note: When the Seller clicks On/Off the product, it means that the product selections will also be On/Off.
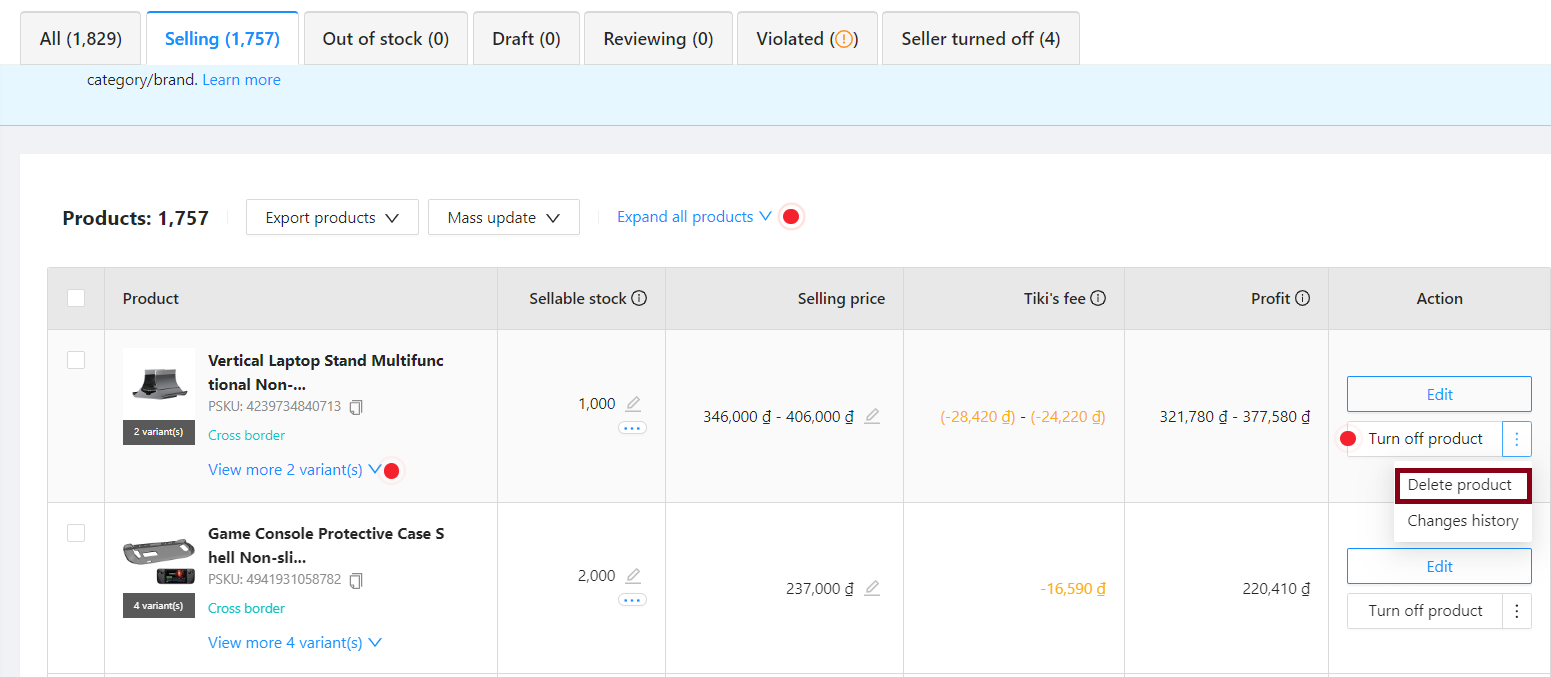
4. Delete product
Single product delete: in the Action column, the Seller clicks on the product to be deleted > Click on the vertical ellipsis, select Delete product.
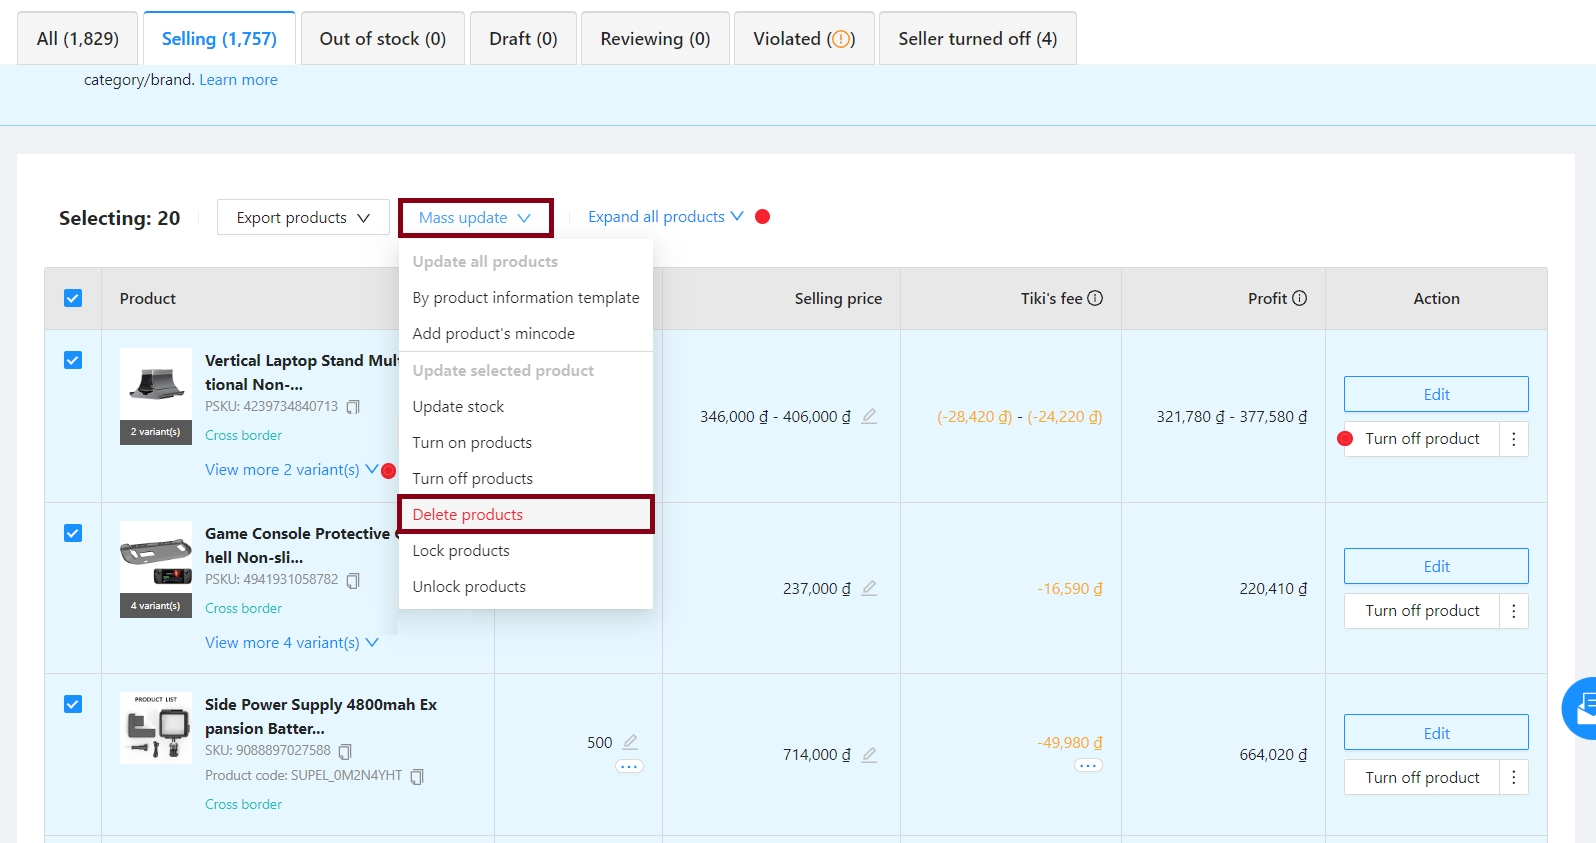
Mass product delete: Select products you want to delete, then from Mass update menu, select Delete products.
Note: When you delete a product, all product information and customer reviews for that product are entirely removed and cannot be recovered.
5. Add new options for current products
For products with no or more than 1 options, the Seller can add extra variants to the product by:
Step 1: In the Action column, the Seller clicks Edit immediately the product you want to add new variants.
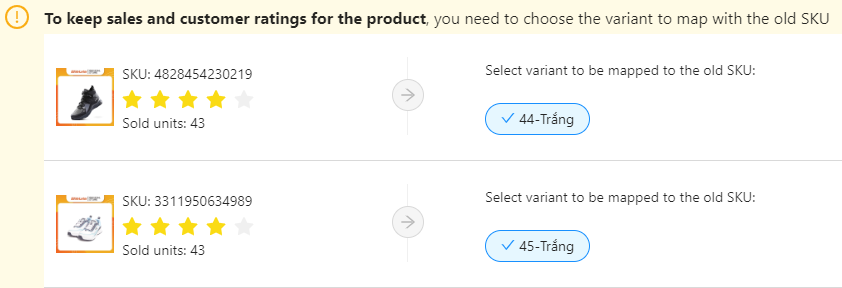
Step 2: Fill in information about options, price, inventory, product status, etc. similar to section I, step 3.1. Next, the system will default to an option (sub-product) or you can change accordingly to transfer all the sales and evaluation metrics of the old product to this new sub-product. This will help you to keep customer ratings of your products.
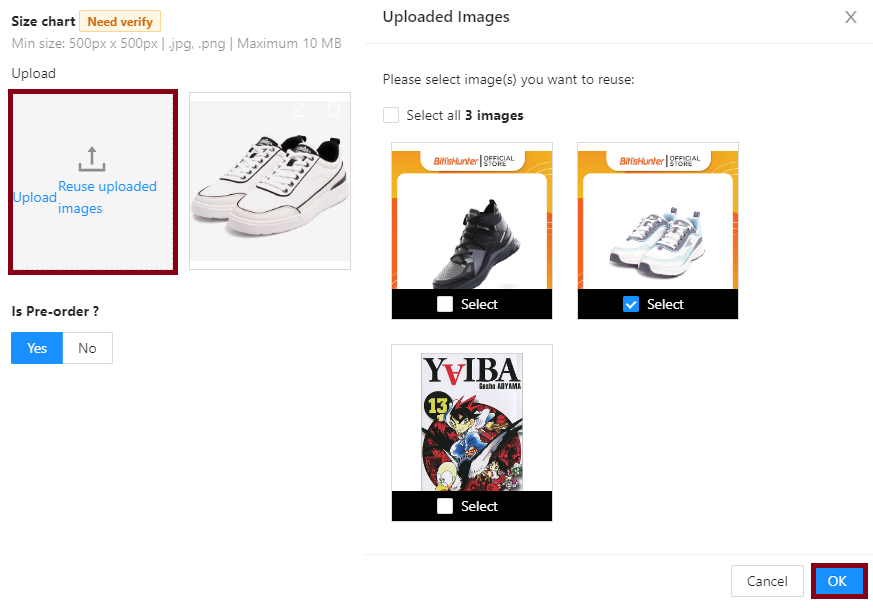
Step 3: At the Image section, please select Upload or Reuse uploaded photo > Click OK.
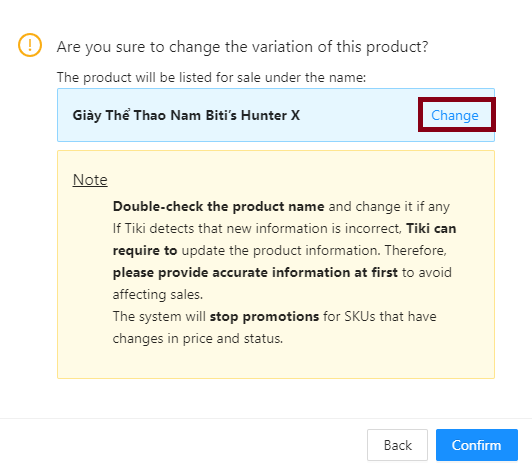
Step 4: Click Update > At this point, please click on the Change to rename the product according to the settings just installed > Check all information and click Confirm. The product with updated information will be available for sell on your store immediately.
Notes:
For multiple option products where one or more variants are defective/out of stock/no longer in need of business, you can hide/disable the old variant and create a new one (Edit/delete variants feature will be updated by Tiki in the near future).
Products with limited visibility/violation will not be able to add new variants.
6. Mass update of categories/products/documents for Draft products
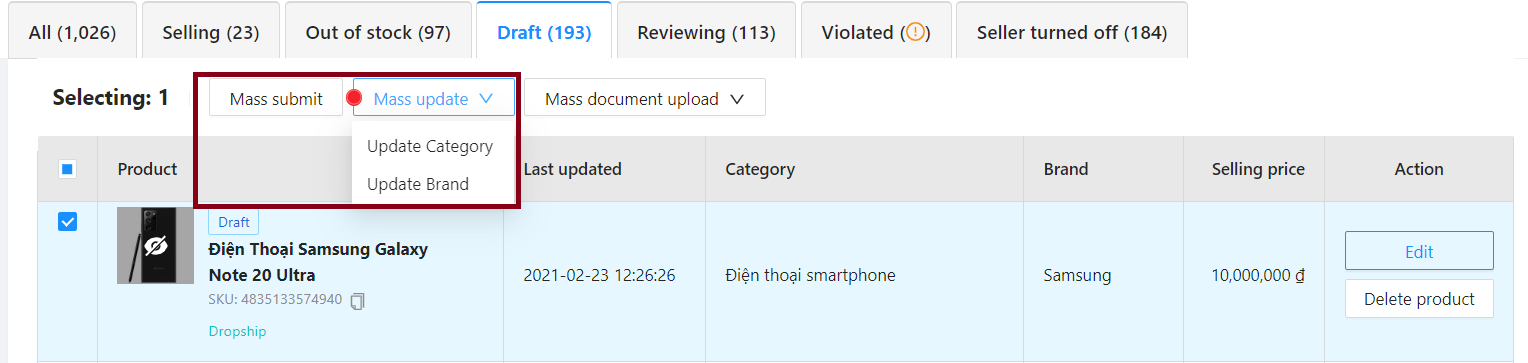
6.1 Mass update of Categories / Brands
If there are many products that need to be submitted for review or need to be updated in mass (Category/Brand), the seller selects the product and clicks Mass submit/Mass update.
Update Category: Select Mass Update > Update Category > Select the bottom-level category in bold > Click Update.
Update Brand: Select Mass Update > Update Brand > Search for brands > Click Save.
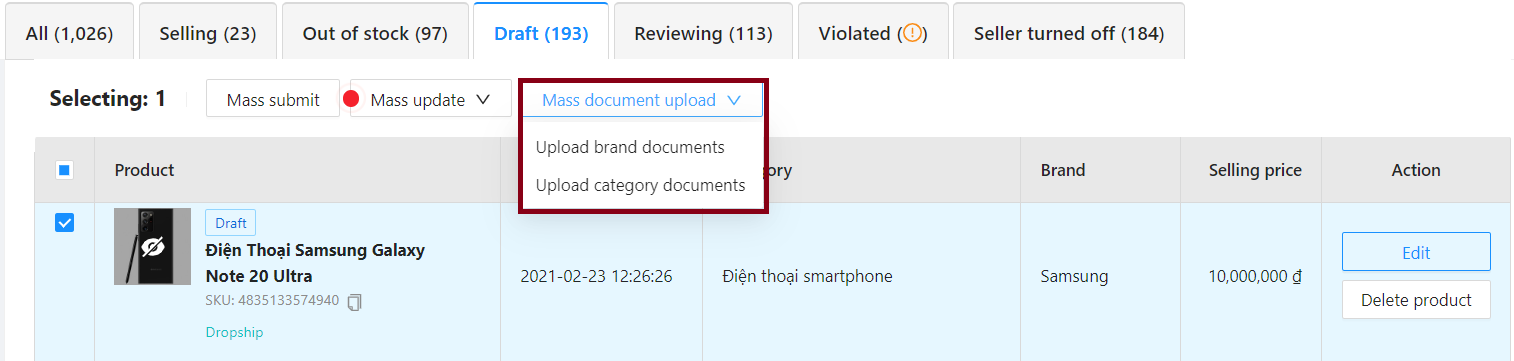
Tip: After the update, sellers continue to use the Mass document upload feature to add documents faster and easier.
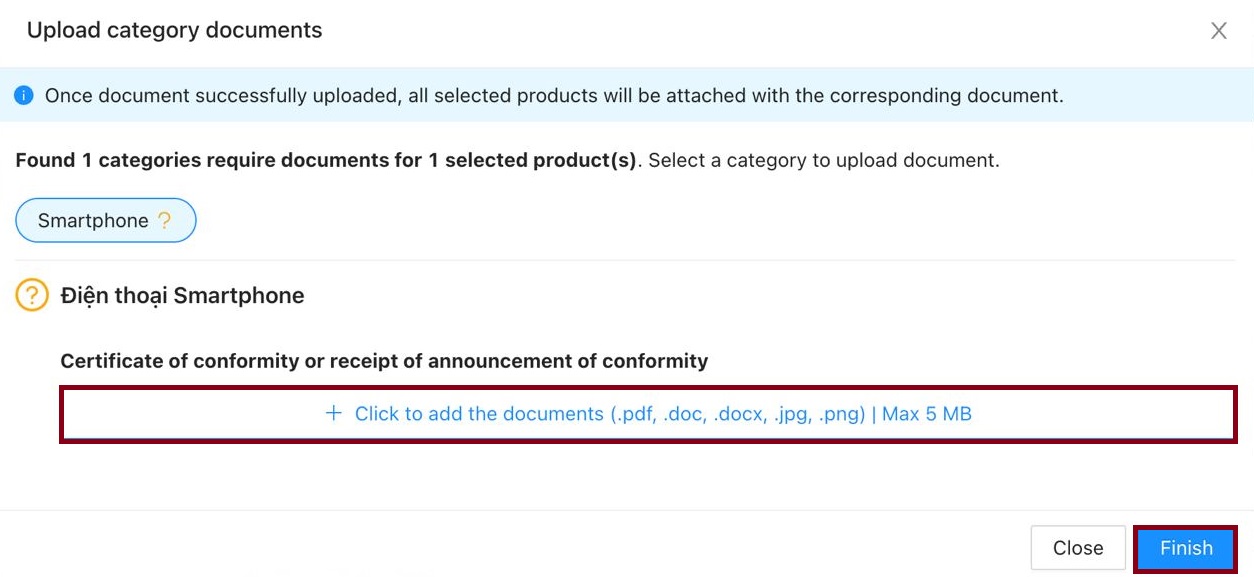
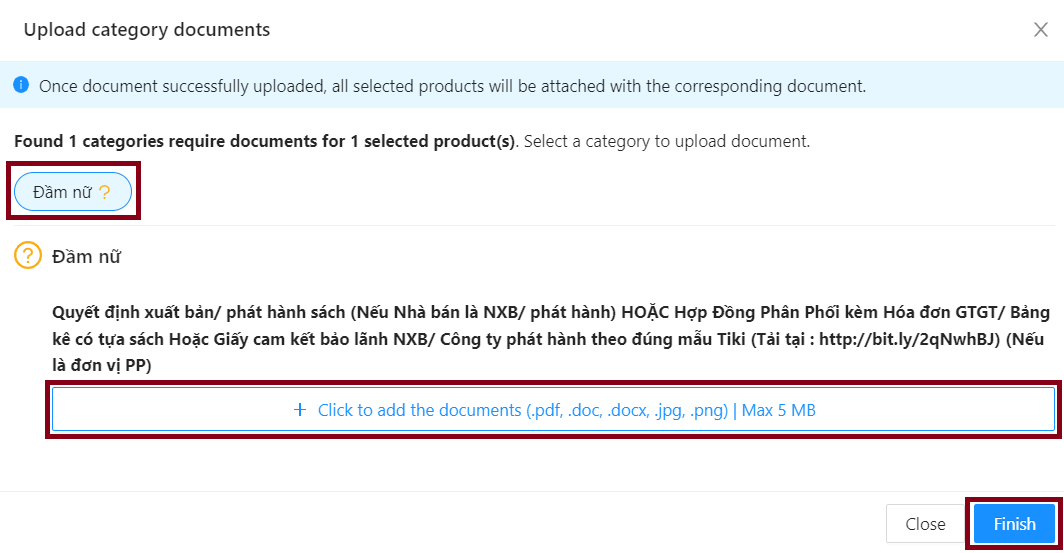
6.2 Mass document upload: Seller can mass upload documents (Brand/Category) for selected products.
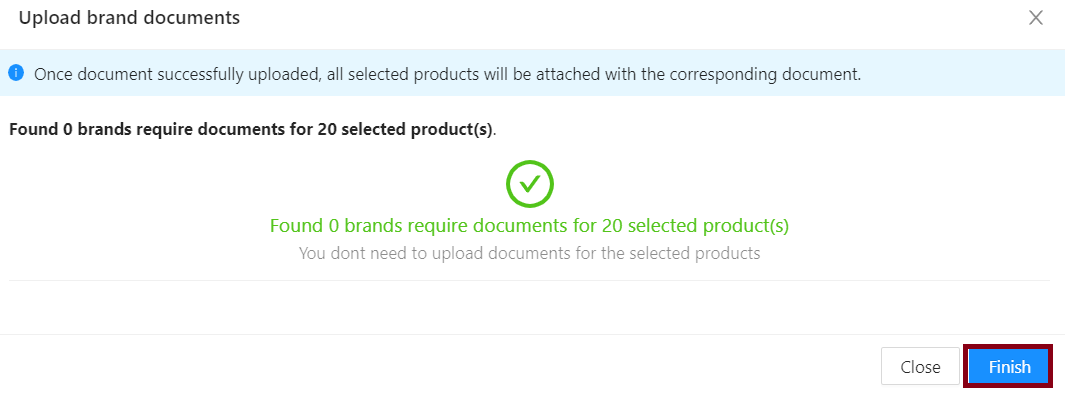
7. Submit product review:
If there are many products to submit for approval, the seller selects the products and Mass submit.
8. Update product information
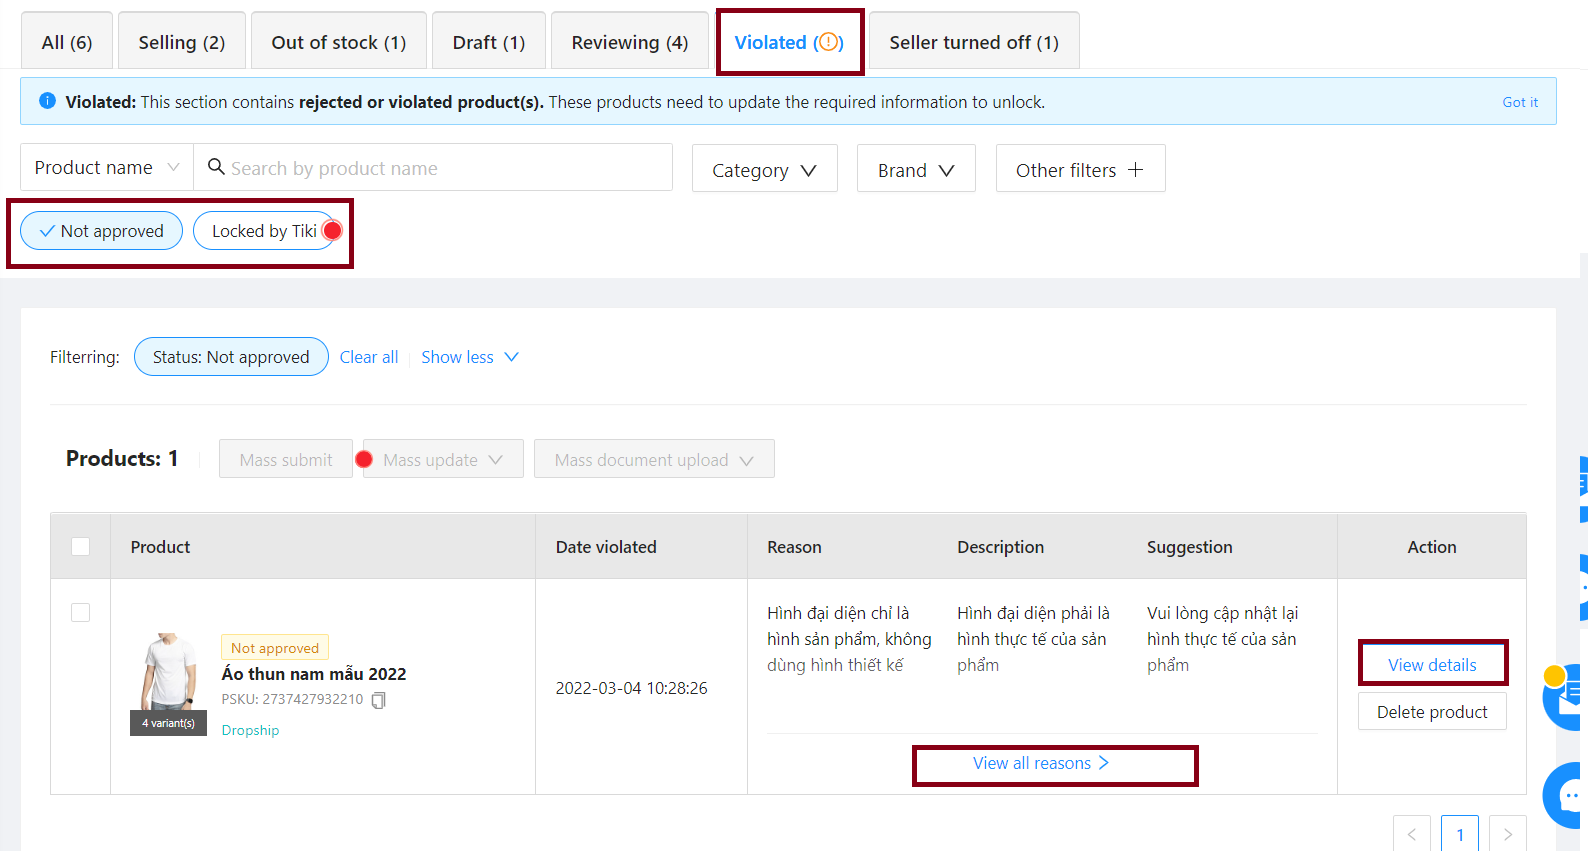
When a product violates Tiki’s regulations, the seller receives a notification via email or at the Product List page. To return the product to its normal state, the seller takes the following steps:
Step 1: Go to Seller Center, select Product > Product List. At the Violated tab, 2 categories will be displayed: Not approved, Locked by Tiki. Seller clicks View all reasons > In the Action column, click View details to adjust. Please also use Google Translate to help you.
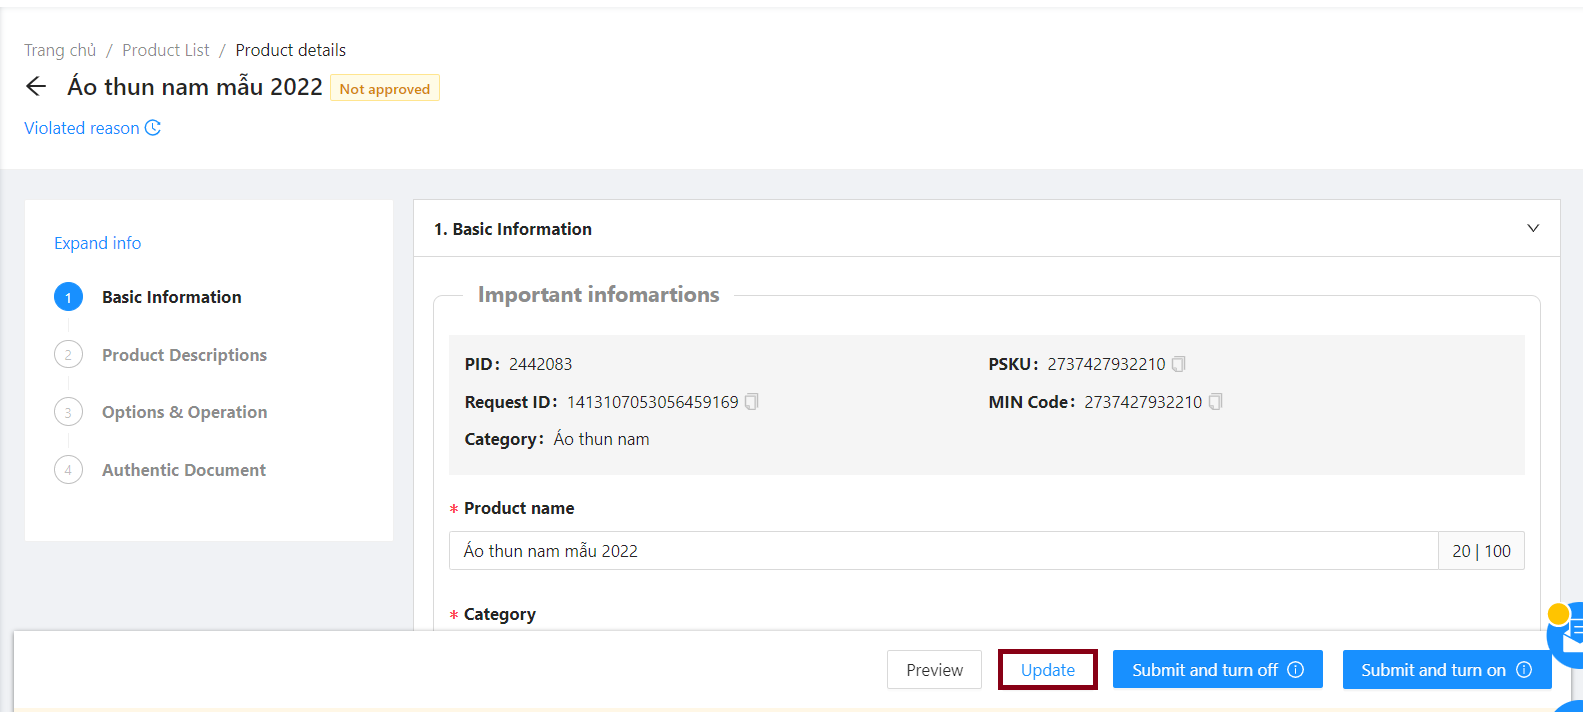
Step 2: After adjusting, click Update to submit for review. After the system approves successfully, the seller’s product will return to its normal state.
 9. Update other product attributes
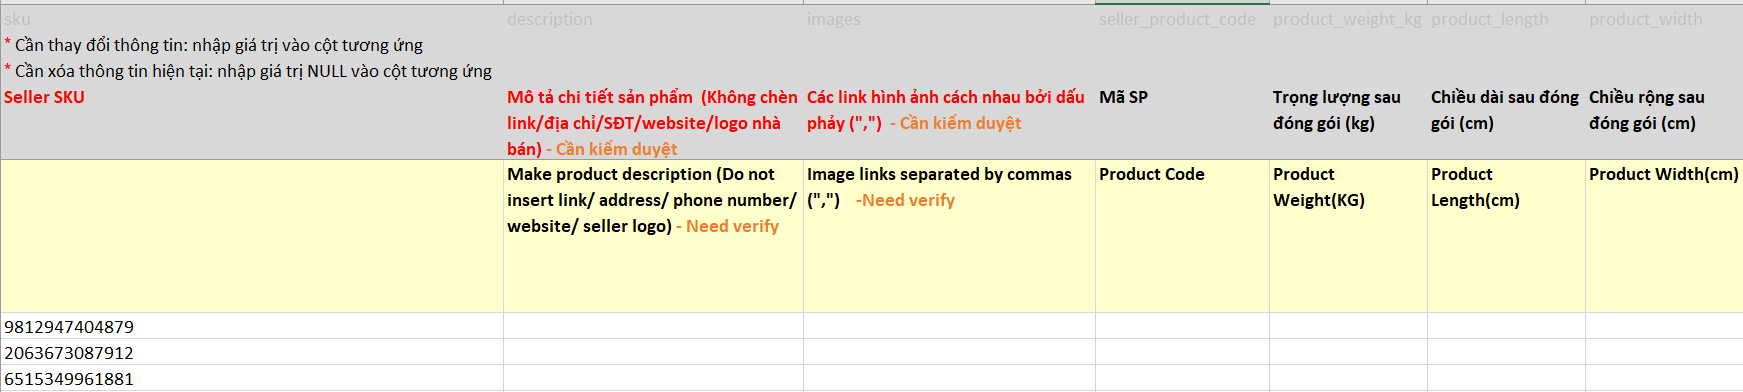
Sellers can mass update the following product attributes: SKU, Description, Image, Product Code, Weight, Size,…
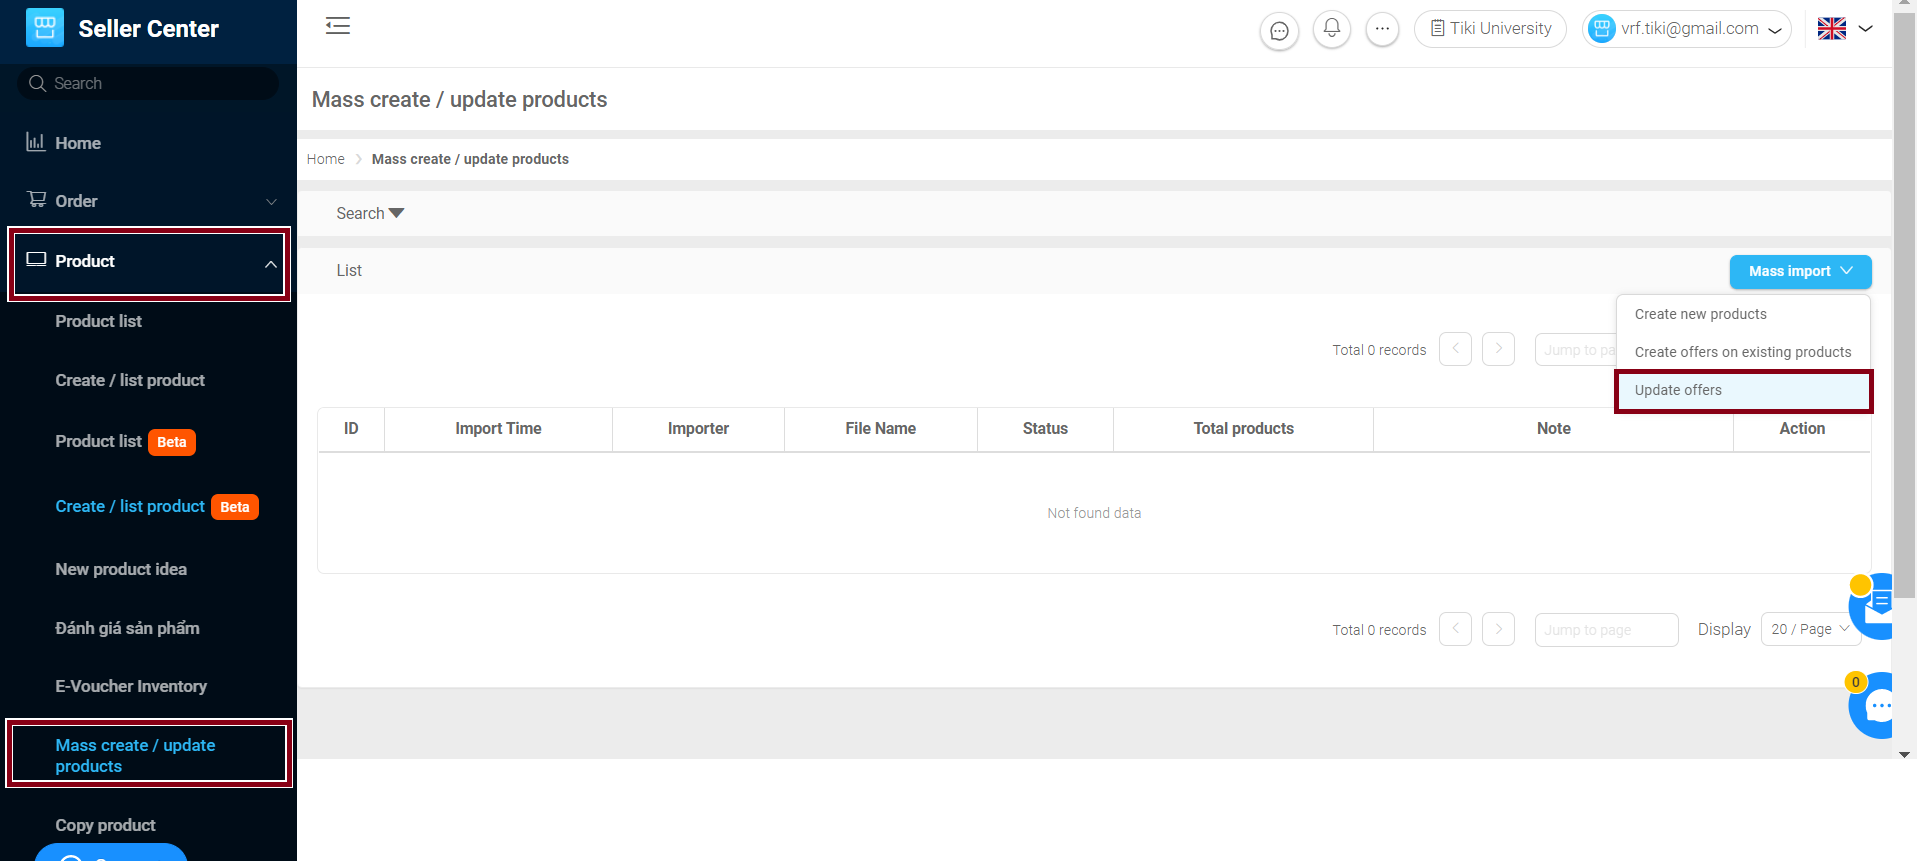
Step 1: At Seller Center, select Product > Mass create/update product
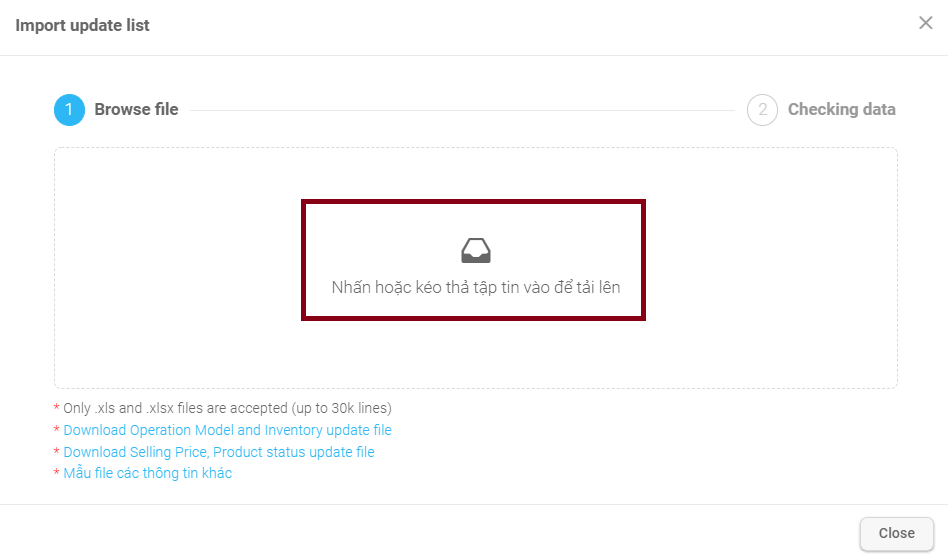
Step 2: On the screen that appears, select Mass import > Update offer.
Please then select to download a sample file for other information (Mẫu file các thông tin khác).
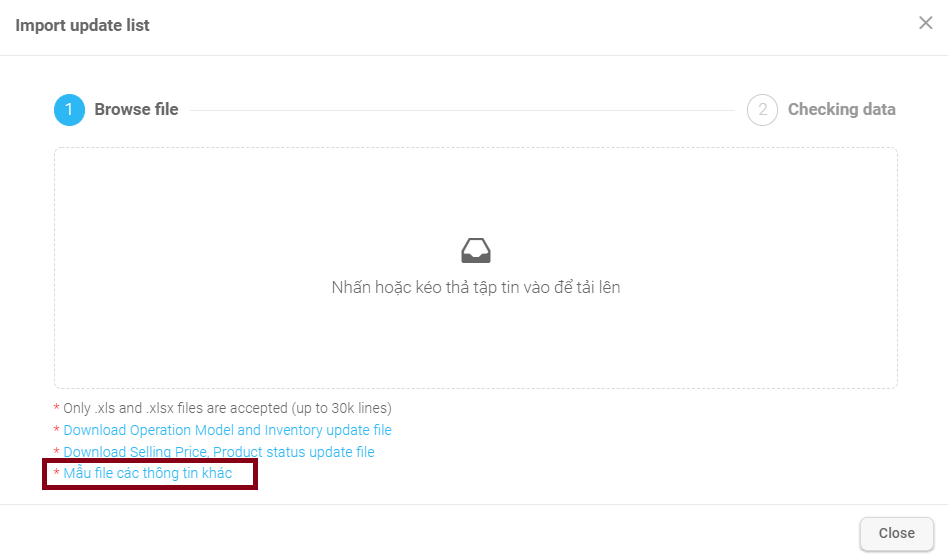
Step 3: Open the downloaded file and edit the information according to the instructions.
Step 4: Save your Excel file, then upload it back to the system following the window in Step 2 (above).
Note: You cannot use this feature to update attributes such as: Category/Brand/Product name. Only criteria available in the file can be updated.
Product listing limit is the maximum number of products a seller can list for sale and be displayed.
Product limit for new sellers (The seller has operated on Tiki for < 45 days and has less than 100 orders/month): Up to 5000 active products (Disabled/Enabled by the seller). Products that DO NOT count towards the limit include: Products permanently locked by Tiki/Hide by Seller.
Limit for current sellers (The seller has operated on Tiki for > 45 days and has more than 100 orders/month): Up to 20,000 active products.
Product limit is calculated on active SKUs.
If the product listing limit is exceeded, the system will block the product listing tool.
The total number of products on the new Product list will be calculated by the number of main product units (if a product has multiple variations, it will still be counted as 1 product unit). If you find a difference in the total number of products on the new Product list compared to the old one, please kindly skip it.
In case you mass upload products by Excel files: When you export data, the system still shows product information for each SKU (if a product has multiple variations, each variant is counted as a SKU and shown on an Excel row). Please put this in mind to set correct product information.