

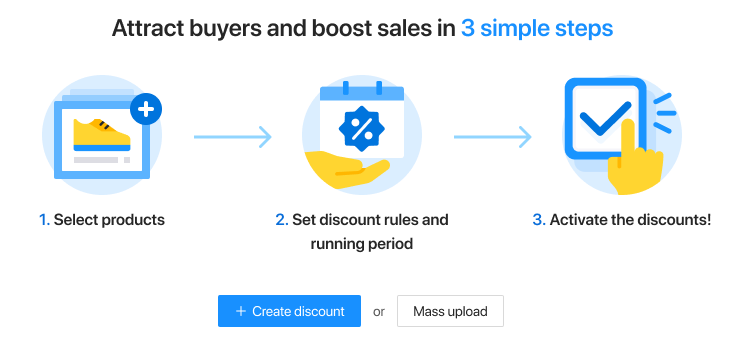
One of the most fundamental advertising techniques is applying discounts on products. This feature enables sellers to offer attractive promotional deals for their products, encouraging customers to make orders as soon as possible.
There are two major sections:
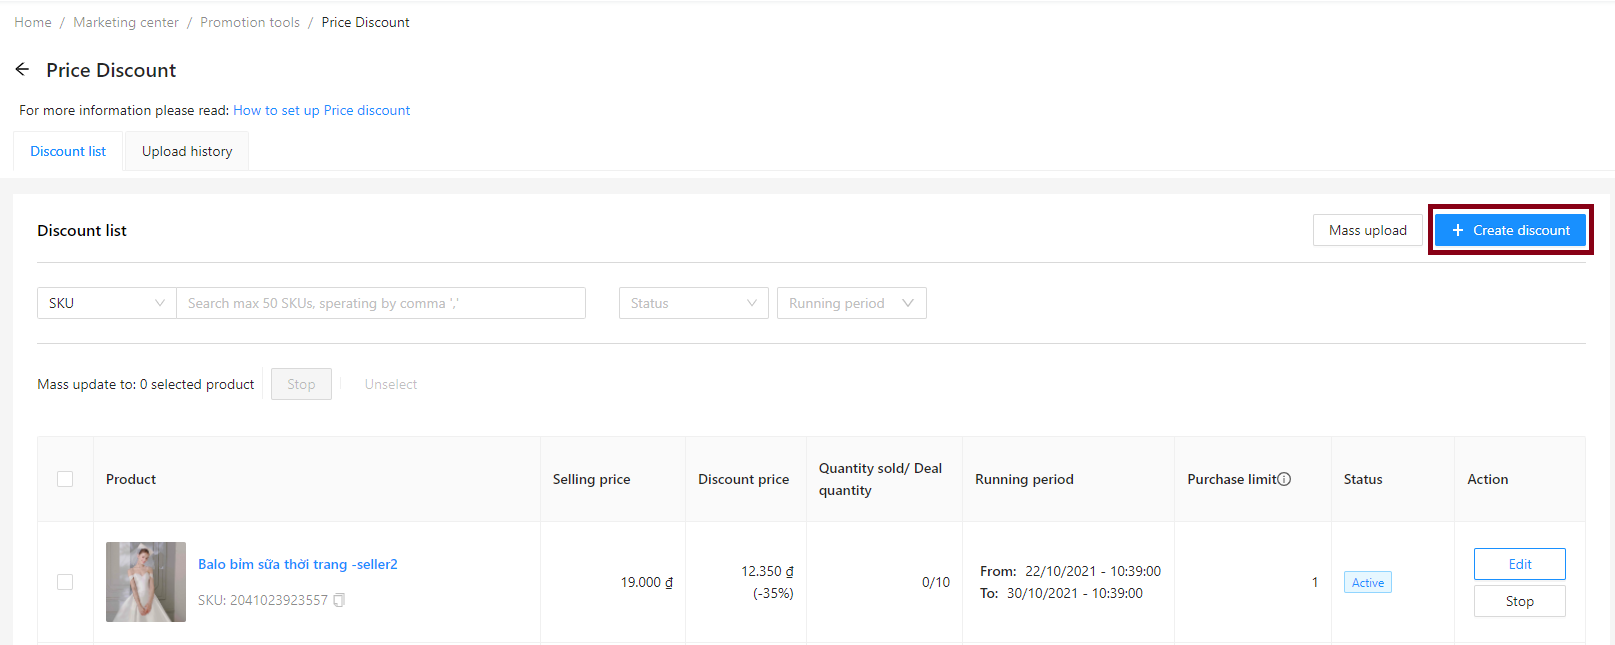
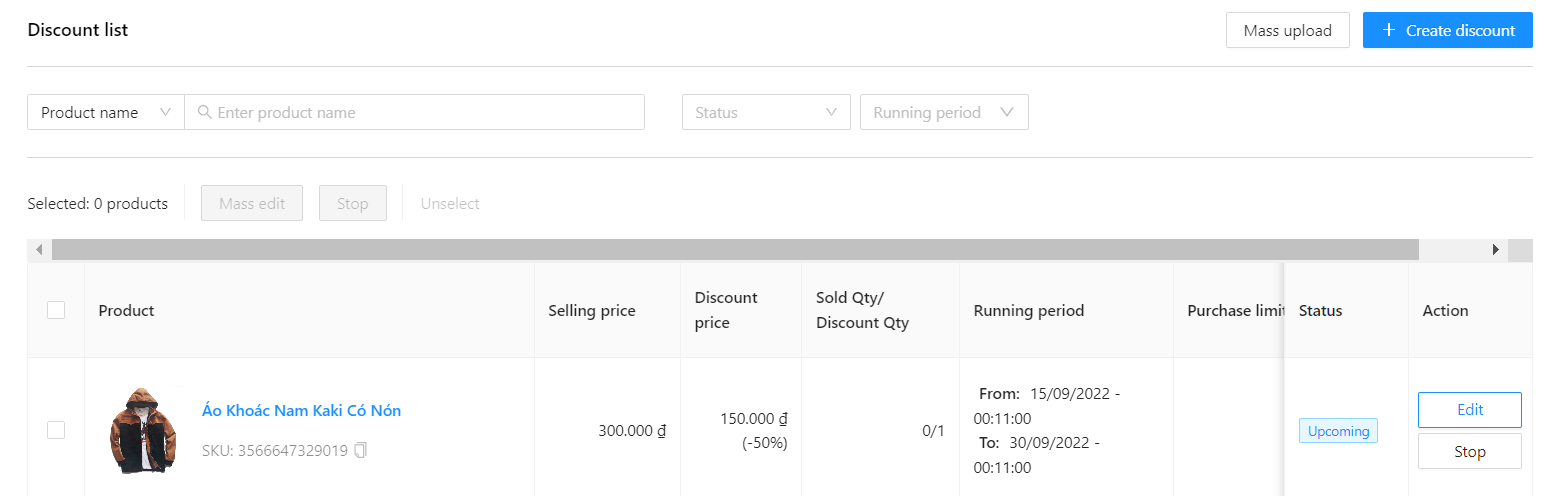
1. Discount list: Displays a list of created discounts that the seller can edit or stop before the last day of promotion.
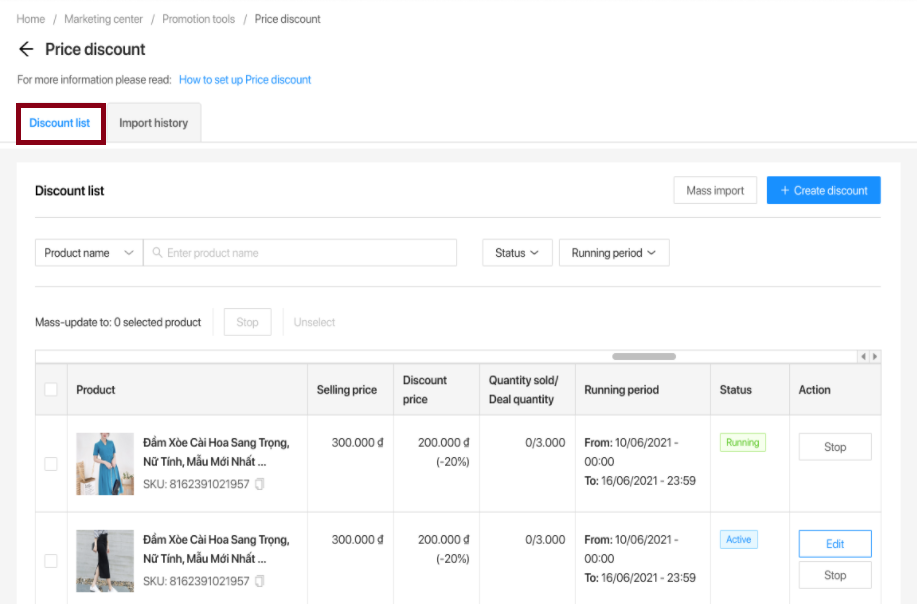
2. Import history: Displays the list of deals uploaded. Allow you to manage and download the rejected/completed product list.

Method 1. Create deals using the Price discount tool from Seller Center web interface
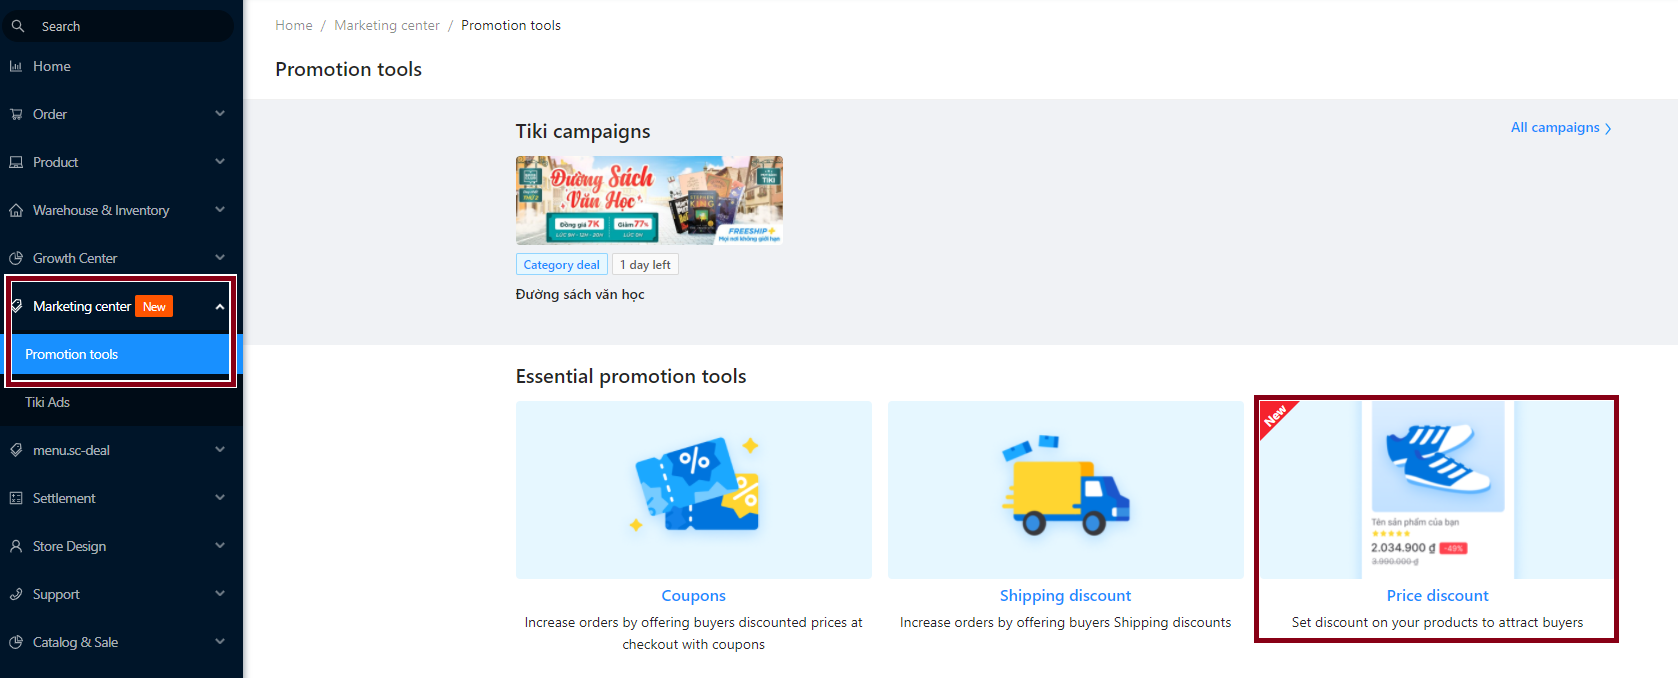
Step 1: Log in to the Seller Center > Choose Marketing center > Select Promotion tools > Price discount
Step 2: The system will navigate to the Price discount section, select Create Discount. The product list only displays products that are “On” and in stock.
You can input the SKU and choose the category in the search box.
Choose the product to add from the left panel, then click on the “+” button or select Select entire page to add it to the right panel. You can add up to 100 SKUs.
To remove a product, choose it from the right panel and click on the “x” button or Unselect all.
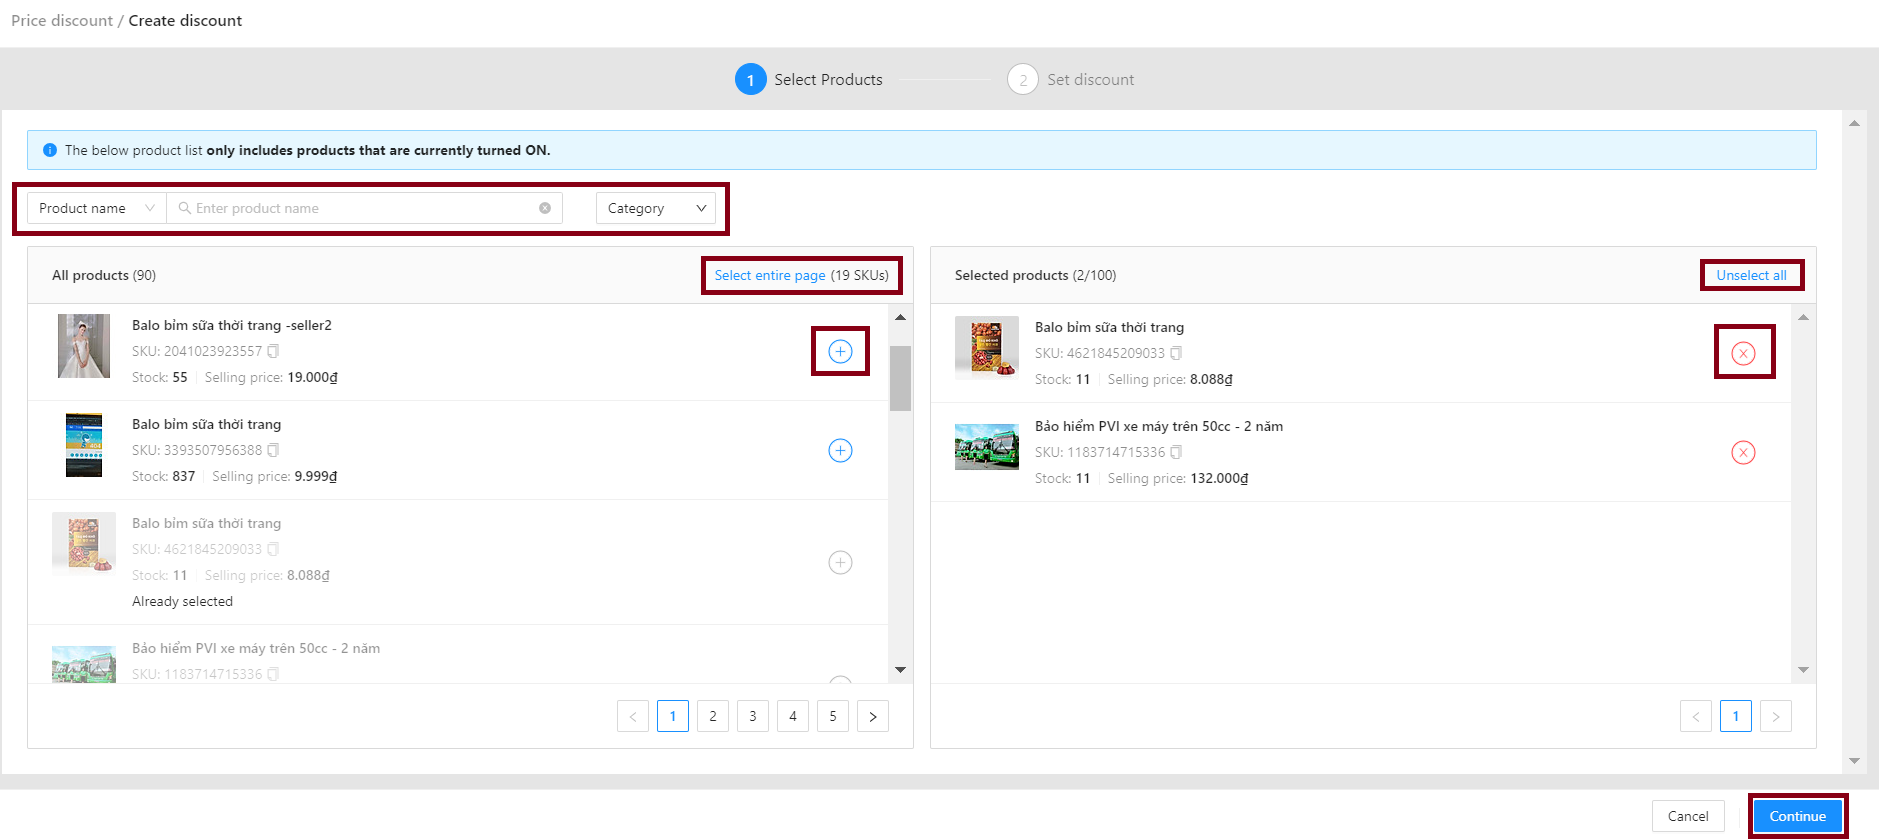
Then, click Continue to establish the discount price and deal quantity.
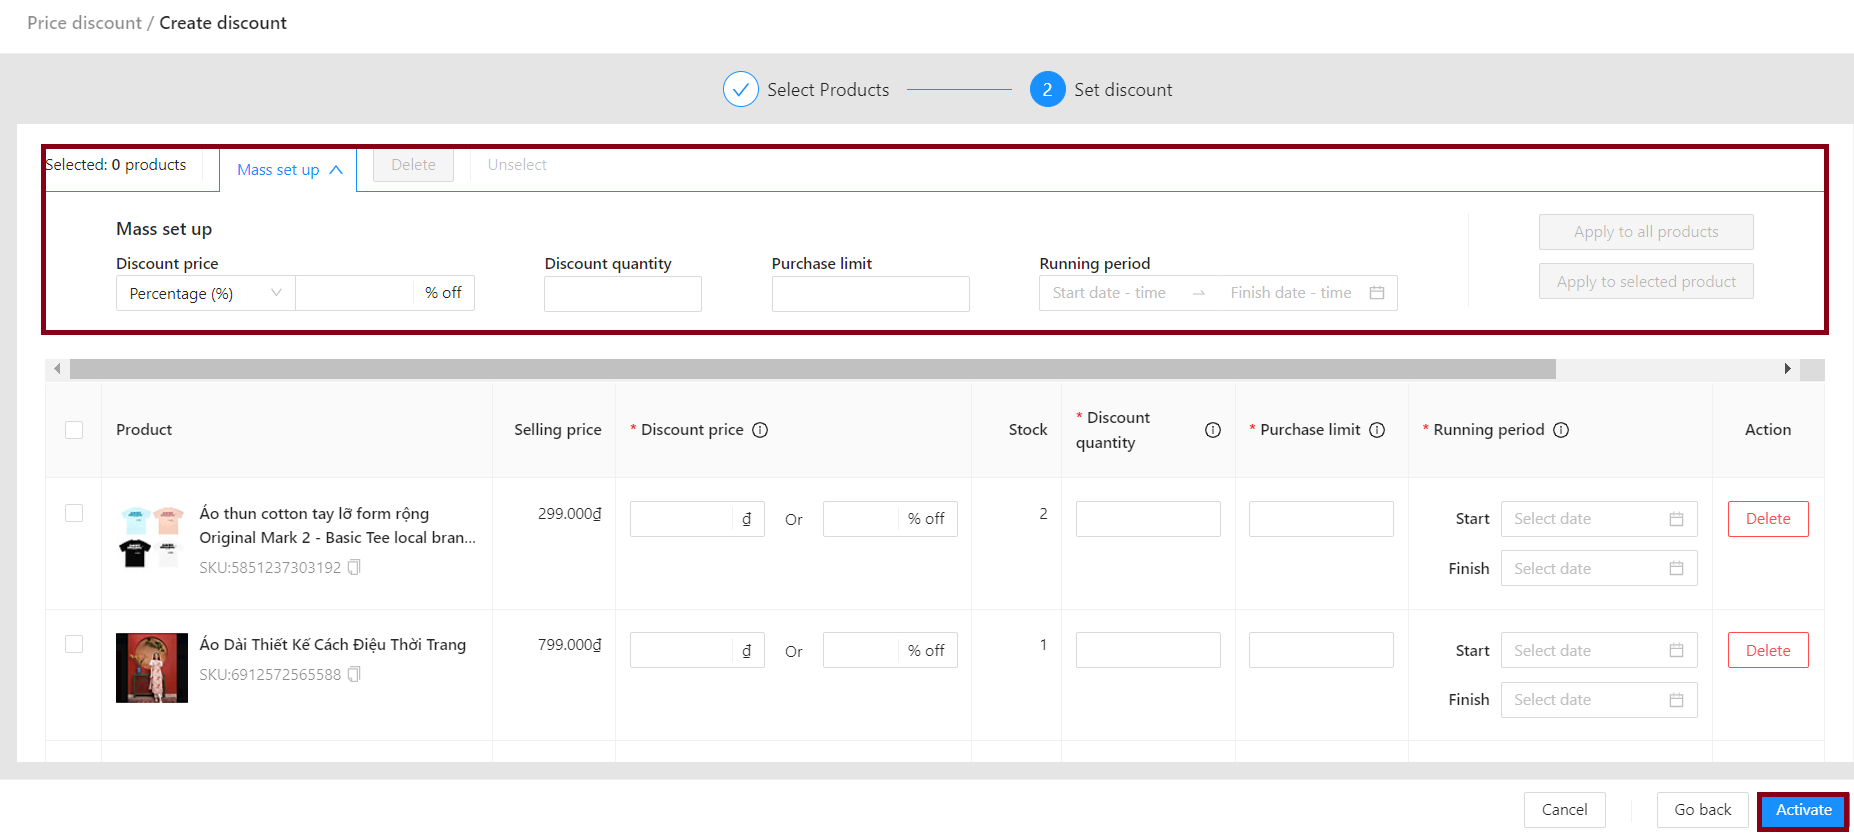
Step 3: Please enter discount information for selected products in step 2, including:
Discount price: Can be set by exact amount or by % of product selling price. The price after discount is not less than 50% of the selling price.
Discount quantity: Please fill in the desired quantity of discount products. Note that this item will not be editable after you click Activate.
Purchase limit: The maximum number of products that a customer can buy on the same order.
Running period: Choose the start and end time, the interval is not more than 180 days.
If the seller want to input information for many products at the same time, select Mass set up and enter the information as above, then choose 1 of 2 options:
Apply to all products: to apply the entered parameter to all products in the list, or;
Apply to selected products: to apply the entered parameters to the products that have been selected by the Seller.
After that, at the Create discount window, fill in the basic information, then click Activate.
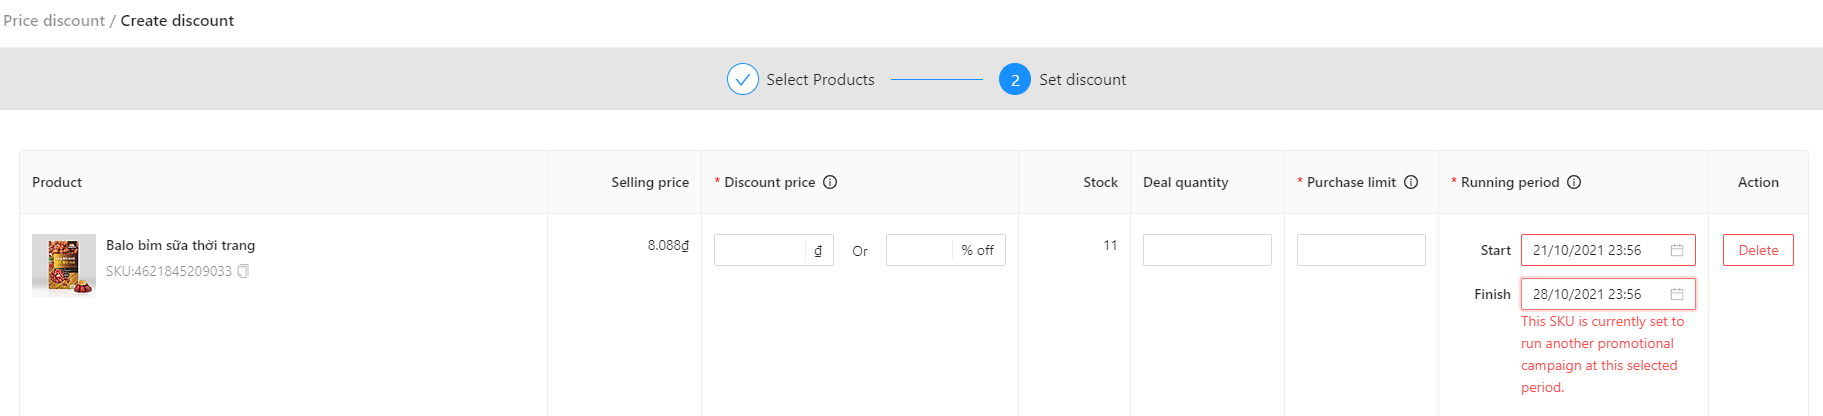
The failure of the discount installation could be caused by a number of factors:
The discount price is less than 50% of the selling price.
The start time is later than the end time.
You set the start time of the discount to be sooner than the time you click Activate (to create discount). For example, the seller sets the discount to start at 11:30 am, while the time when the seller clicks Activate is 11:45 am. You will then need to reselect a start time further in the future.
The product that is setting up a discount was previously created to run the sale for the same period of time. Sellers need to check if their products have been previously discounted in the Discount List section.
Step 4: The product, after being successfully installed with a discount, will appear in the Discount list.
Method 2. Mass deal set up using Excel file
Sellers can create discounts by using Excel spreadsheets to mass upload and manage imported files as follows:
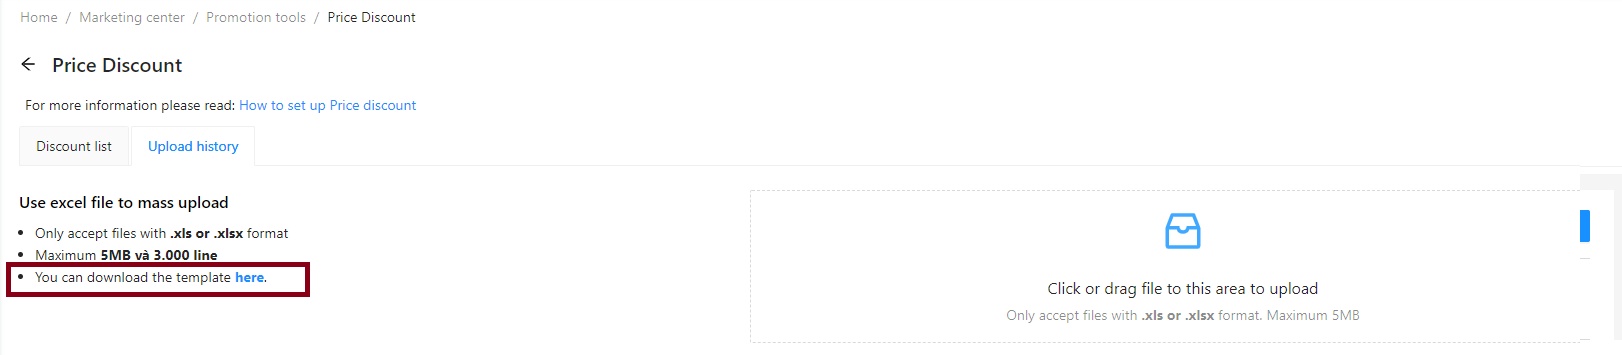
Step 1: Go to the Seller Center and choose Marketing center > Promotion tools > Price discount > Upload history.
Step 2: At the Upload history section, please find the text as marked below and click on the word “here”.
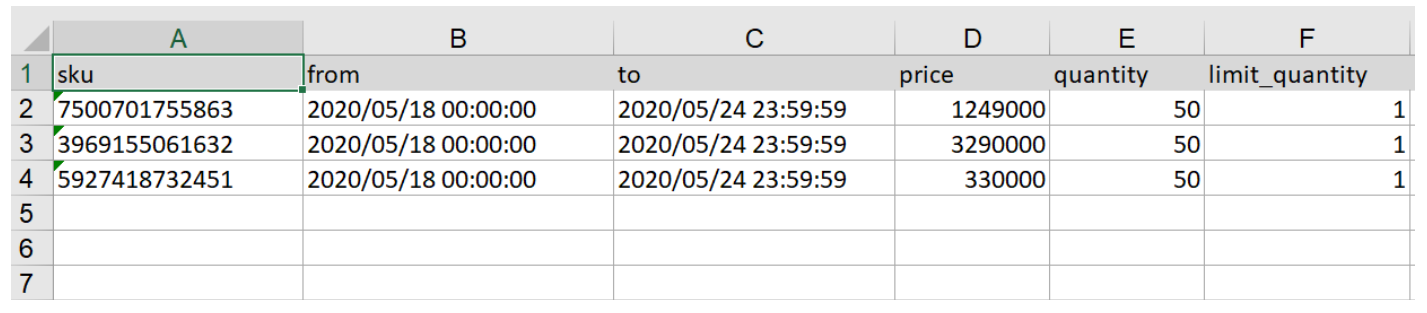
Step 3: Fill in required information. You can learn more about price setting rules at section 1.Creating a deal.
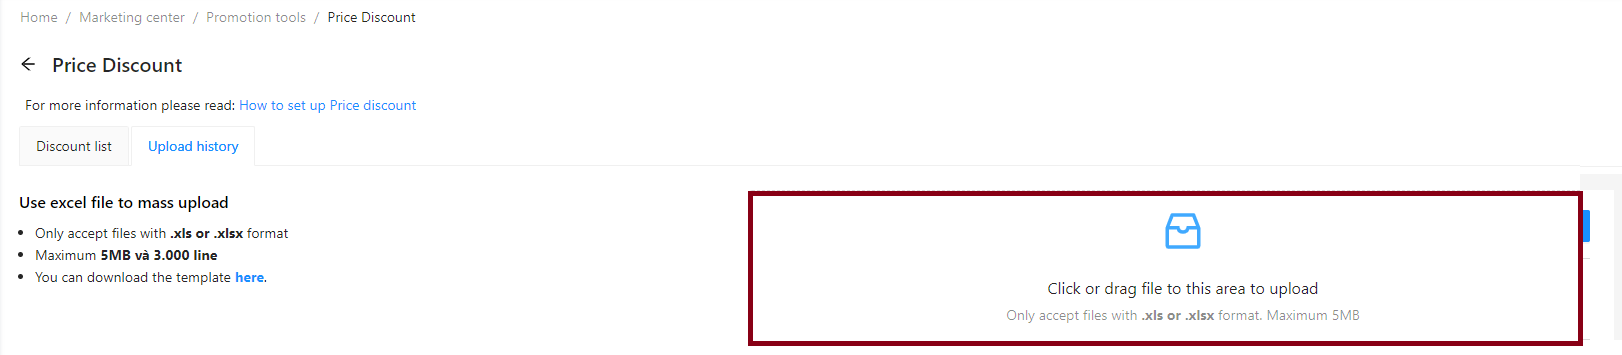
Step 4: Drag or drop the updated file as shown in the picture below.
Note:
Only .xls or .xlsx formatted files are accepted.
A maximum file size of 5MB with 3,000 lines is allowed.
Filters, hidden sheets, and multiple sheets should not be included in the file.
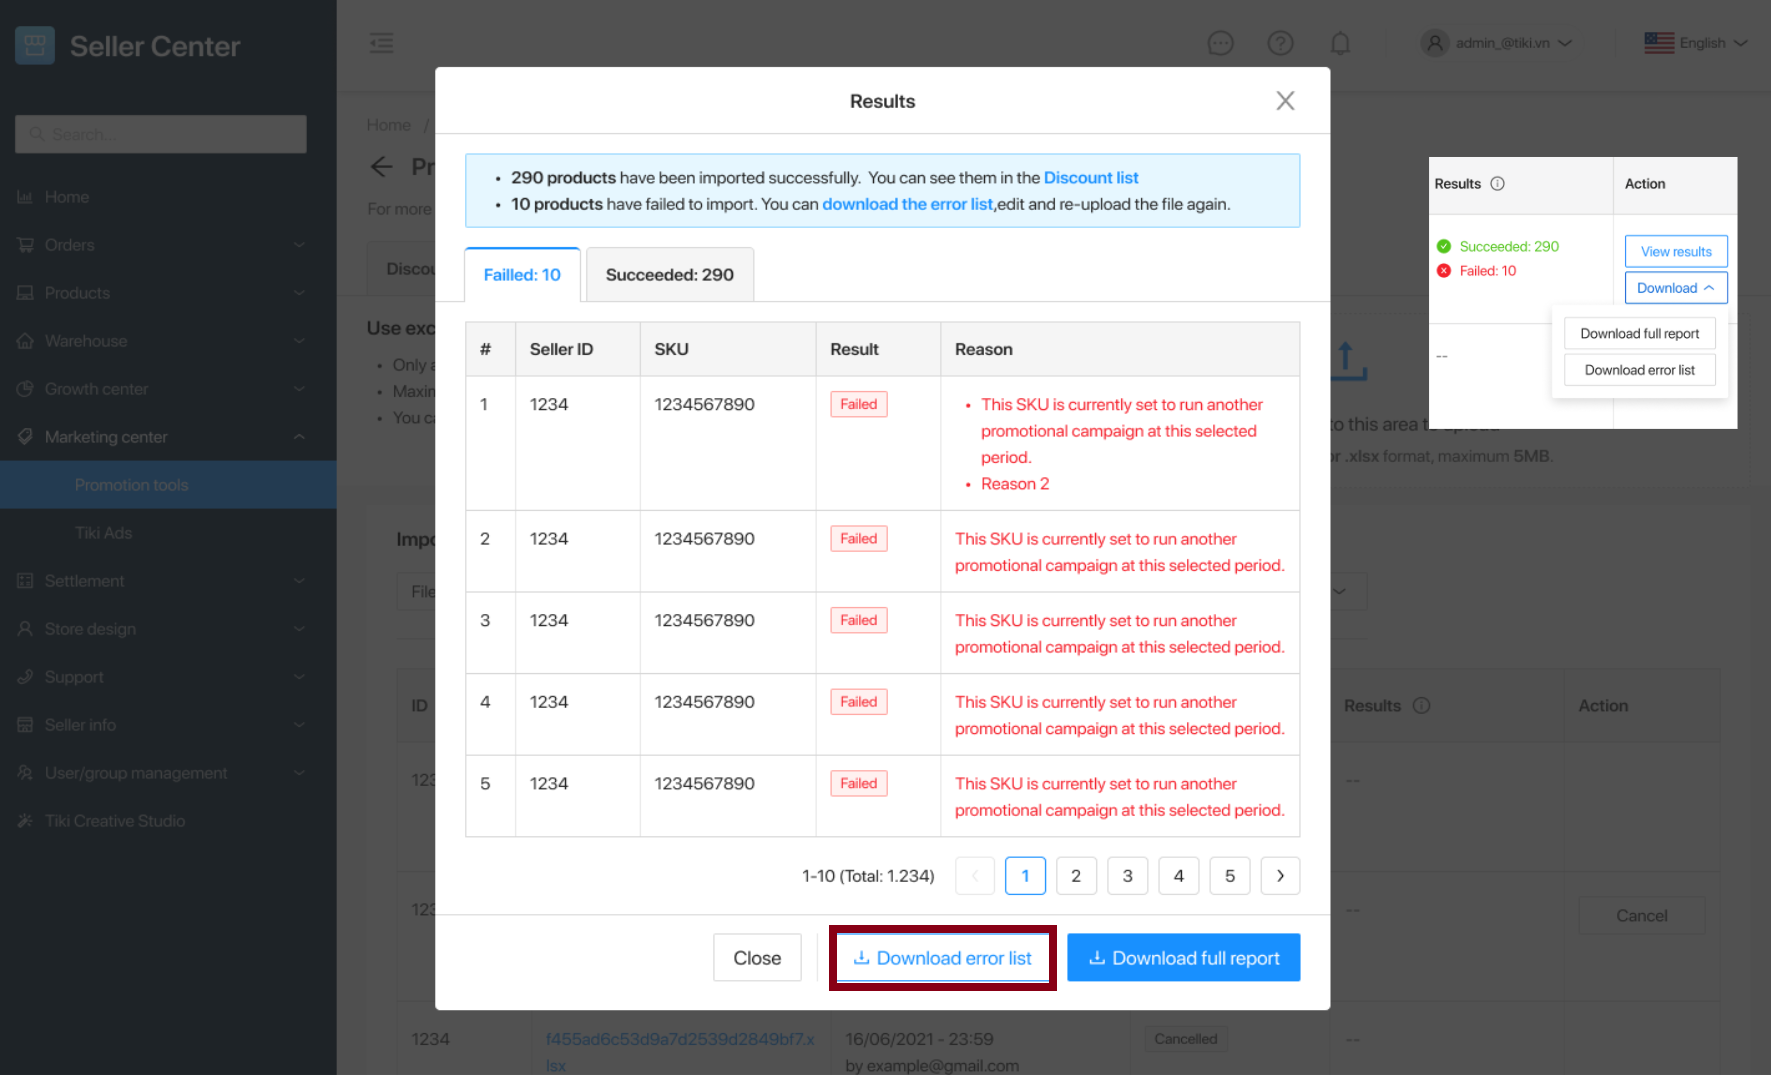
Step 5: Check the upload status.
By entering file ID, Uploader, Status, and Upload Time, you can filter and search uploaded files.
The number of approved and disapproved products is displayed in the Results column.

Succeeded: The product was imported and displayed in the Discount List.
Failed: The product was rejected by the system. At the Action column, select View results, then choose Download error list to save the file to your computer and make modifications before re-uploading.
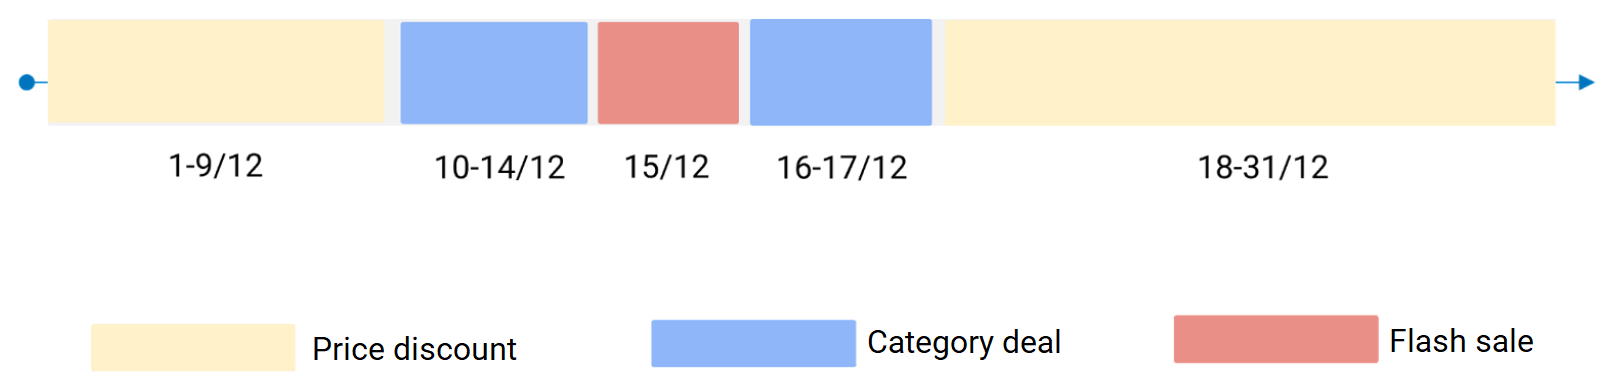
Tiki will prioritize the following product promotions in order to ensure that they reach customers in the best and most consistent way possible:
1. Flash sale – Top priority
2. Category deal – Second priority
3. Price discount – Third priority
When a product participates in more than one promotion with partially or completely overlapping running times, the system will use priority to determine which promotion is applicable at any time, allowing the seller’s promotions to run continuously. When a campaign’s runtime expires, the system will continue to trigger the next lower-priority campaign.
Examples:
Product A participates in Flash sale on December 15
Product A participates in Category deal continuously from December 10 to December 17
Product A participates in Price discount continuously from December 1 to December 31
Based on priority, promotions will be applied to product A in stages as follows:
At any given time, the seller cannot register more than one campaign for each type of promotion (Flash Sale, Category Deal, or Price Discount). The system will notify you if you register for the same campaign twice.
Depending on the status of the discount (Active or Running), sellers can:
|
Deal status |
Description |
Action |
|
Upcoming |
The discount has been set up and is ready to go. |
Edit deal Stop deal |
|
Running |
The deal is running. |
Stop deal |
|
Paused |
Because the product is currently active in another deal, the deal has been paused. |
Stop deal |
|
Sold out |
Deal quantity is sold out. |
– |
|
Expired |
The deal running time is over. |
– |
|
Stopped |
The discount is terminated for a variety of reasons, including the seller terminating the deal, the product being out of stock, the product being turned off, and so on. |
– |
Detailed instructions:
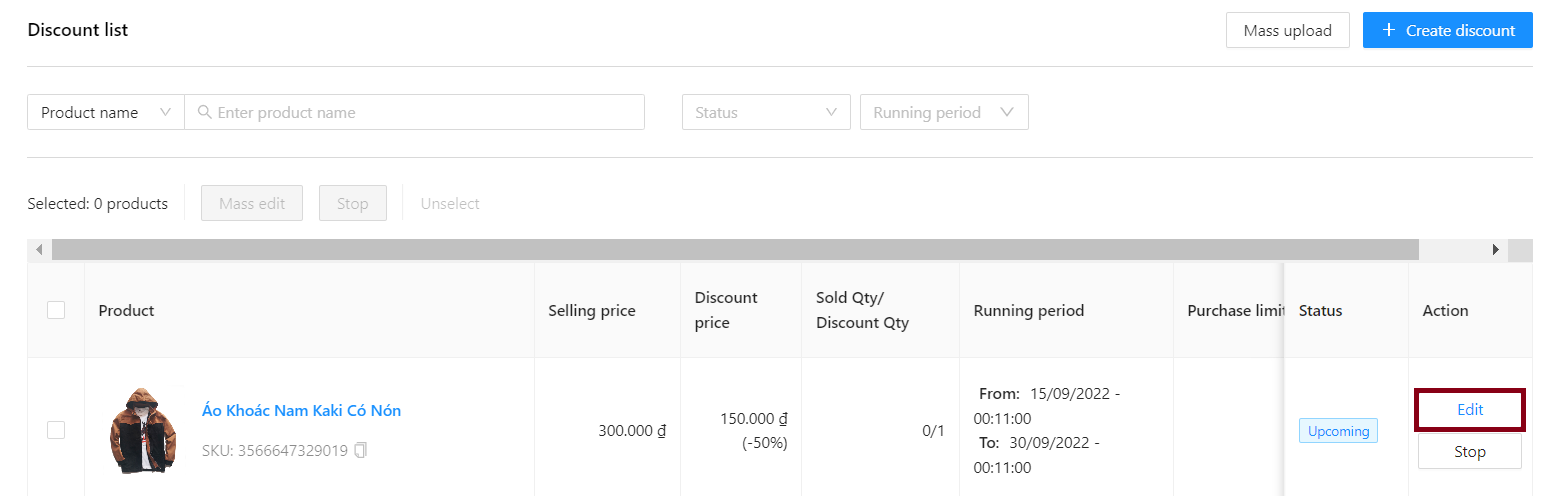
1. Edit discount
1.1 Single product edit
Editable items include: Discount price, Purchase limit, and Start/Finish time. Deal quantity cannot be edited.
Seller selects Edit in the Action column corresponding to the discount to be performed. After filling in the information to be edited, click Update.
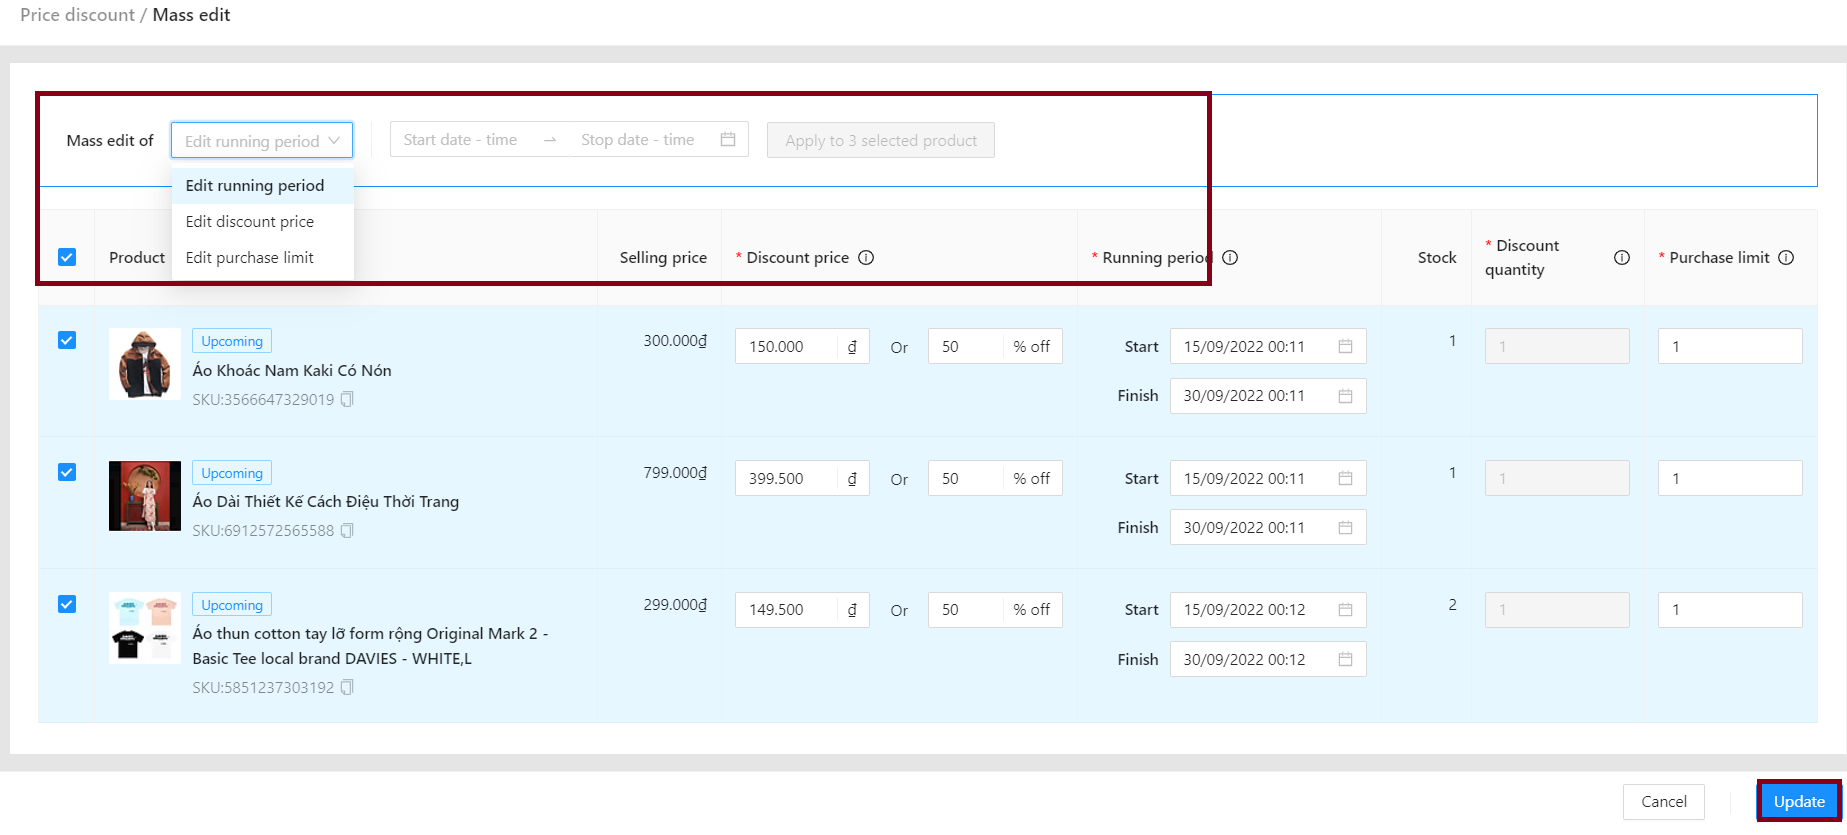
1.2. Mass edit
At the Discount List, choose the products that need to be edited. If you need to edit more discounts, you can click through the following pages and continue to do bulk selection (up to 100 discounts at a time). Then click Mass edit.
Editable items include: Running period, Discount price, Purchase limit. The Discount quantity cannot be edited.
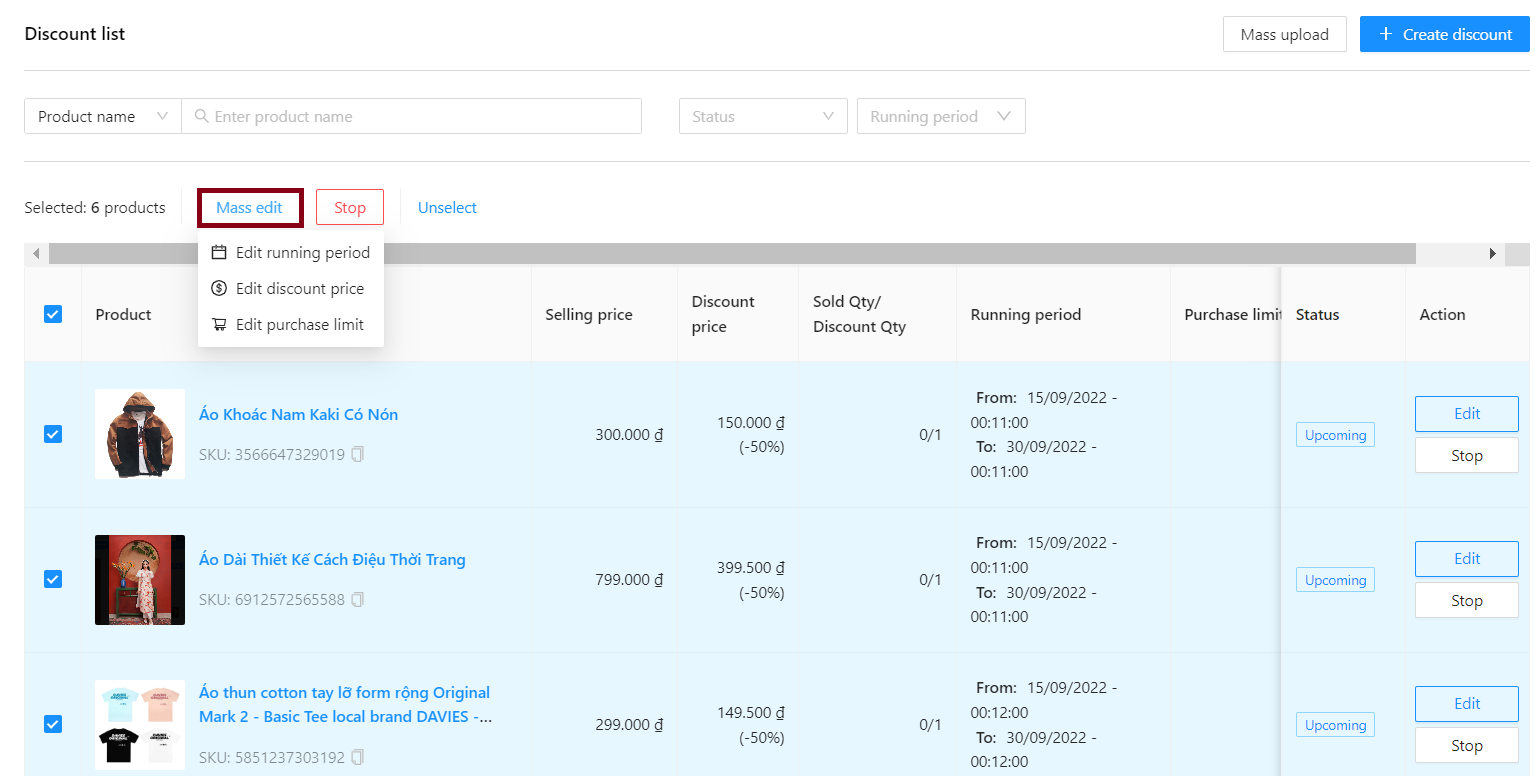
Please fill in the new information for the deals then click Update.
2. End discount
2.1 End discount for each product
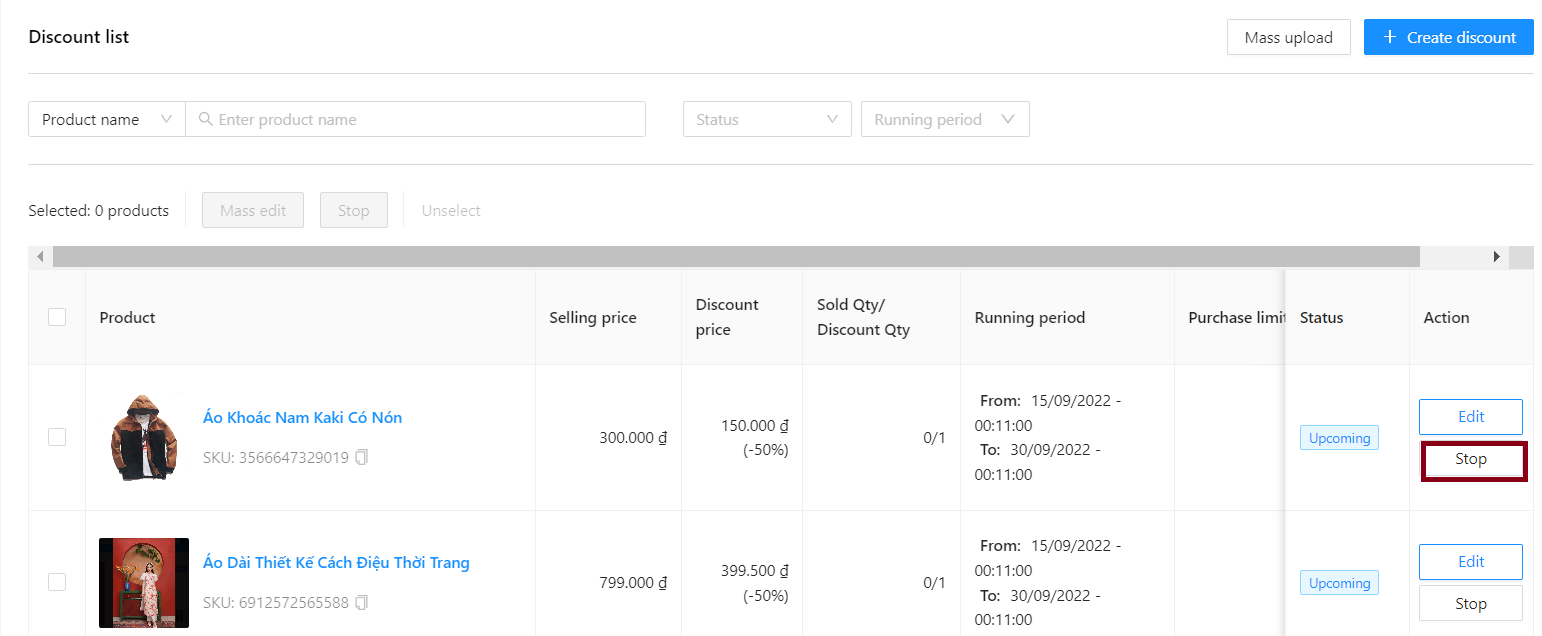
Seller selects Stop in the Action column corresponding to the discount to be performed. Then click Confirm.
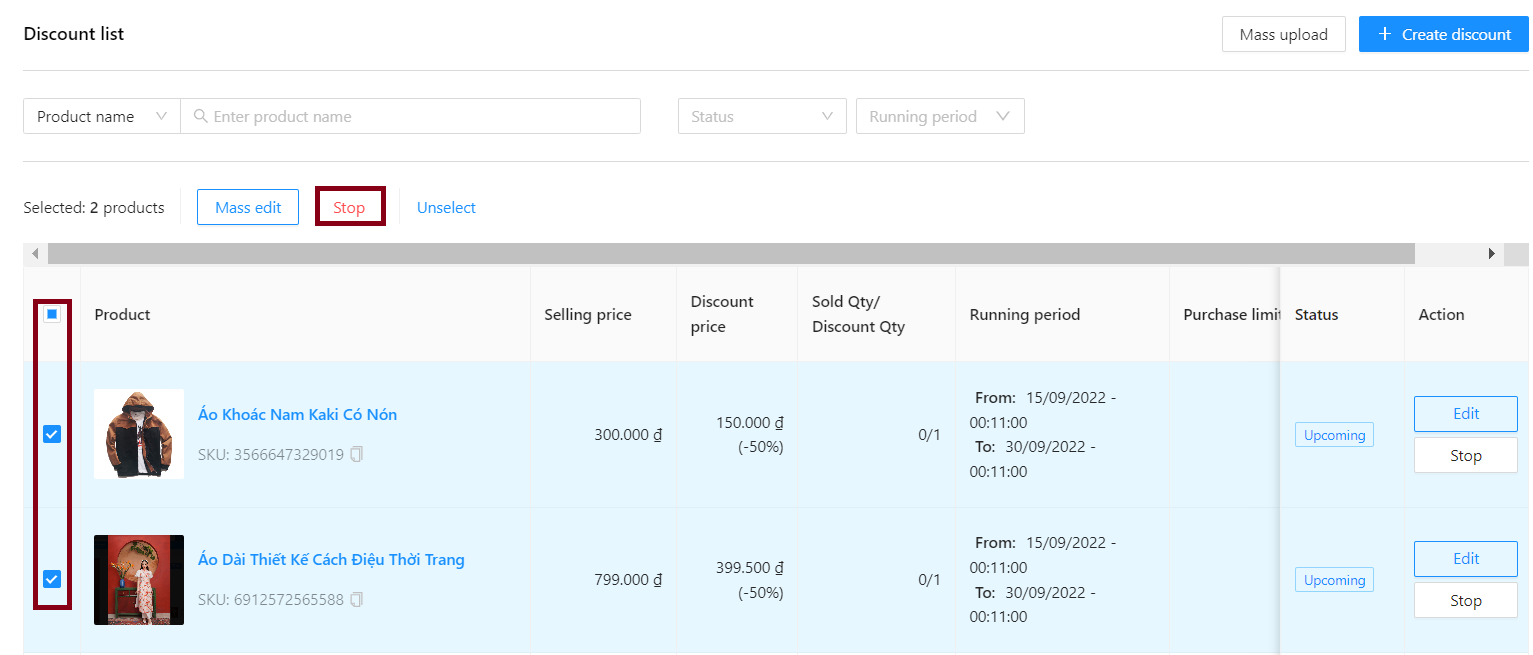
2.2 Mass discount end
Sellers can select individual products in the page or select the entire page to perform mass ending. Up to 100 discounts can be ended in one go.
Sellers can also use the search function (by SKU/product name) and filters (by Status and Applicable Time) to search for discounts on demand. Then perform the mass discount ending function.
At the Seller Center, choose the products to end or select the entire page. If you need to end more discounts, you can click through the following pages and continue with mass selection (up to 100 discounts). Then click Stop and select Confirm.
The system can only end the discount for the discounts that are in the Upcoming or Running status. In the remaining cases, the system will automatically refuse to fulfill the request to end the discount.